Dual Booting Linux on a Machine That Barely Runs Windows — Part 3: Installation, GRUB and the Performance Verdict
Dual Booting Linux on a Machine That Barely Runs Windows
Part 3 — Installation, GRUB and the Performance Verdict
By the time Linux Mint finally booted through the SD card reader, the hardest part of the project was already behind me.
The ISO was clean. Secure Boot was off. Fast Startup had been disabled. The card reader had solved the boot media problem. For the first time in the entire process, I was no longer staring at BIOS menus, frozen logos, or raw kernel text.
I was looking at a working Linux desktop.
And after everything, seeing that desktop felt earned.
First Look at the Live Environment
The first thing I noticed was the dark Linux Mint background with a single Install Linux Mint icon sitting in the top left corner of the screen. There was a taskbar at the bottom with a few system icons, but the install icon was what immediately stood out because that was the entire reason I was there.
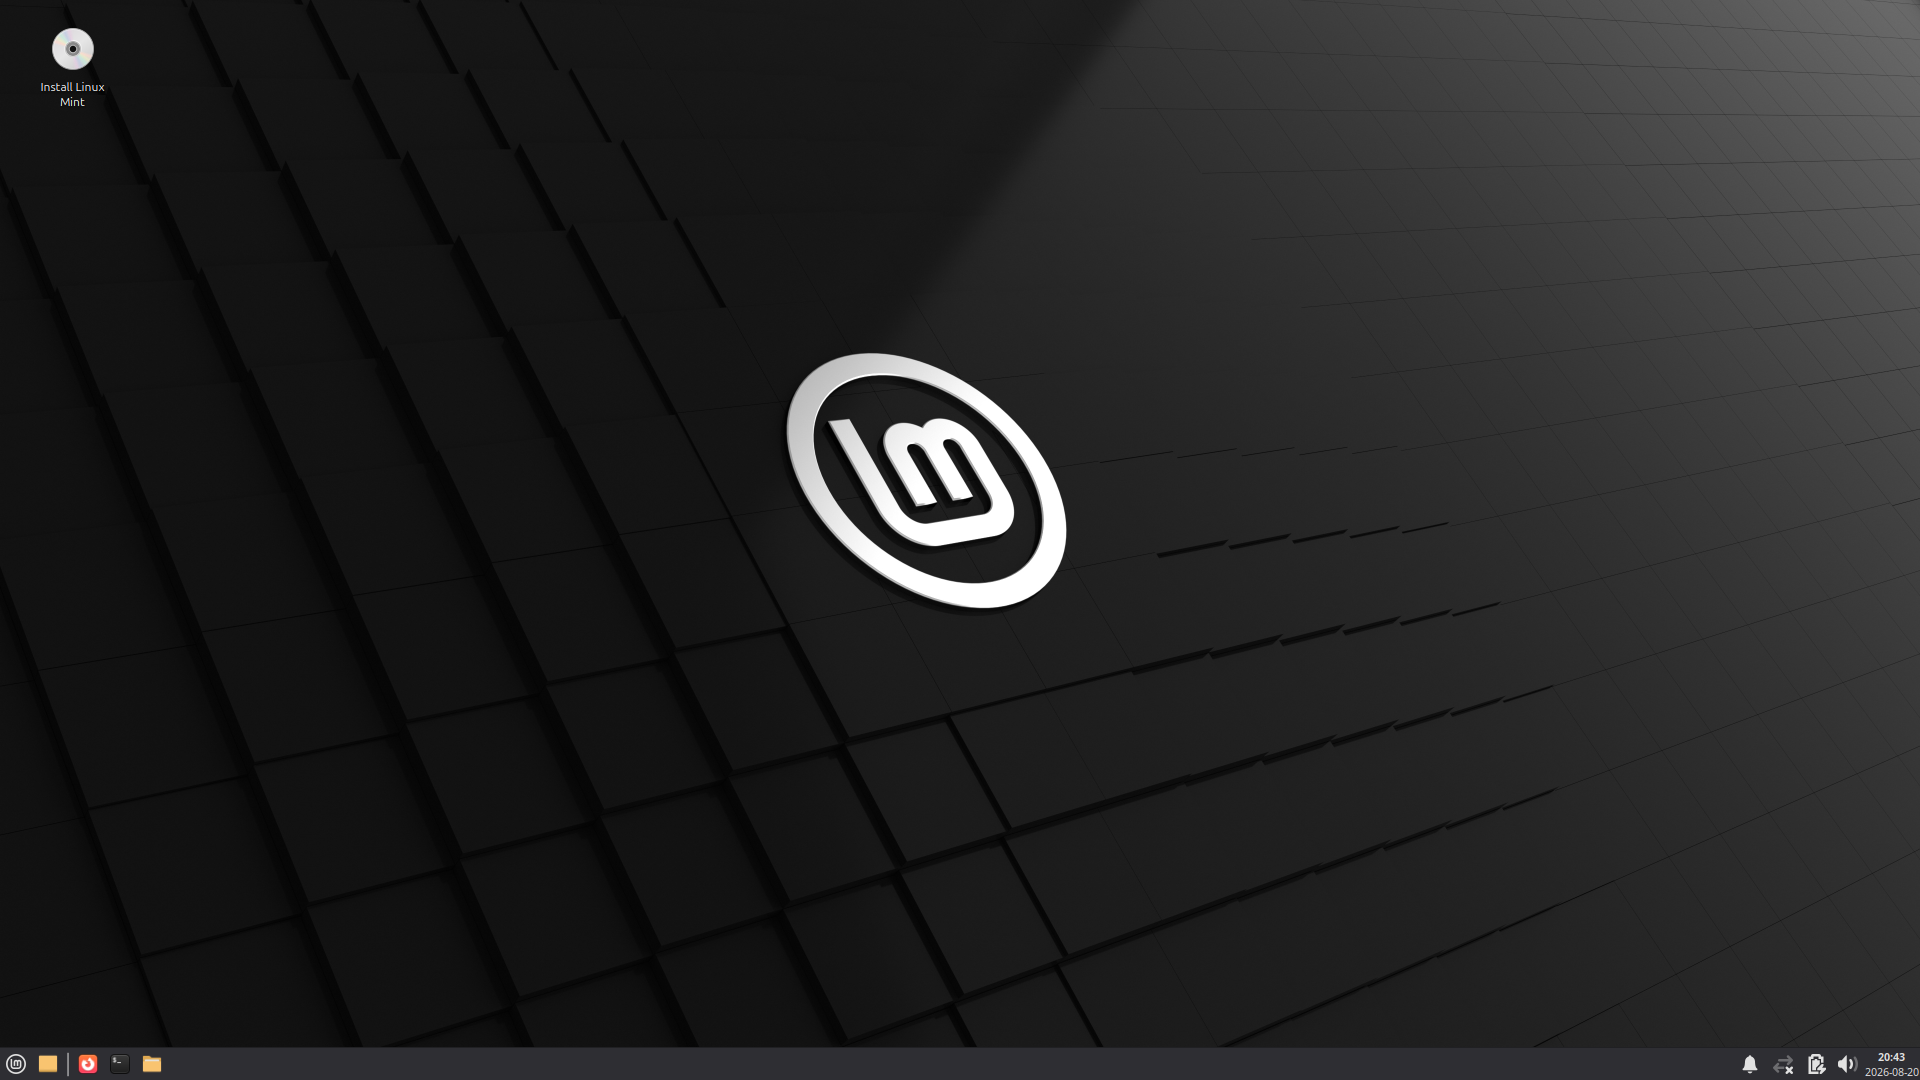
The live environment is a fully working Linux session that runs directly from the boot media without installing anything to your drive yet. It lets you test key hardware components before committing to the installation.
After Part 2, I had no interest in blind faith. I wanted proof the system actually worked on my hardware before writing it to my SSD. So I ran through some quick checks — WiFi connectivity, audio output, keyboard input, and display brightness controls.
Everything worked on the first try. The system was responsive, the hardware was clearly compatible, and Linux Mint was running smoothly on the machine.
That was enough for me.
So I clicked Install Linux Mint.
Starting the Installation
After the chaos of Part 2, the installer felt almost dishonestly simple.
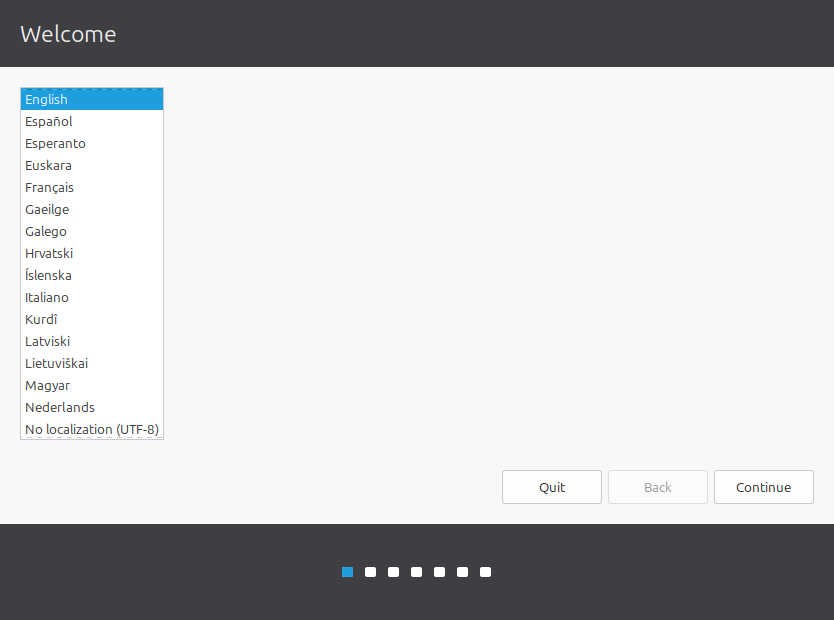
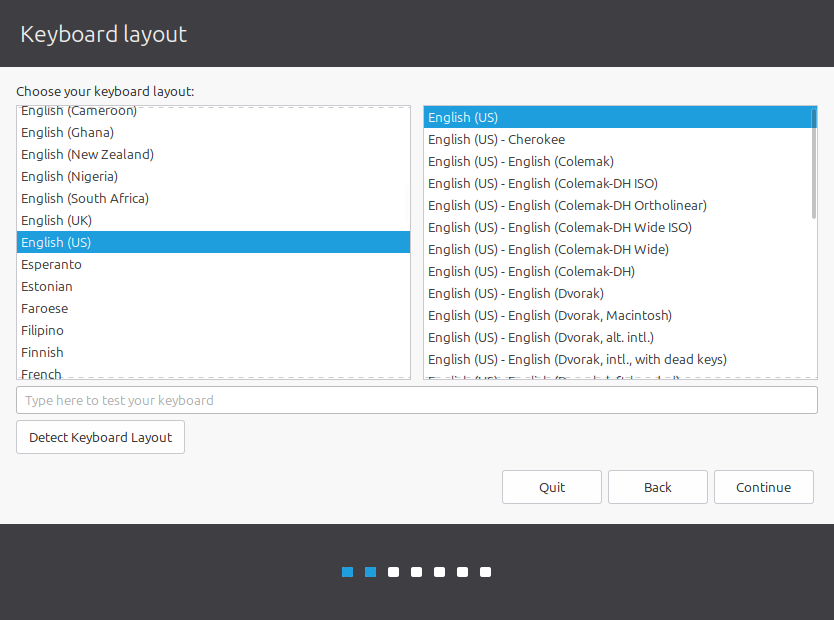
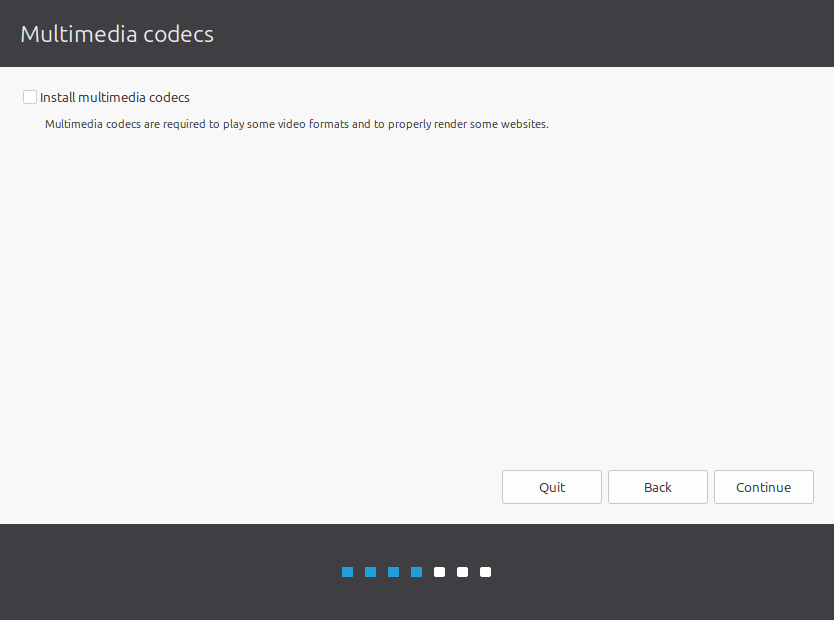
The flow was standard: language selection, keyboard layout, WiFi connection for third-party software downloads, and the option to install multimedia codecs for MP3 and MP4 support. I accepted the codec option.
The Unmount Warning
Then I got a pop-up message that made me pause:
The installer has detected that the following disks have mounted partitions: /dev/sda. Do you want the installer to try to unmount the partitions on these disks before continuing?
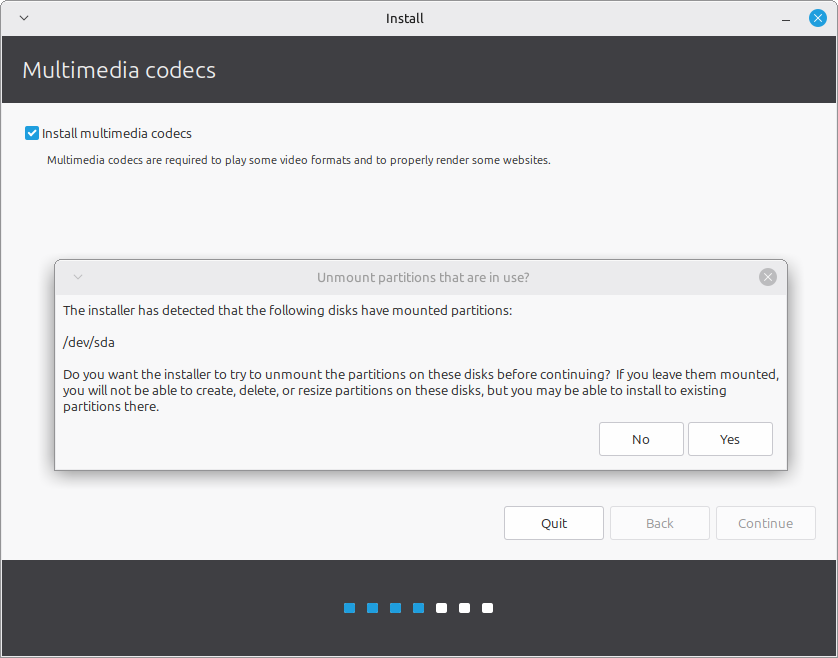
I did not immediately understand what this meant, so I took a moment to research it before clicking anything.
What it meant was simple: the live environment had automatically mounted the existing partitions on my SSD so it could read them. The installer needed to unmount those partitions temporarily so it could safely resize and write to the drive without file system conflicts.
This is a standard safety step. Clicking “Yes” does not delete anything. It simply releases the active lock on the partitions so the installer can do its job.
I clicked Yes.
Installing Linux Alongside Windows
The next screen was the most important one in the entire installation process: the installation type.
The installer detected the 117GB of unallocated space I had prepared earlier in Windows and offered the option to Install Linux Mint alongside Windows Boot Manager.
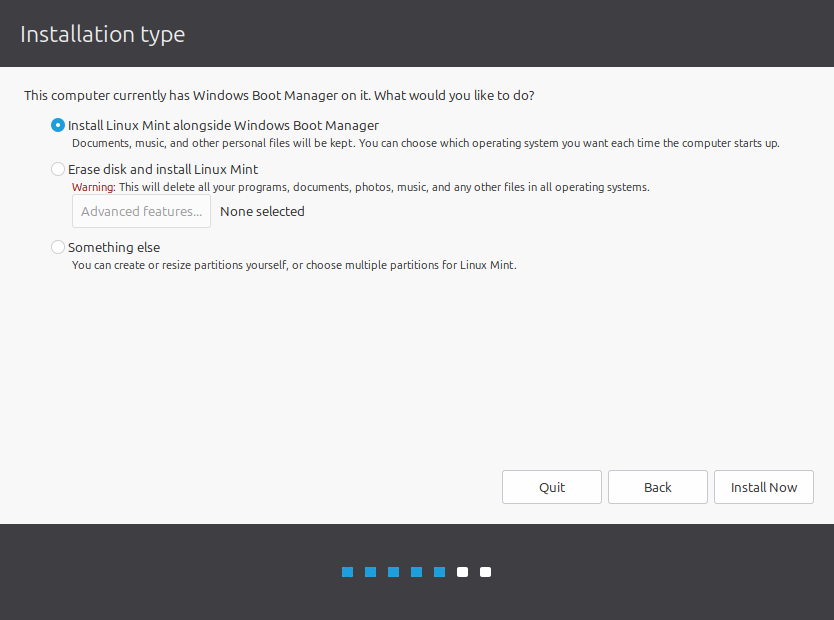
I selected it.
I let the installer handle the partitioning automatically within the reserved space. For my skill level, this was the safer choice — it avoided the risk of manual partition errors and also meant GRUB would be configured automatically without me having to install it manually from the terminal afterward.
The installer created a single ext4 root partition in the 117GB of unallocated space, with a 2GB swap file inside it rather than a separate swap partition. It also reused the existing EFI System Partition that Windows had created, which is how GRUB and Windows Boot Manager ended up coexisting on the same drive — both bootloaders live on the same EFI partition.
The Main Installation
Once I confirmed the installation type, the installer began copying files, configuring the system, and setting up Linux Mint in the unallocated space.
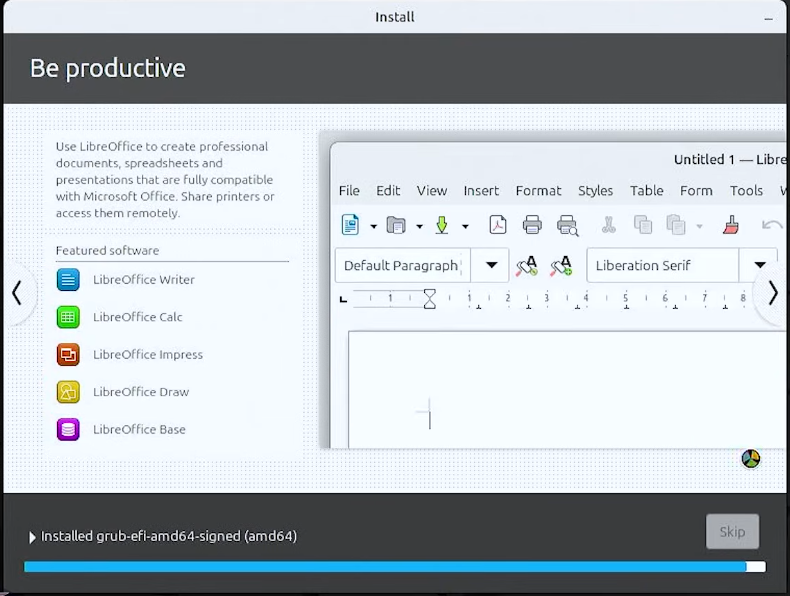
There was not much left for me to do except wait. And after everything Part 2 had put me through, watching that progress bar move forward felt deeply rewarding. I couldn’t be more relieved knowing that the hardest part was truly behind me and the system I had fought so hard for was finally writing itself onto the drive.
The First Reboot
When the installation completed, I restarted the machine.
If anything was going to go wrong with the bootloader or partition setup, this is where it would show up. After Part 2, I was bracing for it.
Instead, I was met with the GRUB menu.
Seeing that boot menu appear on startup felt like the most important screen I had seen in this entire project. After the frozen logos, the kernel text floods, and the TTY2 dead ends, this was the moment everything finally came together. Both operating systems were listed. Both were accessible. It couldn’t have gotten any better than this.
GRUB and the Dual-Boot Result
GRUB now showed both operating systems as boot options:
- Linux Mint 22.3 XFCE
- Windows Boot Manager
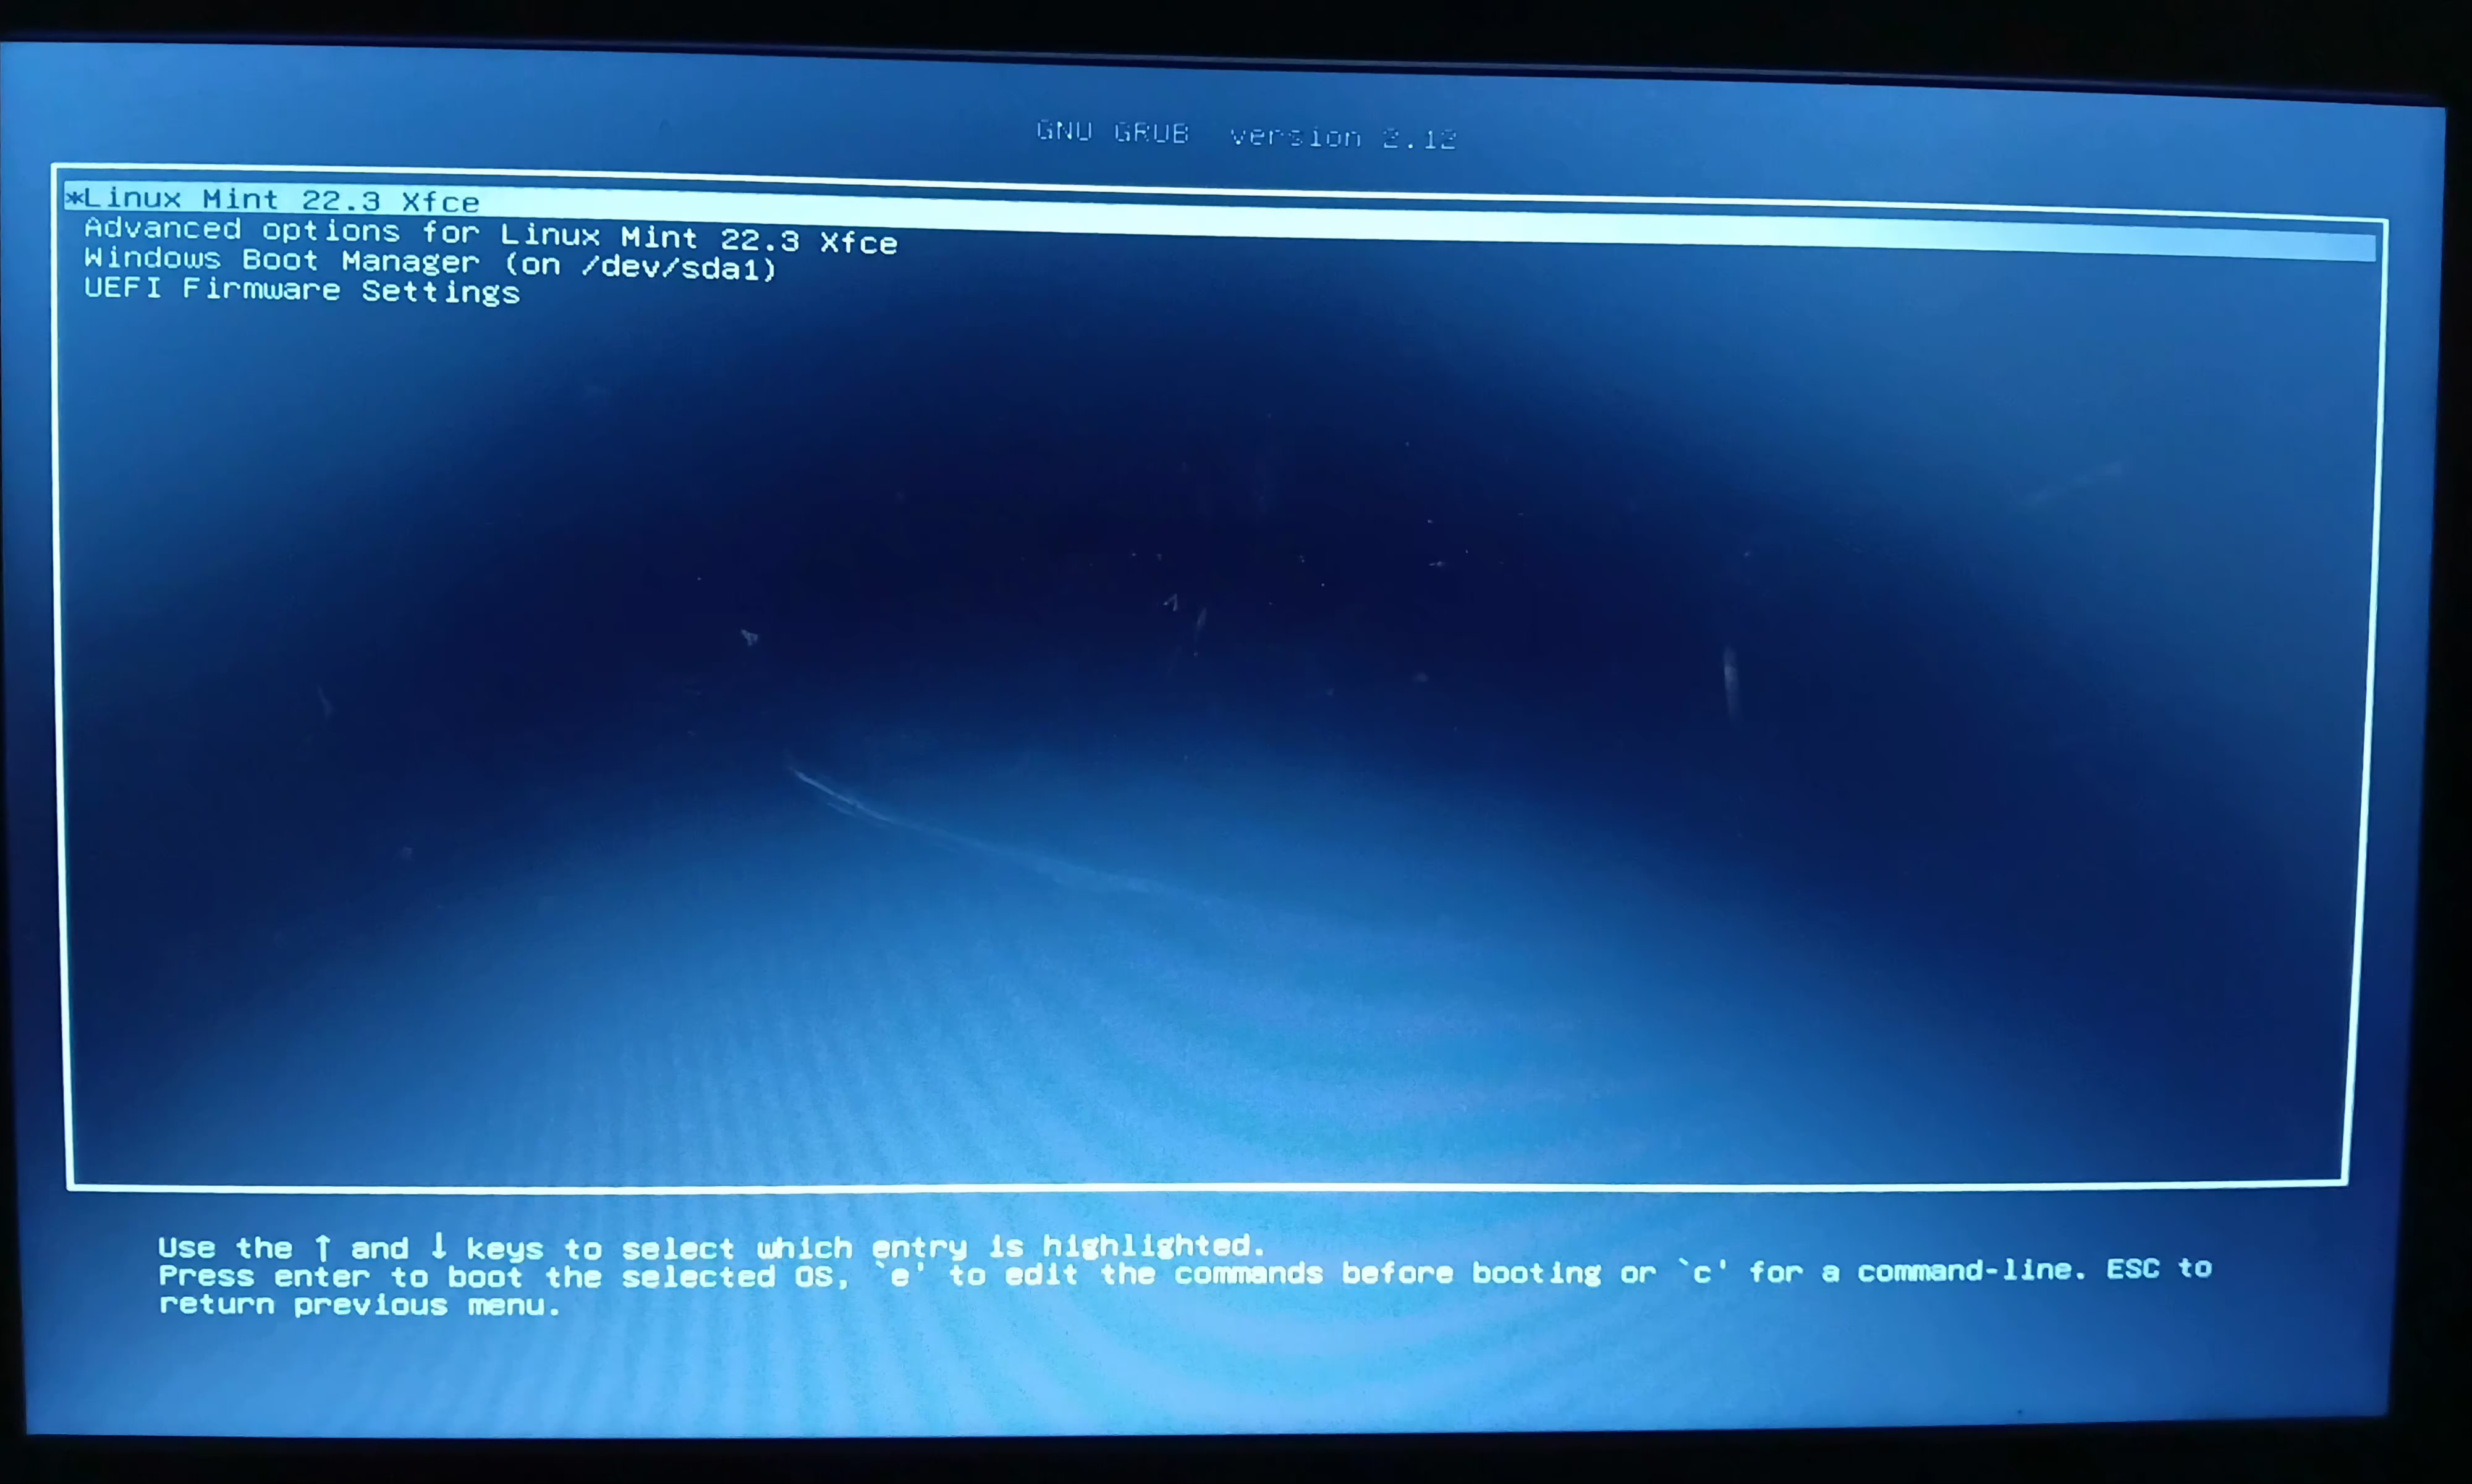
I selected Linux Mint first. It booted cleanly into the installed desktop.
Then I restarted and selected Windows. It booted normally into Windows 11.
Both systems worked. Both were accessible from the same GRUB menu every time I turned on the laptop.
That was the proof that the dual-boot setup had actually succeeded.
I now had access to both operating systems on one machine without sacrificing either one. Linux Mint became my main working environment for daily tasks. Windows remained available for Windows-specific work. Exactly the setup I had been aiming for.
What It Has Been Like Since Then
The most noticeable difference is the smoothness. Linux Mint XFCE feels lighter and more responsive on this hardware. The machine no longer feels like it is fighting the operating system just to stay alive.
I still visit Windows when I need it, just as I’ve mentioned throughout this series. But Linux is where I spend most of my time now.
Feelings are not evidence though. So I measured everything.
The Performance Verdict: RAM Usage
This is the part that justifies the entire project.
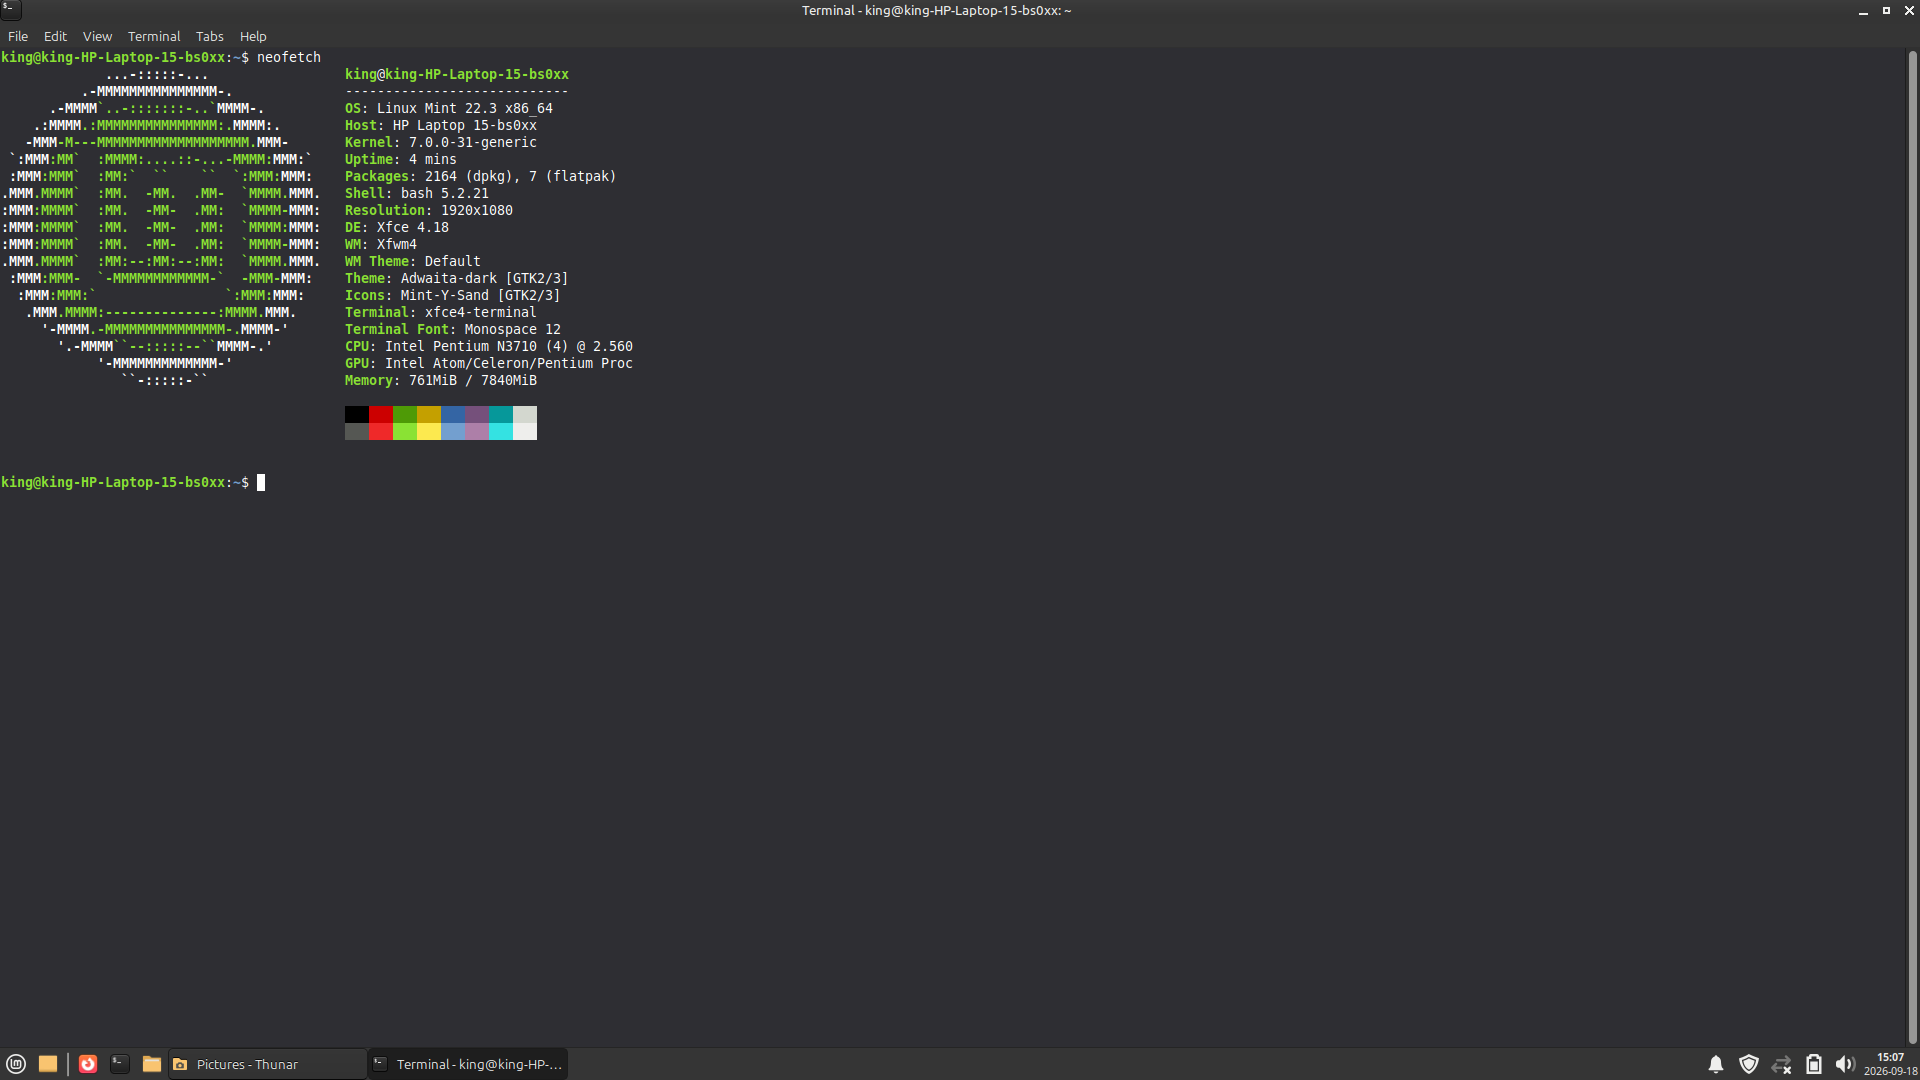
To keep the comparison fair, I measured idle RAM usage on both operating systems at exactly 3 minutes after a fresh boot, with no applications open.
| Operating System | Idle RAM at 3-Minute Mark |
|---|---|
| Windows 11 | 3.0GB / 7.9GB |
| Linux Mint XFCE | 993.6MiB (~1.0GB) / 7.7GiB |
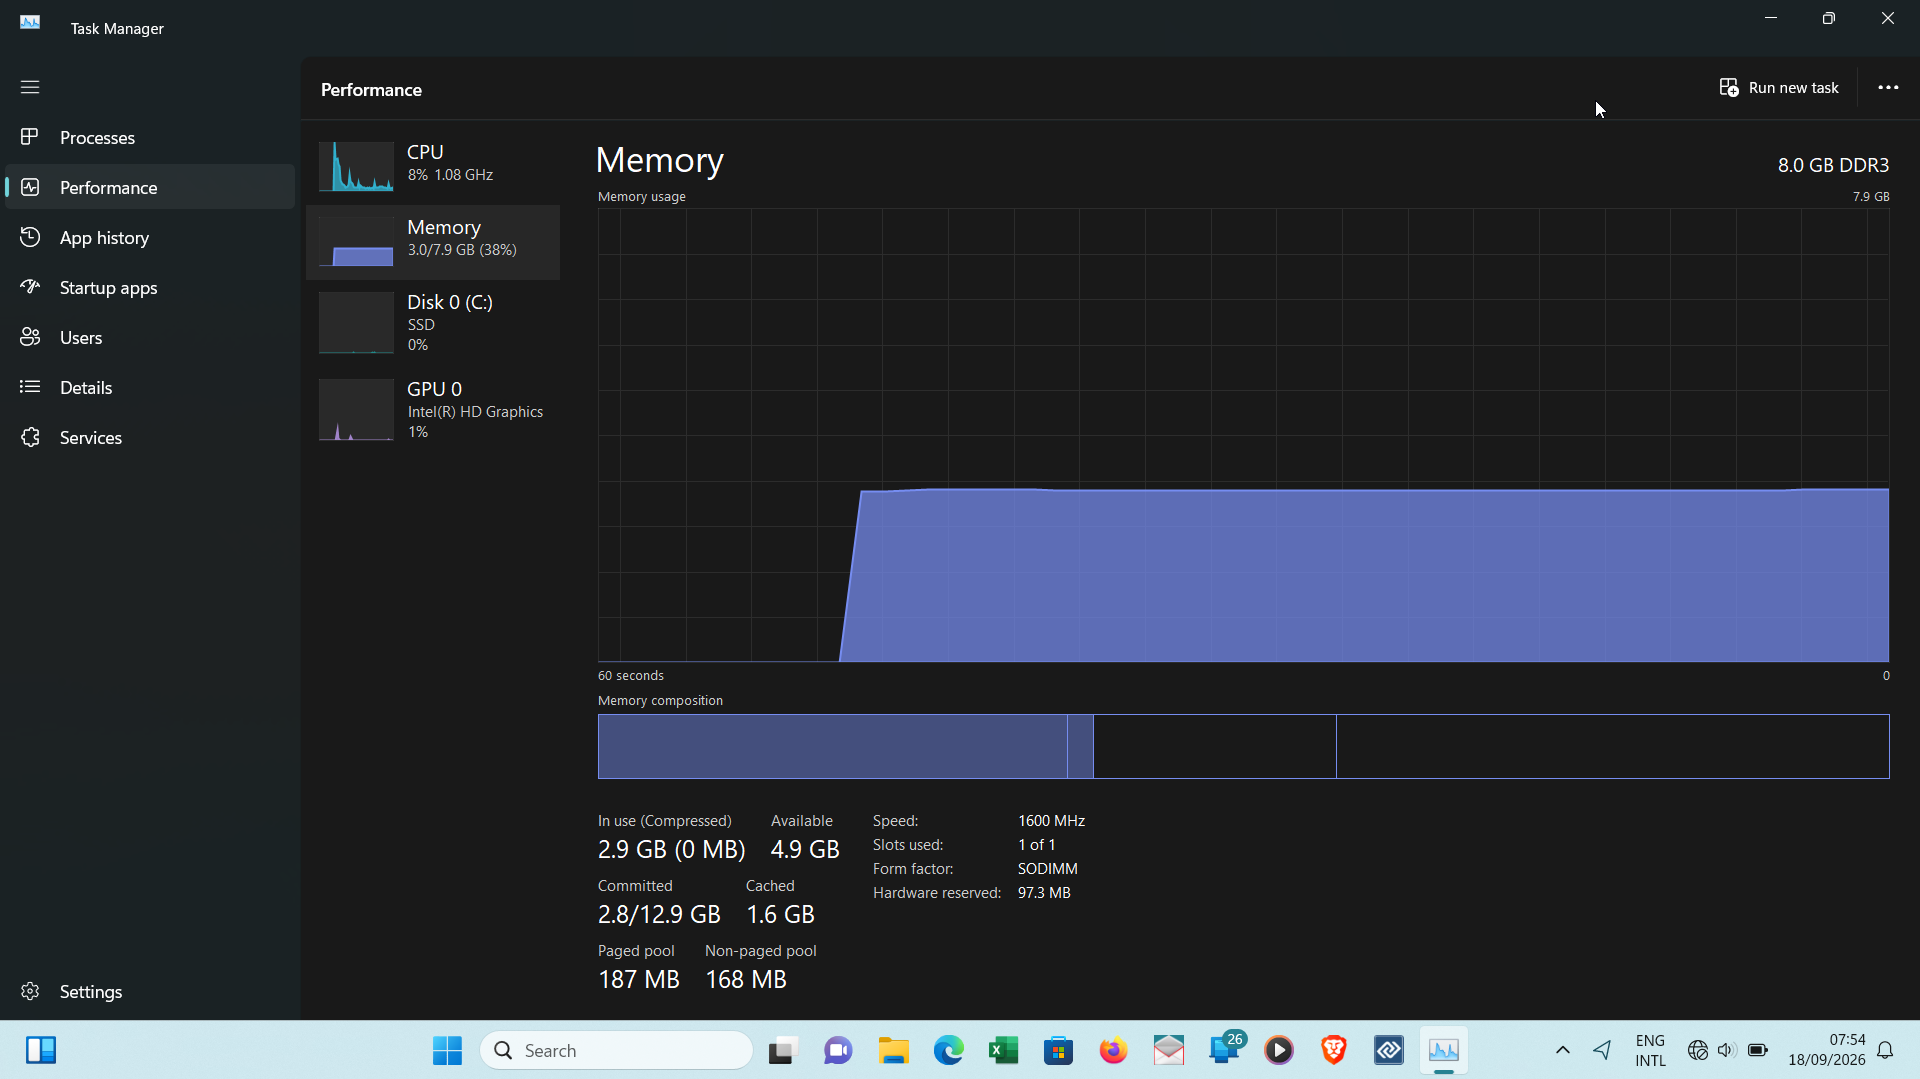
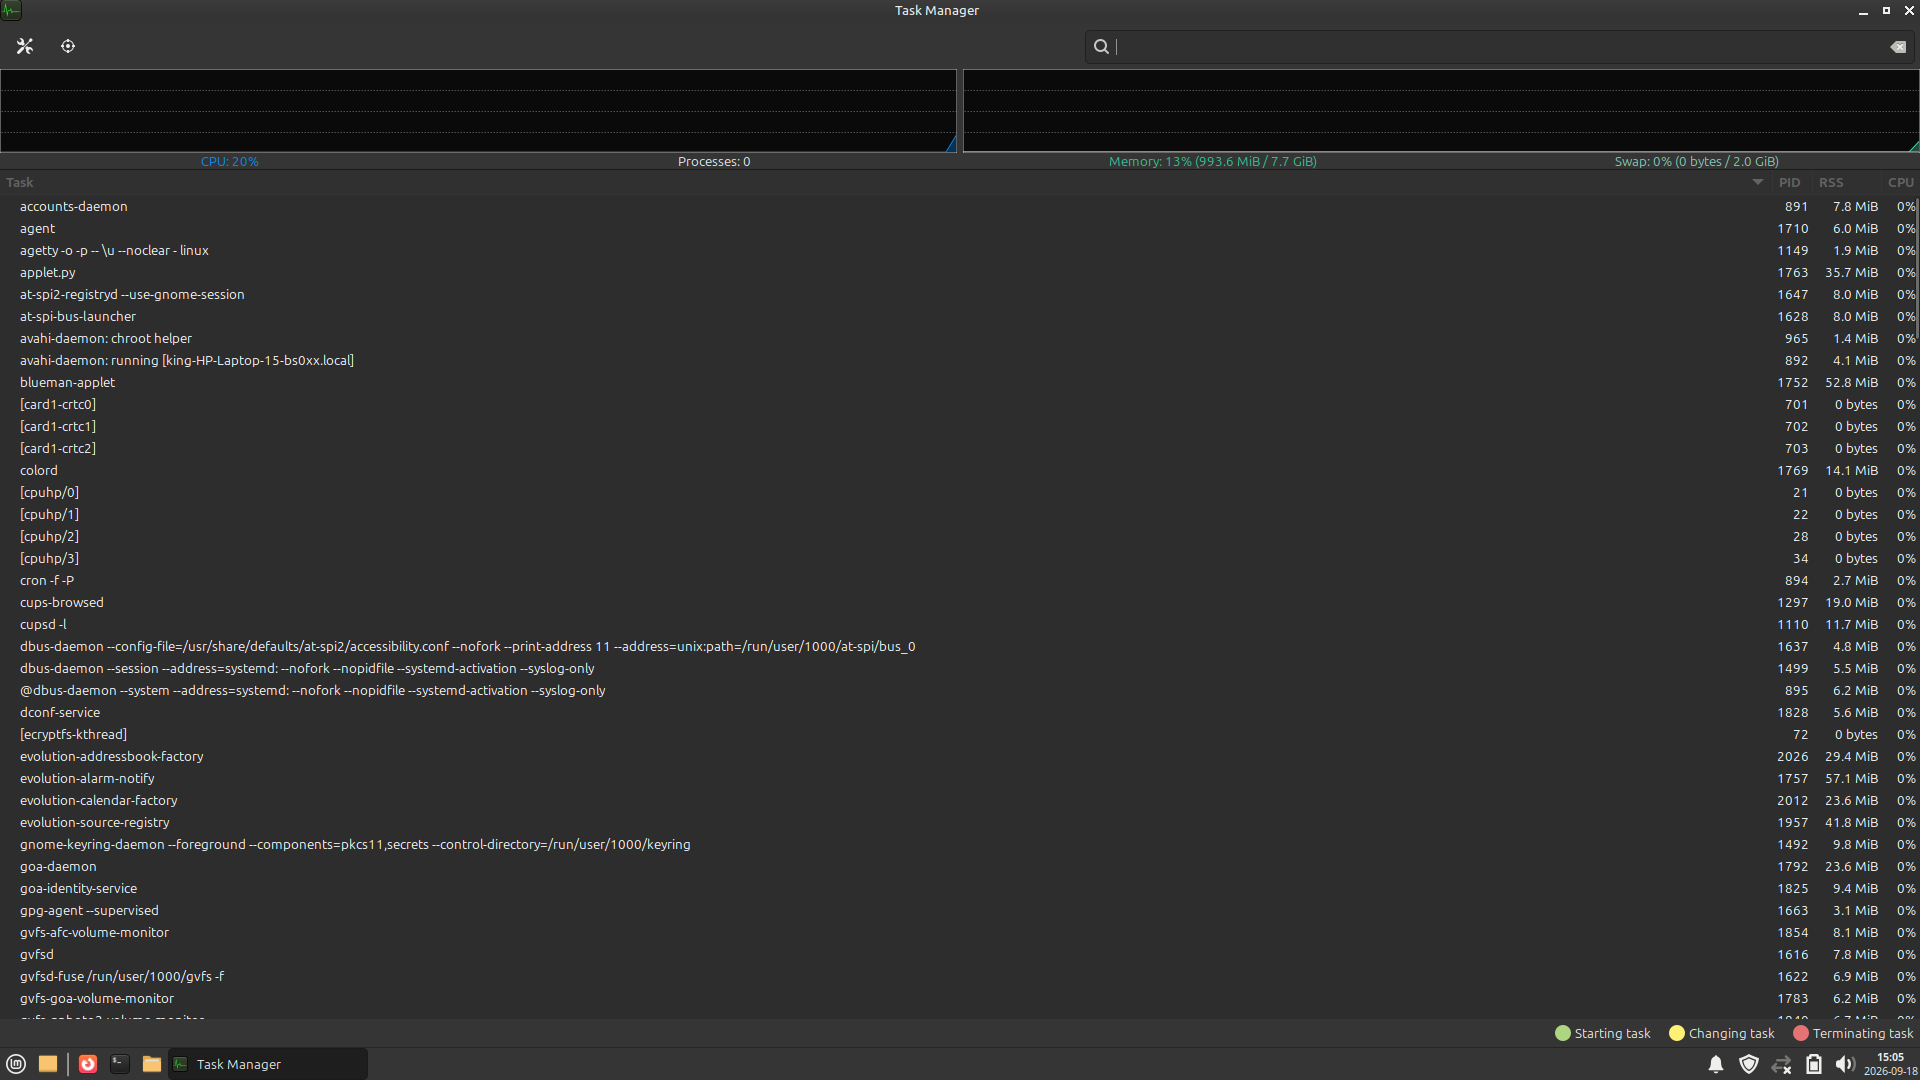
A note on measurement conditions: Both screenshots were taken at the 3-minute mark after a fresh boot with no applications open. This ensures both systems have had equal time to initialize background services and settle into their idle state.
That is a 3x difference in idle memory consumption on the exact same hardware. Linux Mint XFCE leaves roughly 2GB more headroom for actual work — browser tabs, development tools, documents, applications — rather than spending a large portion of system memory on the operating system itself.
On an 8GB machine in an environment where every resource counts — where power is intermittent and hardware replacement is not an option — that extra headroom is the difference between a usable workstation and a frustrating one.
The Performance Verdict: Stress Test
This is where the numbers stop being interesting and start being dramatic.
I ran the same workload on both operating systems to see how each one handled real pressure. The test consisted of 20 browser tabs across Firefox and Brave, including:
- YouTube playing a 4K video
- Shadertoy (GPU-intensive shader rendering)
- Speedometer 3.0 (browser performance benchmark)
- WebGL Aquarium (3D rendering stress test)
- Google Earth
- Google Maps in 3D view
- Sigma (web-based design tool)
- Twitch (live video streaming)
- GitHub repository
Here is what each operating system did under that exact same load:
| Metric | Windows 11 | Linux Mint XFCE |
|---|---|---|
| CPU | 100% (fully maxed) | ~50% |
| RAM | 7.2 / 7.9GB (91%) | 6.2 / 7.7GB (80%) |
| Committed Memory | 10.4 / 12.9GB (exceeds physical RAM) | N/A |
| Swap / Pagefile | Active — committed memory exceeds physical RAM by 2.5GB | 240MB / 2GB |
| Disk Activity | 2% with unstable spikes | Minimal |
| GPU | 14% (Intel HD, active rendering) | Lower |
| Thermal | Hot, overheating | Warm, not hot |
| Battery | Drained so fast I had to plug in to finish the test | Survived the entire test (95% to 45%) |
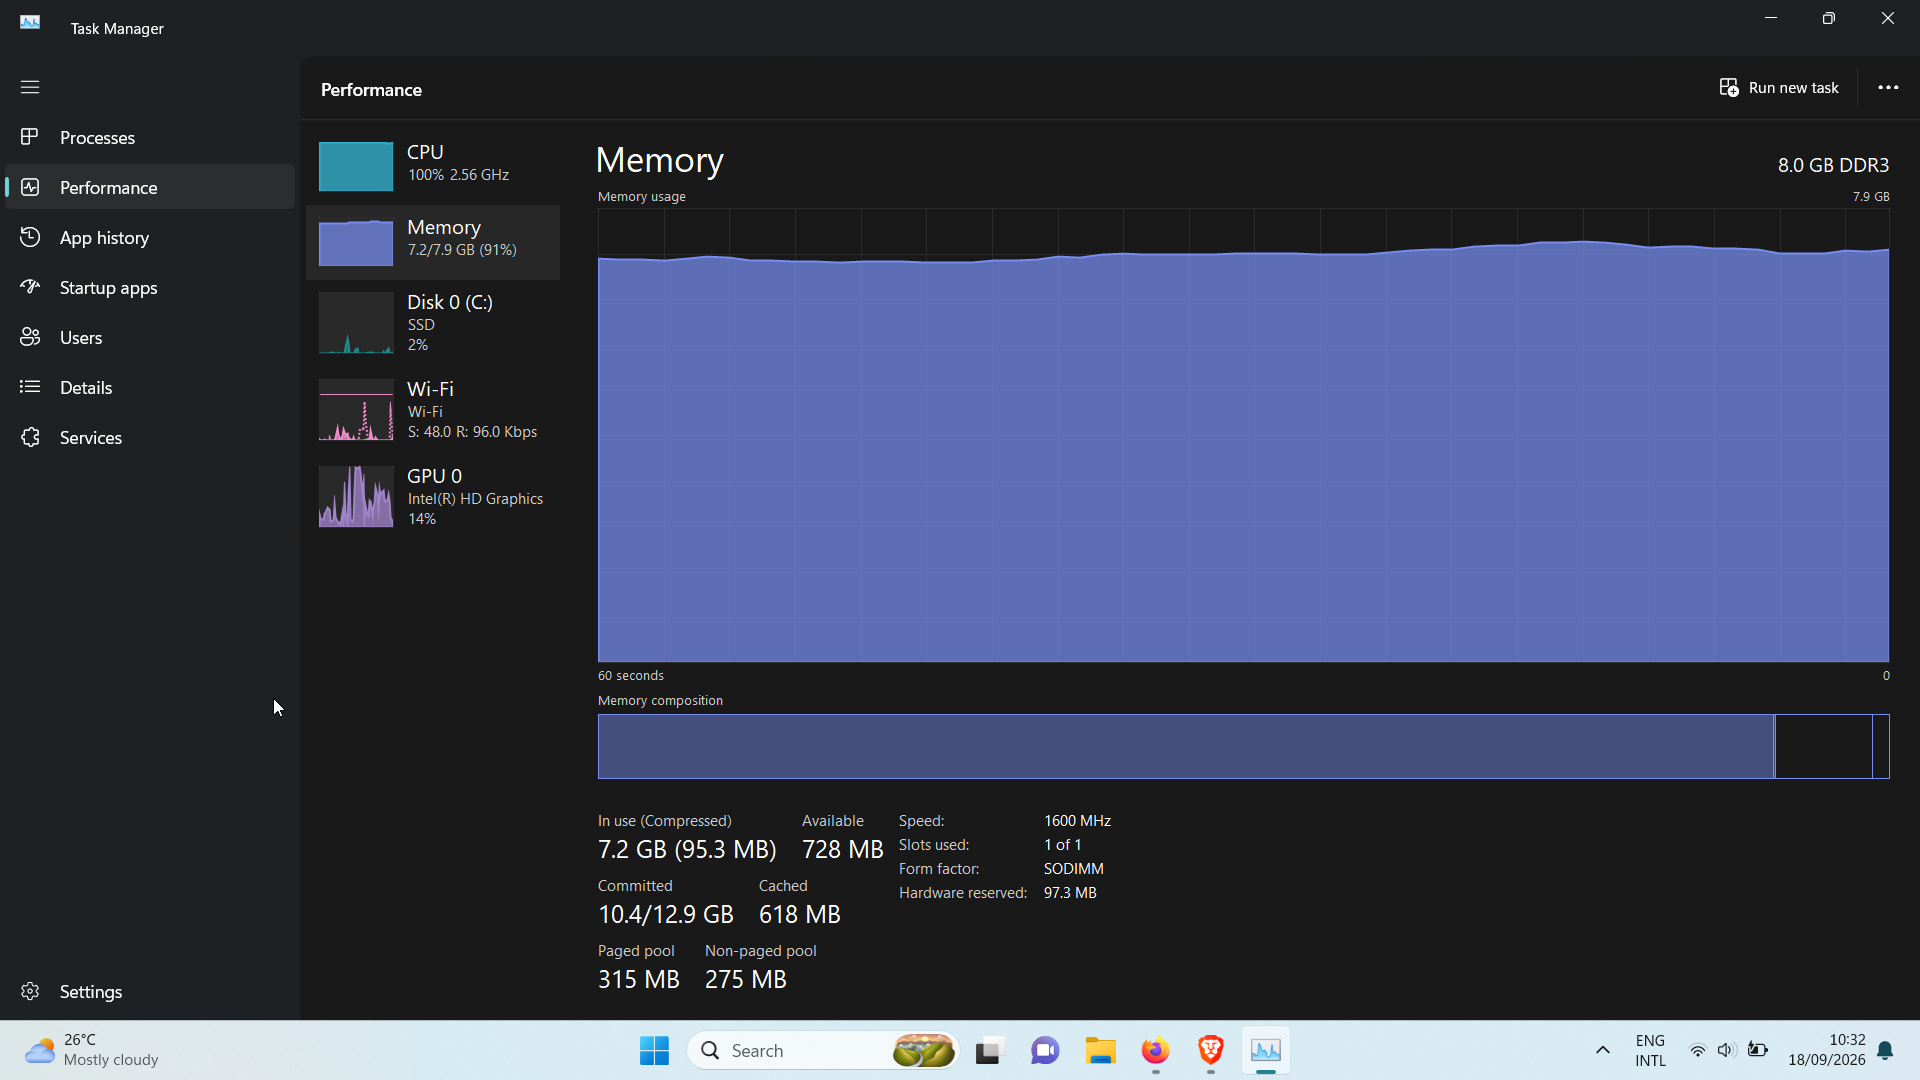
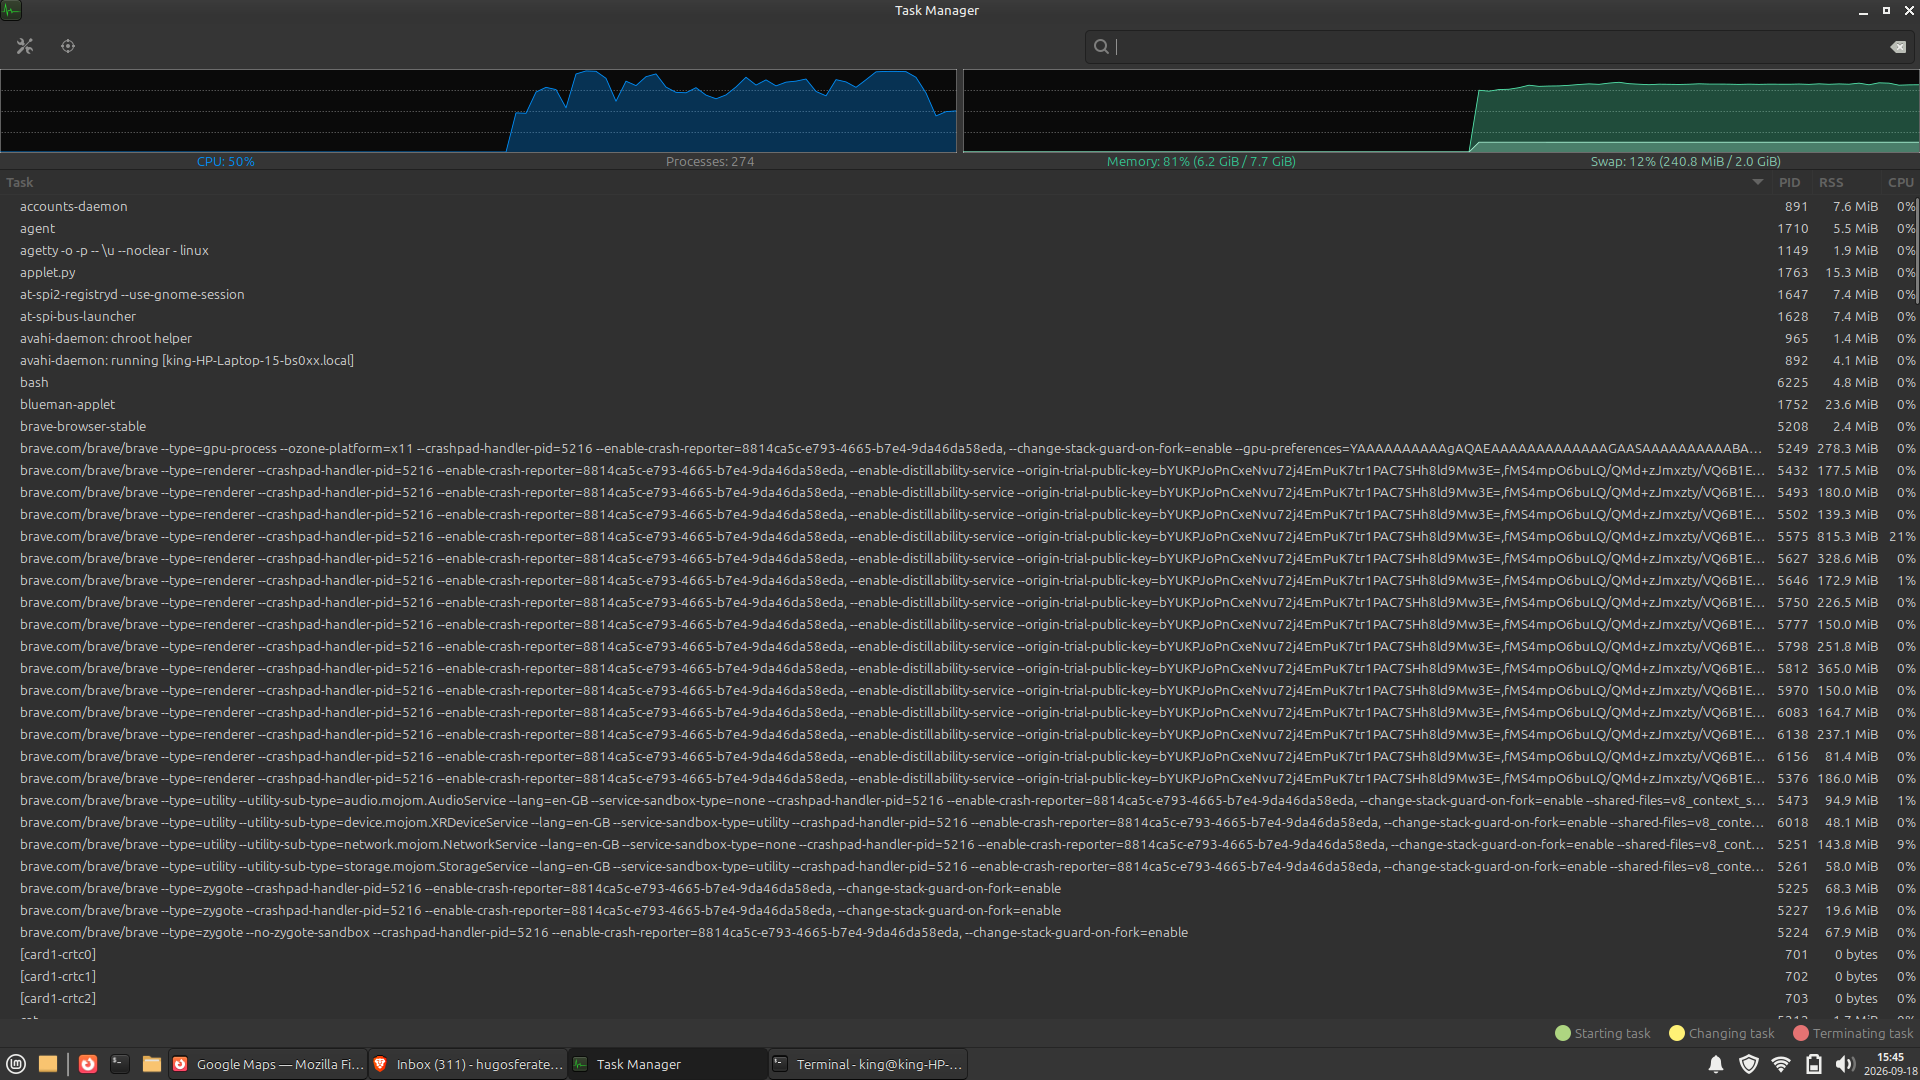
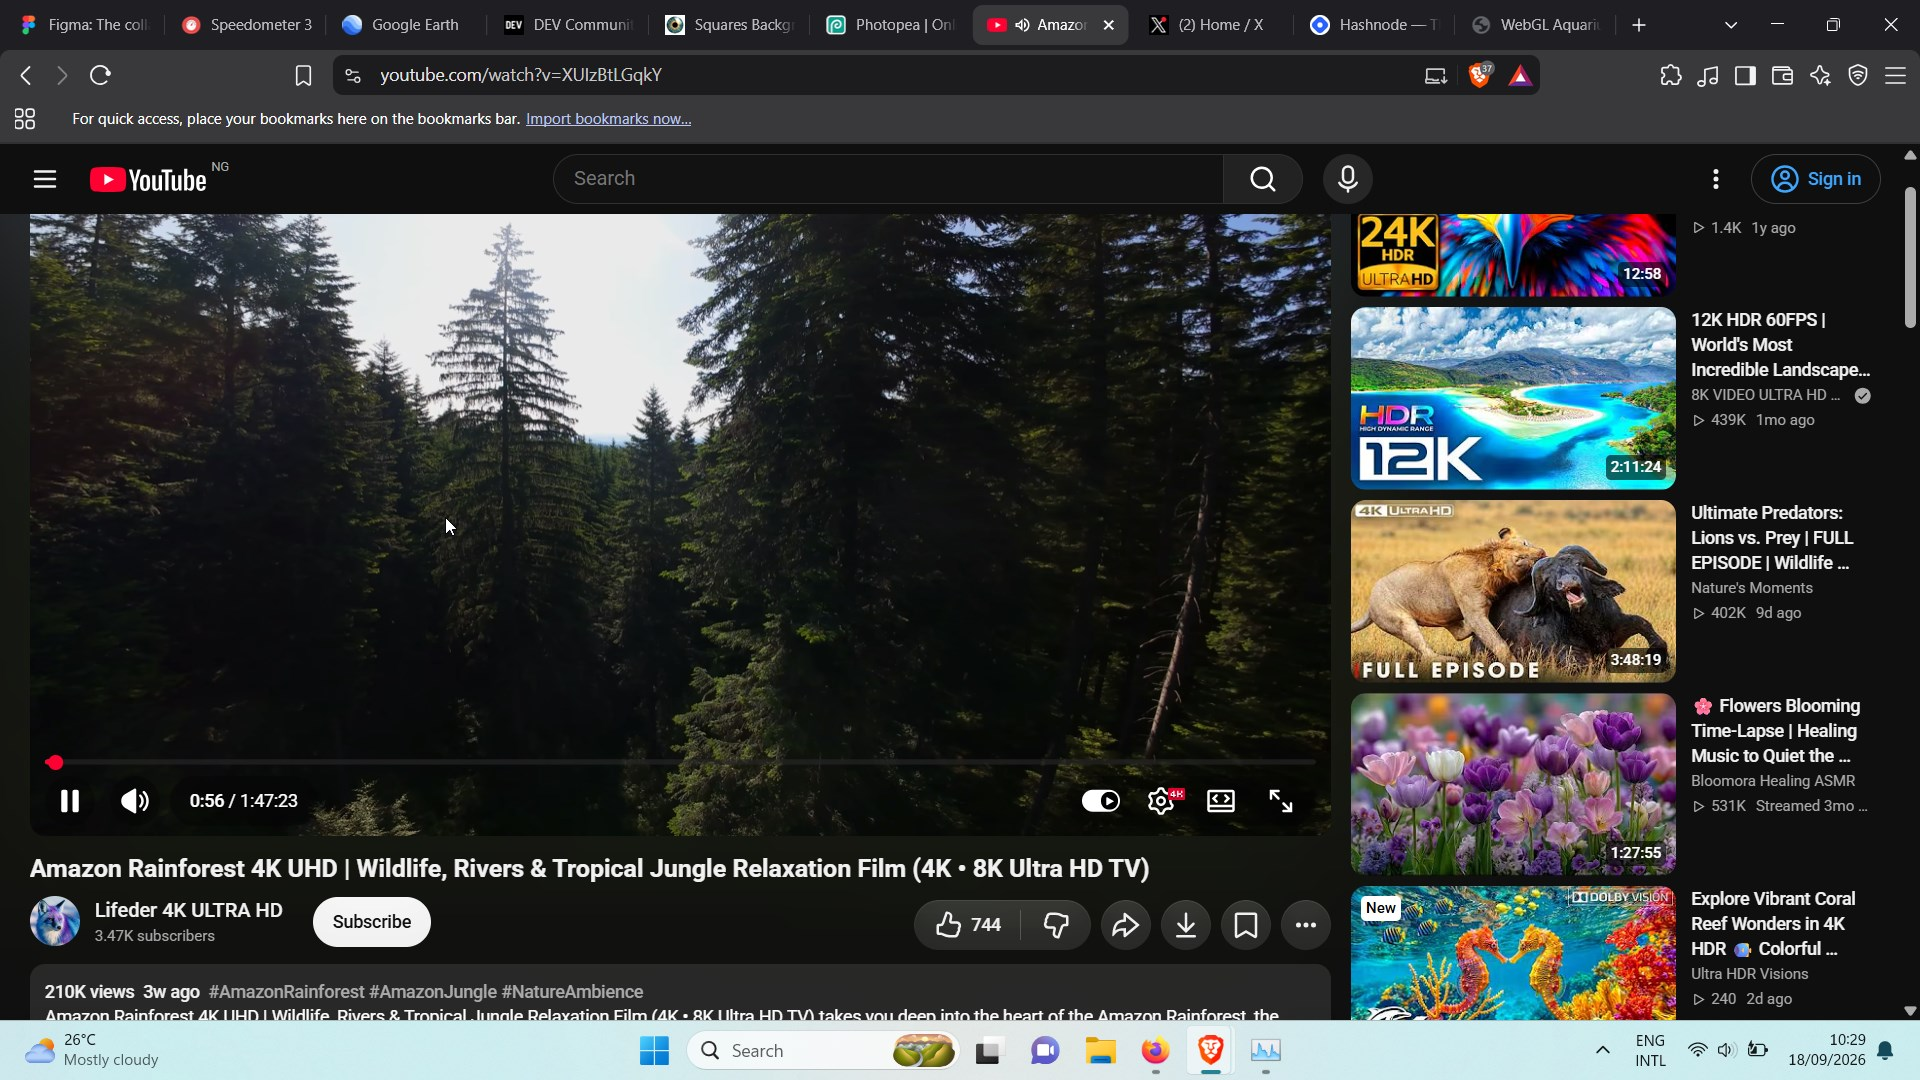
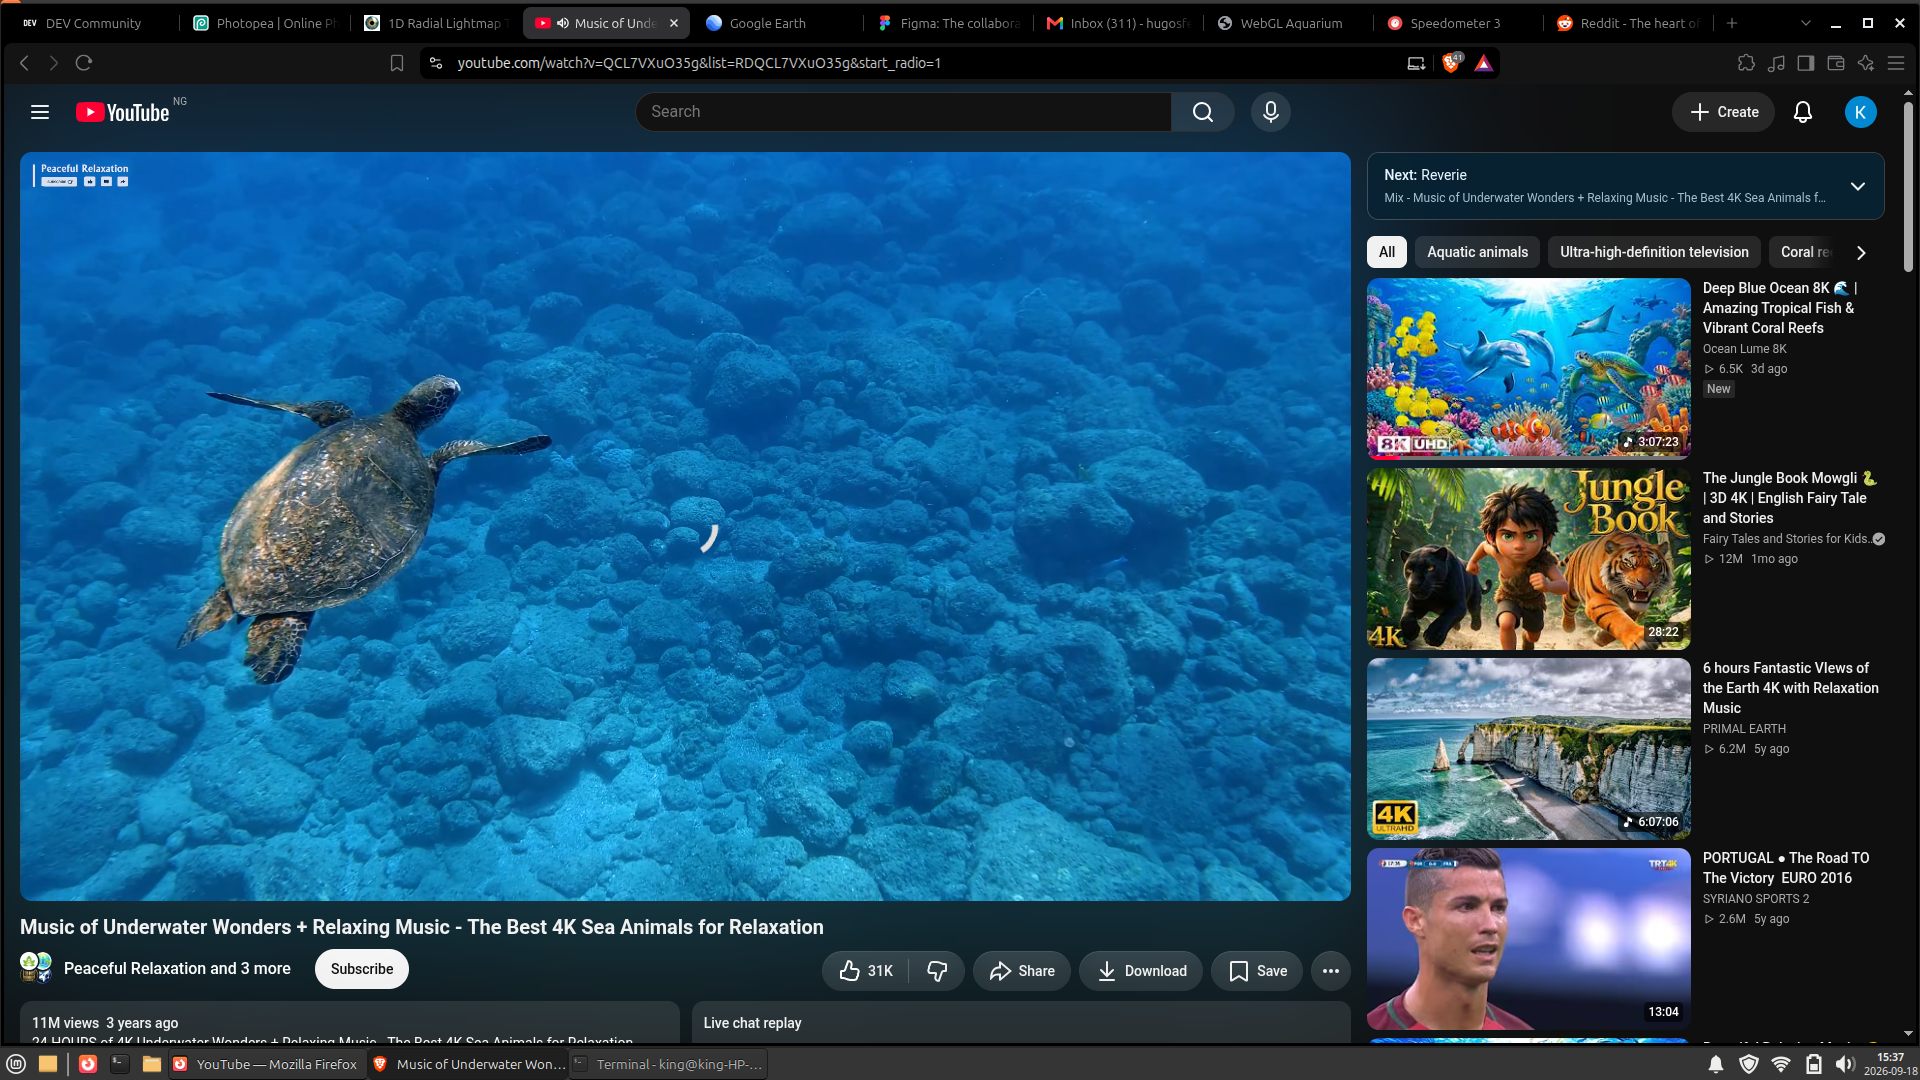
Let me be clear about what these numbers mean.
Windows maxed out the CPU at 100%. It consumed 91% of available RAM. And the committed memory hit 10.4GB out of a 12.9GB ceiling — meaning Windows was relying on the pagefile to compensate for the 2.5GB gap between what it needed and what physical RAM could provide. That is what causes the lag, the heat, and the battery drain. The laptop got hot enough to be uncomfortable, and the battery died so fast I had to plug it in mid-test.
The GPU sat at 14% utilization — proof that the browser tabs were actively rendering WebGL and 4K video content, not just sitting idle in the background.
Linux handled the same 20 tabs at half the CPU usage. It used less RAM. It barely touched swap — 240MB out of 2GB available. The laptop got warm but never hot. And the battery survived the entire test with 45% remaining.
The same hardware. The same workload. Two completely different experiences.
The Performance Verdict: Boot Time
I also measured boot times using a stopwatch across three runs per operating system. The stopwatch started at the power button press and stopped when the desktop was fully loaded.
| Operating System | Test A | Test B | Test C | Average |
|---|---|---|---|---|
| Windows 11 | 45.5s | 43.7s | 44.7s | ~44.6s |
| Linux Mint XFCE | 39.8s | 38.6s | 39.0s | ~39.1s |
A note on the Linux boot time: The
systemd-analyzeoutput shows a total of approximately 38 seconds, of which roughly 9.5 seconds is spent at the GRUB menu waiting for input. The actual kernel and userspace boot takes approximately 23 seconds. The stopwatch times above include the GRUB selection for a real-world comparison.
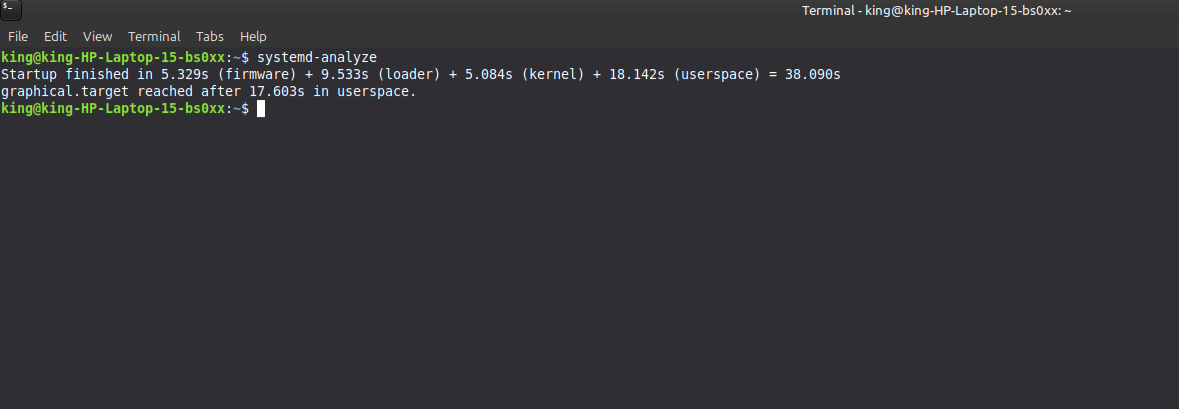
The output above is from one of three runs. All three produced nearly identical results, with total times ranging from 38.0 to 38.5 seconds.
The boot time difference is modest — roughly 5.5 seconds faster on Linux. That is noticeable but not dramatic. The real transformation is not in how fast the system starts. It is in what happens after it loads — the responsiveness, the available memory, and the overall feel of the machine under daily use.
The Bigger Picture
This project was never about declaring one operating system better than the other. Both Windows 11 and Linux Mint have their strengths, and both serve a purpose on this laptop.
The point was finding the right pairing for this specific hardware. Windows 11 is a capable operating system, but its resource demands are designed with modern hardware in mind. On a Pentium N3710 with 8GB of RAM, those demands leave little room for the actual work I need to do. Under heavy load, it maxed out every resource the machine had and still needed more.
Linux Mint XFCE was the better fit for this machine. Not because Windows is bad, but because XFCE was built for exactly this kind of hardware constraint. It managed the same workload at half the CPU cost and a fraction of the memory overhead.
That was the entire reason I started this project. The numbers confirmed it.
What This Taught Me Technically
This project taught me a lot more than how to install Linux.
Here are the main technical lessons I took from it:
-
Internet infrastructure is not uniform. The Linux Mint mirror system showed me that download reliability depends on geography, hosting, and regional infrastructure. There was no Nigerian mirror, and even the closest African mirrors were unreliable. The assumption that “pick the nearest mirror” solves everything breaks down fast when your region is underserved.
-
A file transfer path is not just a detail — it can be the entire problem. My Tecno T455 transferred files at roughly 434 KB/s. The same SD card through a dedicated reader hit 7.87 MB/s. That is an 18x difference from changing nothing except the connection path. A medium can be suitable for one task and completely unsuitable for another.
-
Kernel errors are readable if you know what to look for. The SQUASHFS errors and the
-5I/O error code told me the boot media connection was failing at the hardware read level, not that the ISO was corrupted. Learning to distinguish between a file problem and a connection problem changed how I approached the entire troubleshooting process. -
File integrity can be verified, not guessed. SHA256 checksums taught me that there are reliable mathematical ways to confirm whether a downloaded file is complete and untouched. Once the checksum matched, I could eliminate the ISO as a suspect and focus on the actual point of failure.
-
There is always a layer beneath the graphical interface, and complex systems become manageable once those layers are visible. BIOS menus, kernel messages, GRUB, TTY2, and SQUASHFS errors all showed me that behind the normal desktop experience, the machine is still operating through text, boot rules, hardware negotiation, and internal state changes. A lot of what looked mysterious at first became understandable the moment I could identify what layer I was actually dealing with: file, boot media, firmware, kernel, or installer.
-
Variable isolation is the backbone of real troubleshooting. The final solution came from changing one major factor at a time — Secure Boot, Fast Startup, ISO verification, boot device — until the actual point of failure became clear. The problem was never any single setting. It was the combination, and the last variable standing was the boot media path.
What This Taught Me Personally
On the personal side, this project did something important for me.
It changed what I believe is possible on limited hardware.
I did not think this laptop had much left to give beyond struggling through Windows 11. I definitely did not imagine it could run two operating systems cleanly and still feel significantly better than it did before. Seeing the idle RAM drop from 3.0GB to under 1GB on the same machine was not just a technical win. It was proof that the hardware was never the problem — the pairing was.
The SQUASHFS text flood looked like a dying machine until I learned that error -5 just meant the kernel was starving for data. The problem wasn’t catastrophic. It was a slow USB connection. Technical problems always look bigger than they are before you understand what they are actually saying.
And maybe the biggest personal lesson was this:
Working with what you have is not the same thing as settling.
Sometimes it means getting more creative, asking better questions, and extracting more value out of a machine or situation than you initially thought was possible. Using a phone as a file transfer bridge, reading kernel error codes I had never seen before, and diagnosing an 18x speed bottleneck from a USB connection — none of that was in any tutorial I followed. It came from engaging with the problem directly and refusing to stop at the first failure.
That is exactly what this project was for me.
Final Verdict
Dual booting Linux Mint XFCE alongside Windows 11 on this laptop was worth it.
Not because it was smooth. Not because it was easy.
But because it solved the actual problem I started with.
This hardware needed a lighter operating system for daily work. Linux Mint XFCE provided that. Windows 11 is still there when I need it.
And now, instead of being trapped inside one operating system that barely fit the machine, I have two working systems on hardware I thought was almost finished.
That is a very different place to be than where I started.
Want the Clean Version?
This series documented the full experience — the mistakes, the troubleshooting, the dead ends, and the lessons learned along the way.
If you made it this far and you’re looking for the shortest practical route to dual booting Linux Mint XFCE on a low-end Windows laptop without the detours, I wrote a clean companion guide that distills everything into a step-by-step walkthrough.
[Link to Clean How-To Guide — coming soon]
Previous: Part 2 — BIOS, Boot Failures and the
Troubleshooting
Back to the series intro: Dual Booting Linux on a Machine
That Barely Runs Windows