How to Install Linux Mint (All Editions) on a Windows 11 Laptop
How to Install Linux Mint (All Editions) on a Windows 11 Laptop
Last tested on:
- Linux Mint 22.3 (XFCE)
- Ventoy 1.1.17
- Windows 11
- Hardware: ASUS VivoBook (i3-7020U) & HP (Pentium N3710)
A complete guide to installing Linux Mint alongside Windows 11. While this guide uses Linux Mint XFCE as the primary case study (due to its performance on low-end hardware), these steps apply to Cinnamon and MATE editions as well. Cinnamon and MATE install identically but want more RAM and GPU headroom. Below 8 GB RAM, or on graphics hardware that struggles with desktop effects, use XFCE.
I wrote this after dual-booting two laptops — an HP Pentium with a phone-bridged download bottleneck, and an ASUS whose drive threw unexplained I/O errors mid-install. Every step here was run on real hardware in real conditions. If something could go wrong, it went wrong here first.
Which guide should you read?
- This guide = Clean step-by-step reference. Use this if you want to install Linux Mint efficiently with a proven procedure.
- The narrative series = The full story of why this guide exists, including failures, kernel errors, and the diagnostic process behind every decision made here. Use this if you want to understand how to troubleshoot when YOUR installation doesn’t go as planned.
Note on Editions & File Names:
This guide applies equally to the XFCE, Cinnamon, and MATE editions. To keep the text clean, we use the XFCE filename and performance baseline as the running example. If you are installing Cinnamon or MATE, simply swap “xfce” for “cinnamon” or “mate” in the ISO filenames and GRUB menu selections. The commands, partition sizes, and installation steps remain identical.
This guide uses progressive disclosure. Each step shows the essential instructions first. If you need deeper explanations, troubleshooting, or advanced procedures, click the expandable sections.
Step 0: Suspend BitLocker (~5-10 minutes)
If BitLocker is enabled, you MUST suspend it before partitioning. If you alter partitions or add a new bootloader (GRUB) while BitLocker is actively enforcing TPM checks, Windows will lock the drive on the next reboot and demand a 48-digit recovery key.
- Open PowerShell as Administrator.
- Check current status:
manage-bde -status C: - If “Protection Status” is ON, inspect which protectors actually exist on the volume:
manage-bde -protectors -get C: - Back up your 48-digit recovery key based on what that output shows:
- If a “Numerical Password” protector is listed: copy the key to your clipboard:
manage-bde -protectors -get C: -Type RecoveryPassword | clip(This prints nothing — the key is now on your clipboard. Paste it into Notepad immediately to confirm it copied.)
- If only “TPM” is listed (no Numerical Password): no recovery key exists on this volume yet. Create one first:
manage-bde -protectors -add C: -RecoveryPasswordThe new 48-digit key is printed directly in the command output.
🛑 Do not proceed until your 48-digit recovery key exists in at least two places off this machine — saved to your Microsoft account or cloud AND written on paper. A key stored only on the encrypted drive is not a backup. If BitLocker locks the drive and the key is gone, everything on C: is gone.
- If a “Numerical Password” protector is listed: copy the key to your clipboard:
- Suspend BitLocker protection (this takes seconds and does not decrypt the drive):
manage-bde -protectors -disable C: -RebootCount 0(Without
-RebootCount 0, suspension expires after ONE reboot and silently re-arms mid-install. Zero means suspended until you re-enable it manually in Step 9.) - Verify suspension:
manage-bde -status C:(Protection Status should now say “Off”, but Percentage Encrypted will remain 100%).
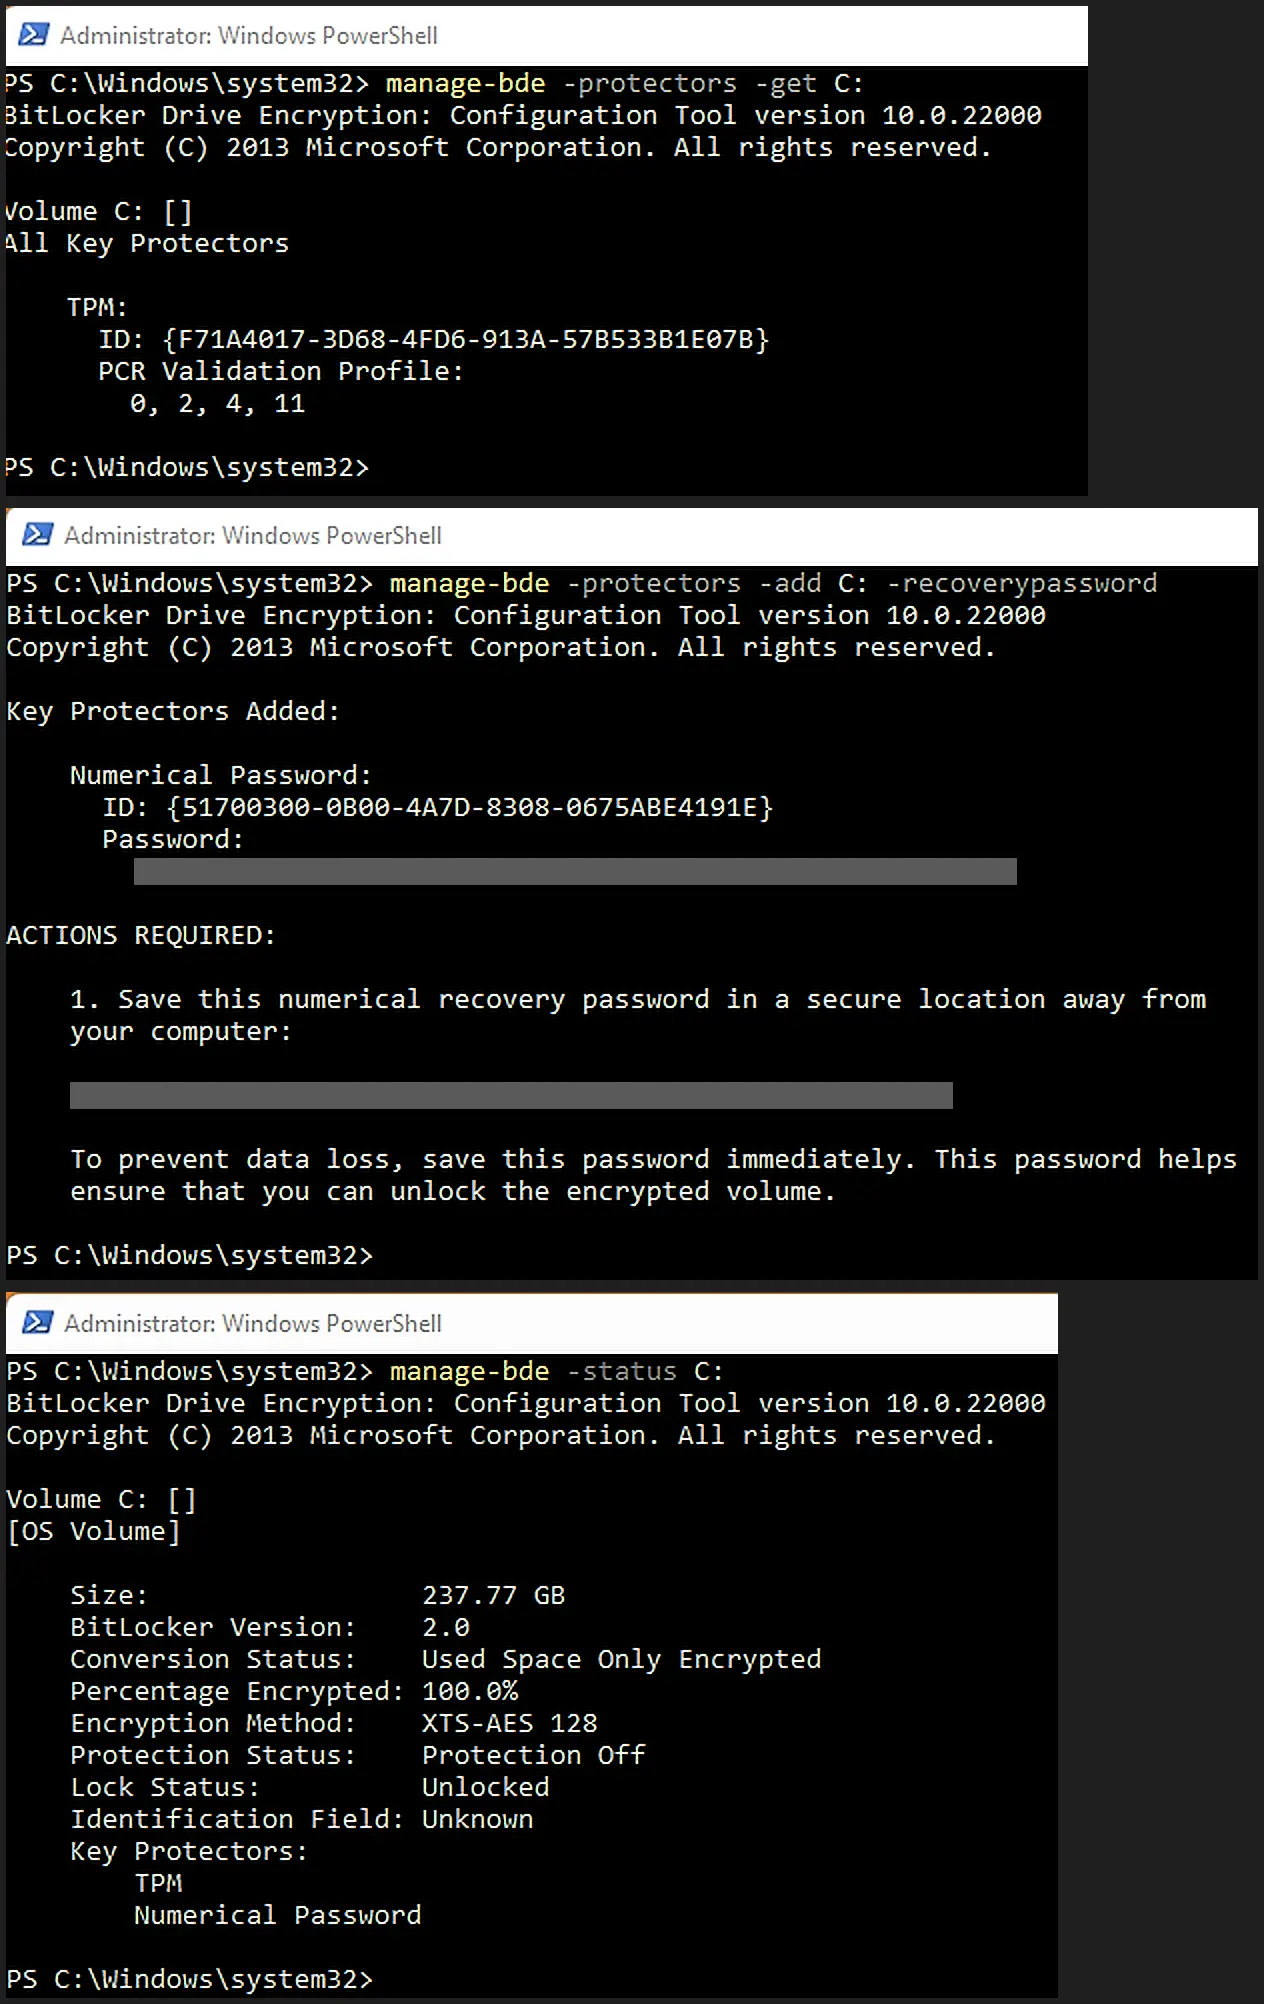
▶ Why is BitLocker dangerous for dual boot?
The TPM Measurement Trap
BitLocker ties the decryption key to the TPM (Trusted Platform Module) chip. The TPM measures the boot chain. When you install Linux and add GRUB to the EFI partition, you change the boot chain. On the next boot, the TPM may detect this unauthorized change and lock the drive to protect the data.
By suspending BitLocker, you temporarily place a clear-text key in the volume metadata, allowing the system to boot through the new GRUB chain without tripping the TPM alarm.
When the typical Microsoft backup routes fail
The standard GUI paths — Control Panel → BitLocker → “Back up your recovery key”, Settings → Device encryption — only work if a recovery key was escrowed when BitLocker was provisioned. On many machines, BitLocker was enabled TPM-only. There is no key in your Microsoft account, no key in the GUI, and nothing to print. The CLI chain above is authoritative because it queries the volume directly.
Windows 11 Home Note (Device Encryption)
If you are on Windows 11 Home, you likely have “Device Encryption”. Warning: Clicking “Turn off” in the Settings GUI initiates a full decryption process that can take hours. It does not temporarily suspend the TPM. Use the PowerShell manage-bde commands above for instant suspension.
Re-enabling after install: covered in Step 9, after dual-boot verification. Do not re-enable before then.
Step 1: Disable Fast Startup (~3 minutes)
- Press Win + R → type
control→ Enter - Go to Power Options → Choose what the power buttons do
- Click Change settings that are currently unavailable
- Uncheck Turn on fast startup (recommended)
- Click Save changes
- (Optional but Recommended) Open PowerShell as Administrator and run:
powercfg -h off(This fully disables hibernation and deletes hiberfil.sys, ensuring a clean shutdown)
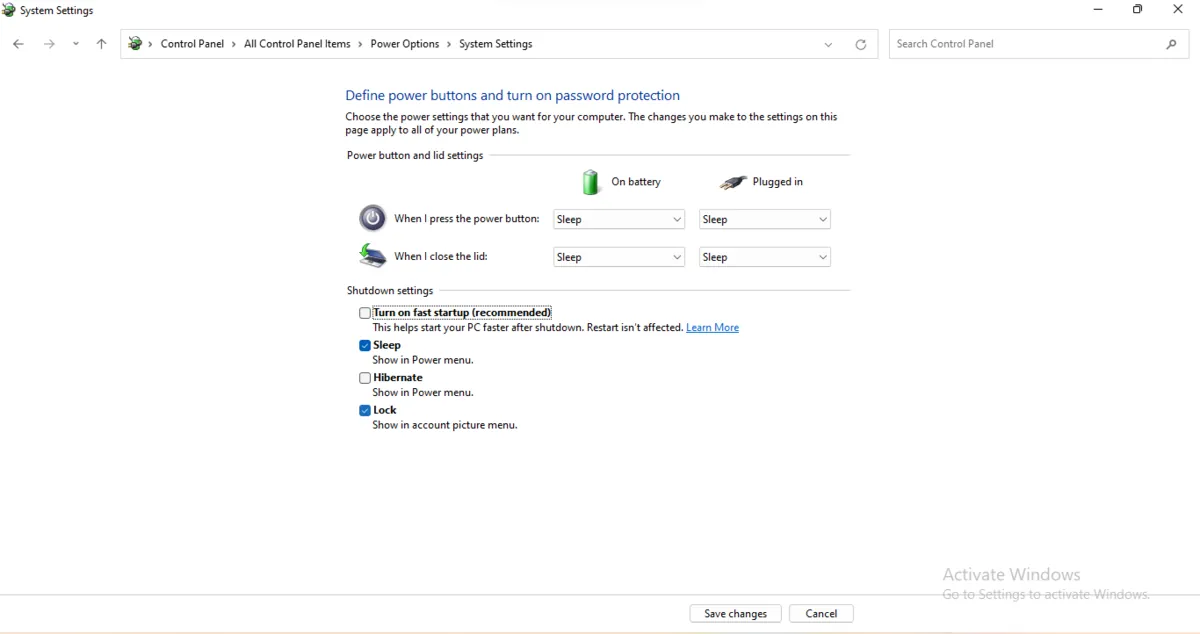
▶ Why does Fast Startup break dual boot?
Fast Startup is a hybrid shutdown feature. Instead of fully shutting down, Windows writes the kernel session to a file called hiberfil.sys and hibernates. This leaves the NTFS partition in a semi-locked state.
When Linux tries to access that partition during dual boot, it can cause file system conflicts, write errors, and strange boot behavior.
The fix is simple: disable Fast Startup so Windows performs a true, complete shutdown every time.
Step 2: Shrink the Windows Partition (~15-30 minutes)
This is where most dual-boot attempts fail. If Windows only lets you shrink a tiny amount, see the collapsible section below.
- Right-click Start → Disk Management
- Right-click C: → Shrink Volume
- Wait for Windows to calculate available space
- Enter the amount to shrink in MB (1GB ≈ 1024 MB)
(Windows Disk Management labels these values “MB,” but they behave like MiB: 1 GiB = 1024 MiB. Use the formula:
intended Linux space in GiB × 1024 = MB to enter. Example: 90 GiB = 92160 MB. Do not enter more than the “Size of available shrink space in MB” value shown above it.) - Click Shrink
- Verify the Unallocated space appears
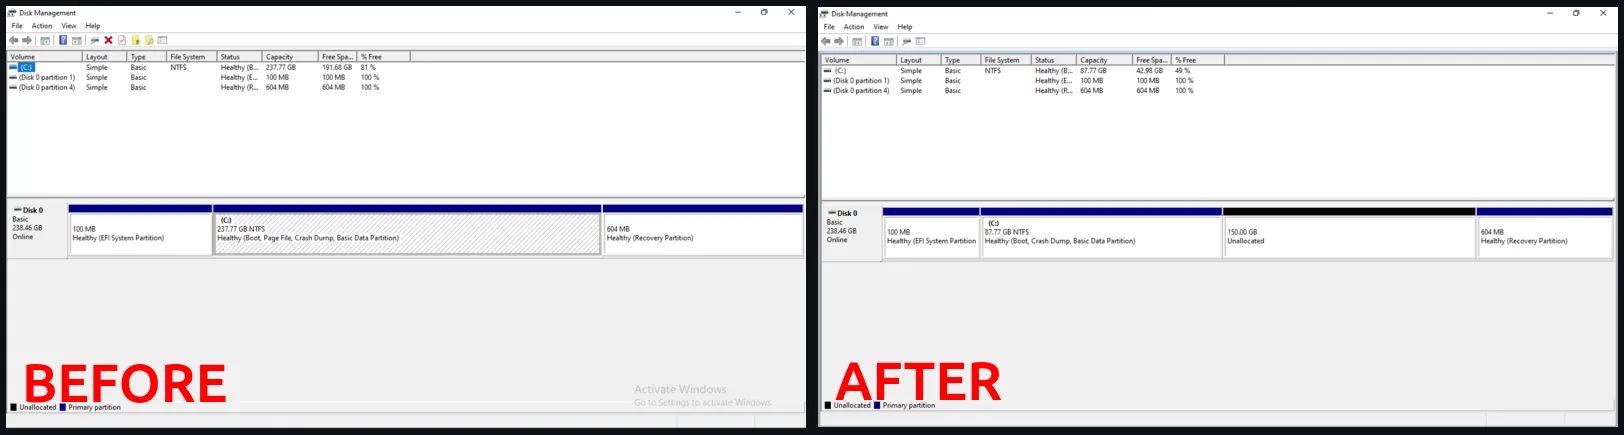
Recommended partition split for a 256GB SSD:
| Partition | Size | Purpose |
|---|---|---|
| Windows 11 (C:) | ~80-120GB | Windows system and apps |
| Unallocated | ~90-150GB | Reserved for Linux Mint |
| EFI / Recovery | Remaining | System partitions (do not touch) |
DRIVE LAYOUT VISUALIZED:
BEFORE: [EFI][MSR][Windows C: ████████████][Recovery]
AFTER:  [EFI][MSR][Windows C: ██████][Unallocated █████][Recovery]
⚠️ Problem: Windows only lets you shrink a tiny amount?
Why this happens:
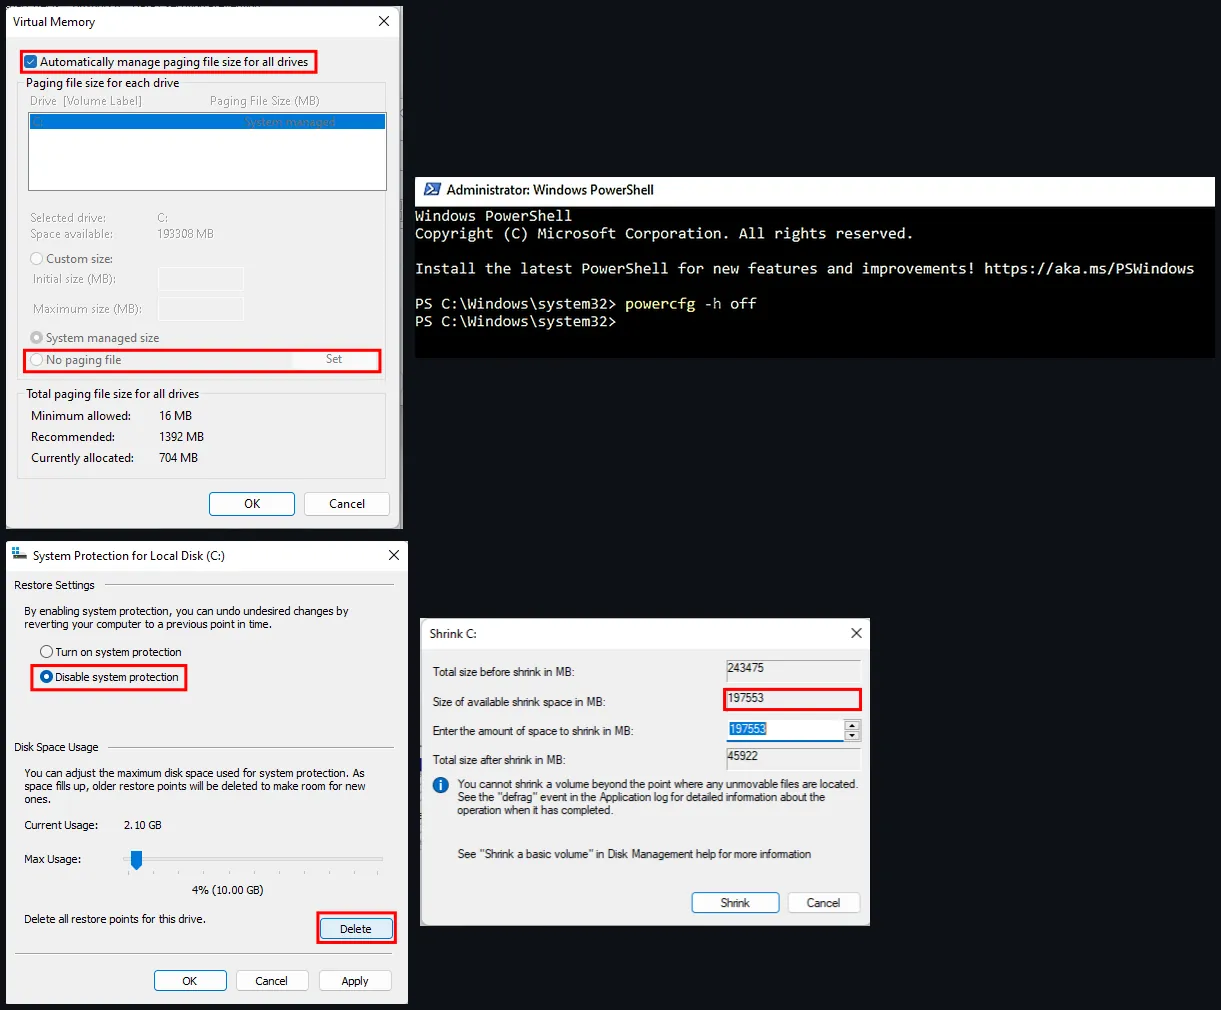
Windows has unmovable system files (pagefile.sys, hiberfil.sys, System Restore points) pinned to the end of the partition. Disk Management cannot shrink past them.
How to fix it:
A. Disable the pagefile temporarily:
- Press
Win + R→ typesysdm.cpl→ Enter - Go to Advanced tab → Performance Settings
- Go to Advanced tab → Virtual Memory Change
- Uncheck “Automatically manage paging file size”
- Select No paging file → click Set → OK
- Restart when prompted
B. Disable hibernation:
- Open PowerShell as Administrator
- Run:
powercfg -h off
C. Disable System Protection:
- Press
Win + R→ typesysdm.cpl→ Enter - Go to System Protection tab → Select C: → click Configure
- Select Disable system protection
- Click Apply to commit the change while keeping the dialog open.
- Click Delete to remove existing restore points. (Warning: This removes an existing Windows recovery option. Ensure you have backups).
- Click OK to close the dialog.
D. Restart the computer and try shrinking again. The available shrink space should increase significantly.
E. After shrinking, RE-ENABLE only these settings:
- Pagefile: Check “Automatically manage paging file size”.
- System Protection: Turn on system protection.
Step 3: Download the Linux Mint ISO (~15-60 minutes)
- Go to the official Linux Mint download page
- Select your Edition (XFCE, Cinnamon, or MATE)
- Choose a download method: Direct mirror or Torrent
- Wait for the download to complete (~2.5GB to 2.8GB)
- Verify the ISO Checksum:
- Quick Method: Open Command Prompt, paste this exact line (adjust the path), and press Enter:
certutil -hashfile "C:\Users\YourName\Downloads\linuxmint-22.3-xfce-64bit.iso" SHA256 - Compare the output hash with the official checksum on linuxmint.com/verify.php.
- Quick Method: Open Command Prompt, paste this exact line (adjust the path), and press Enter:
▶ When and why to use torrent instead of mirrors, including qBittorrent setup
What is a mirror?
A mirror is a server in a specific country that hosts a copy of the Linux Mint ISO. Mirror availability depends on local infrastructure. During our installation in Nigeria, the closest African mirrors were unreliable.
Why use a torrent?
A torrent downloads the file in small pieces from multiple peers simultaneously. This is more resilient on unstable connections because the download can pause and resume without losing progress. The .torrent file (a tiny ~28KB metadata file) is universal; it will automatically fetch the specific edition (Cinnamon, MATE, or XFCE) you selected on the download page.
How to set up qBittorrent (Standard Flow):
-
Download qBittorrent from the official site ONLY. (Fake installers carrying malware are common on third-party sites).
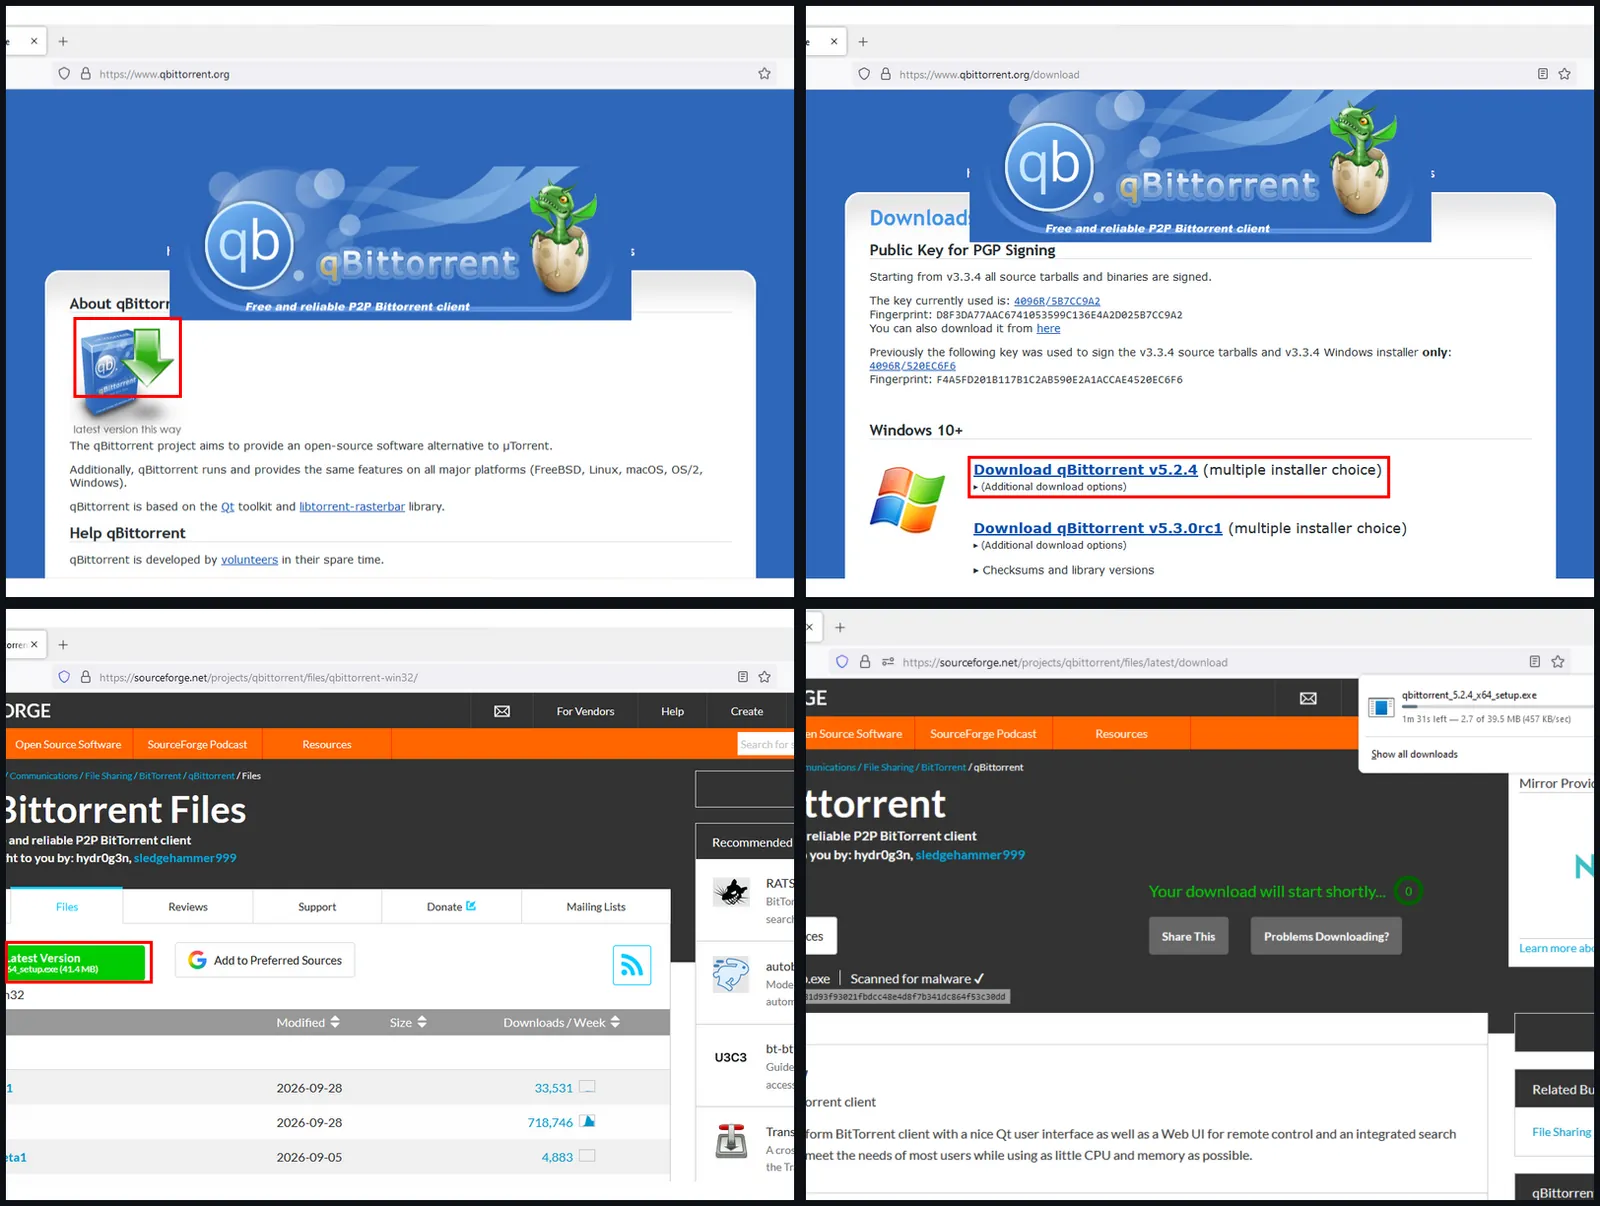
The colored boxes are the route: official homepage arrow, then the stable v5.2.4 link — the release candidate below it deliberately unmarked — then SourceForge's Latest Version, then the malware-scanned setup.exe. This is what "official source only" looks like click by click, with the decoy rc build visibly declined. -
Install and open qBittorrent. Approve administrator access only for the installer if Windows requests it, and click through any post-installation wizards using default settings.
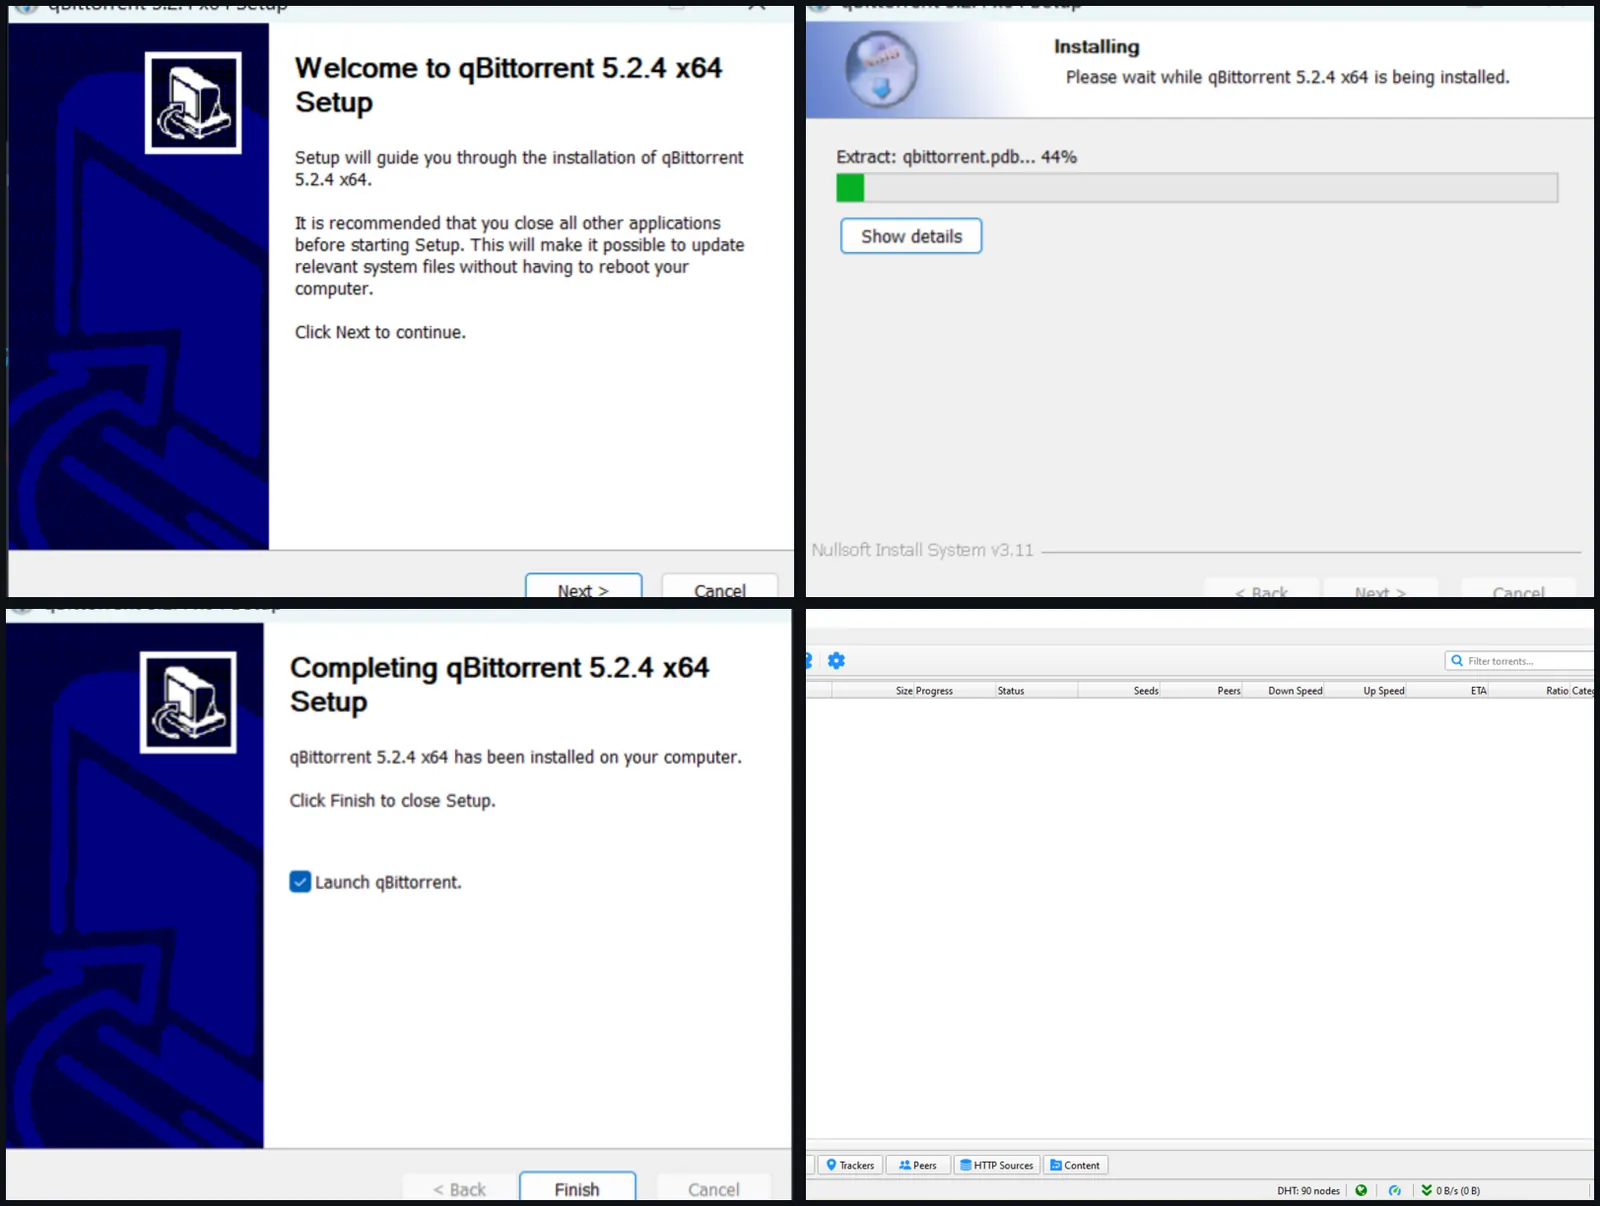
Next, Next, Finish — the wizard adds nothing you didn't ask for. The last panel is the prize: a clean, empty client with a live DHT count, ready for the .torrent you are about to feed it. -
Download the Linux Mint
.torrentfile from the Mint download page.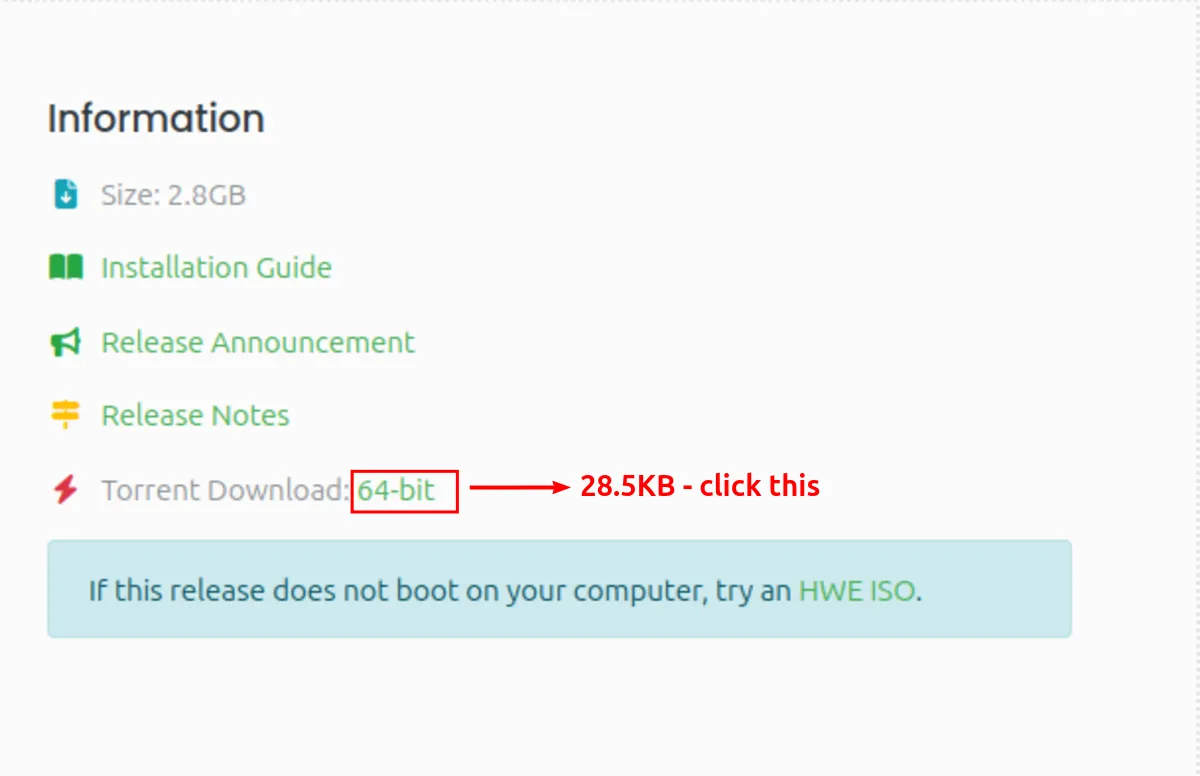
The torrent is the 28.5 KB line, not the 2.8 GB one. The red box marks the metadata file you actually pull into qBittorrent; the 2.8 GB figure above it is the ISO itself, which the torrent then fetches. - Add the torrent to qBittorrent: Open the qBittorrent app. Click the ”+” (Add Torrent File) icon on the top toolbar (or go to File > Add Torrent File). Browse to your Downloads folder, select the
.torrentfile, and click Open. -
A “New Torrent” dialogue menu will appear. Leave it on default settings and click OK. The download starts.
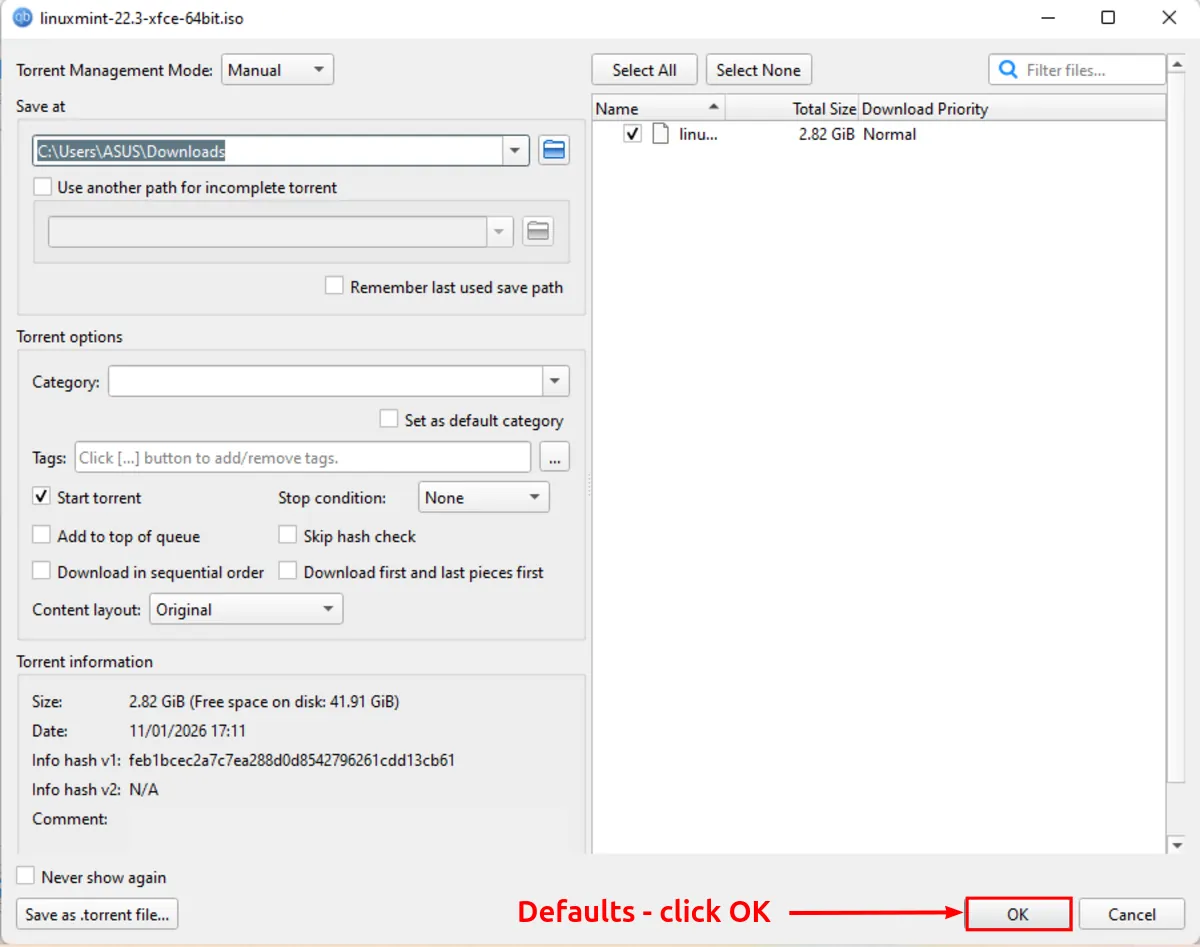
Leave it alone and click OK. The red mark is the whole instruction: default settings, no tweaking, Start torrent already ticked so the pull begins the moment you confirm. -
(Note on Seeding: After reaching 100%, you are uploading (seeding) to others. On metered or capped data, right-click the file → Pause. On unmetered connections, leaving it seeding for a while keeps the torrent alive for the next person in your region).
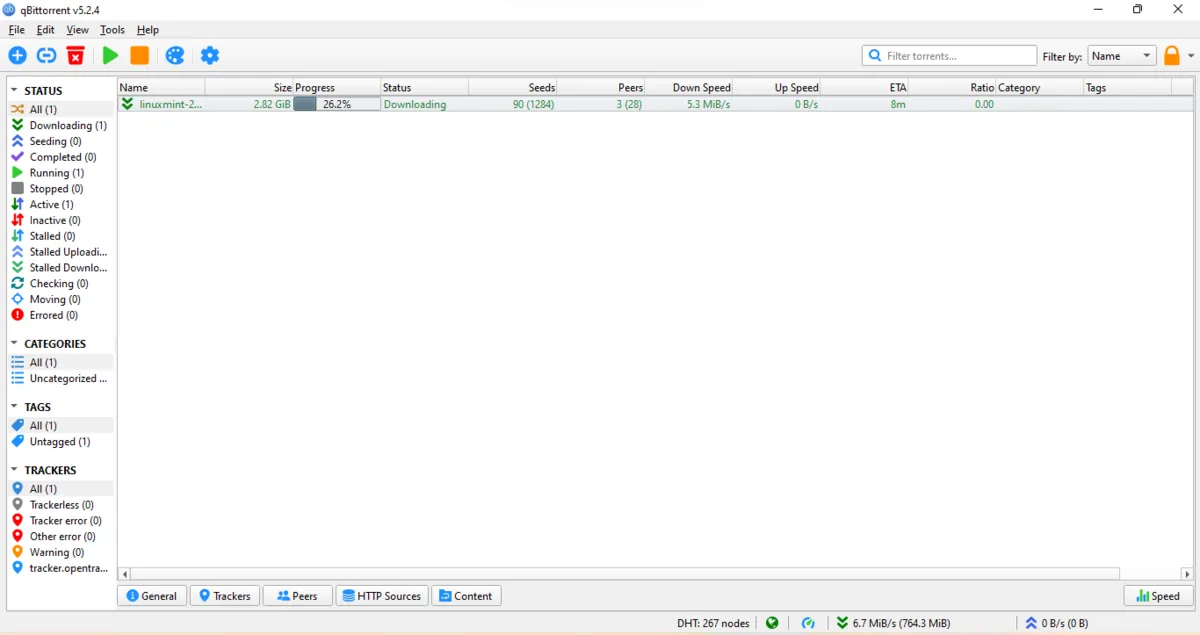
A healthy pull on a flaky link: 90 seeds feeding 3 peers, speed holding in the MiB/s range, ETA under ten minutes. This is the resilience the torrent method buys you when a mirror stalls. 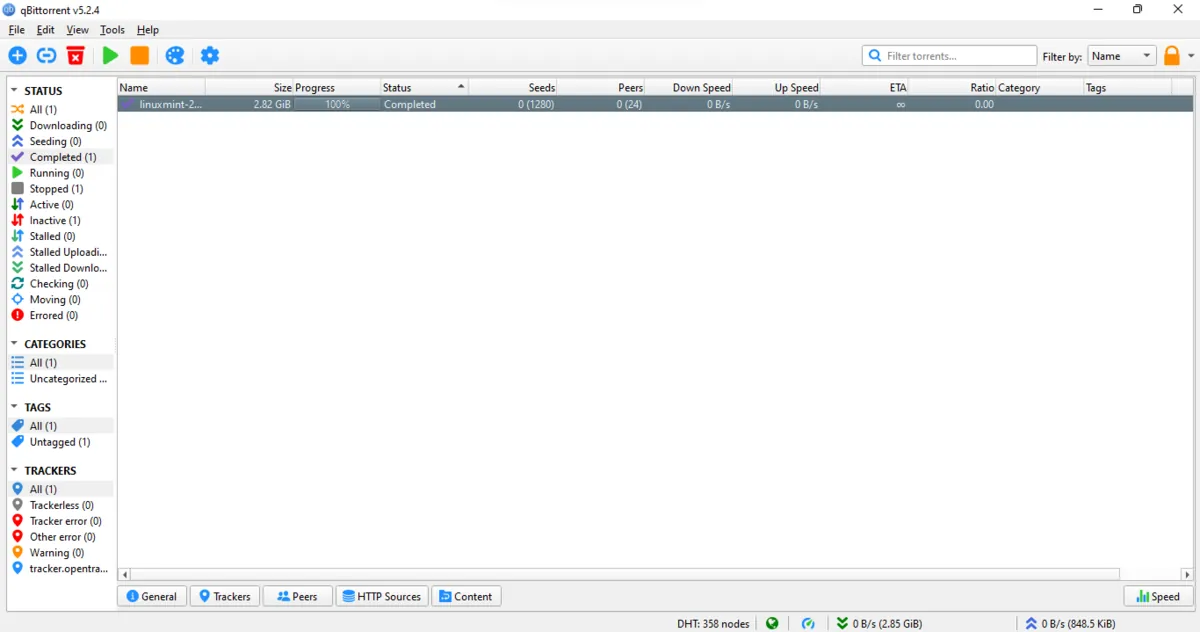
The finish line, paused: 100% and stopped rather than seeding — the state the step-6 note describes for metered or capped connections. The bottom counters (2.85 GiB down, 848 KiB up) are the proof the pull was real.
Fallback for Unstable/Restricted Connections:
If the download is stalling or painfully slow:
- Add trackers: Go to newtrackon.com/lists and click the green copy icon to copy all trackers. In qBittorrent, highlight the downloading Mint file and right-click it → Edit trackers. A dialogue box appears with a single default tracker ending in
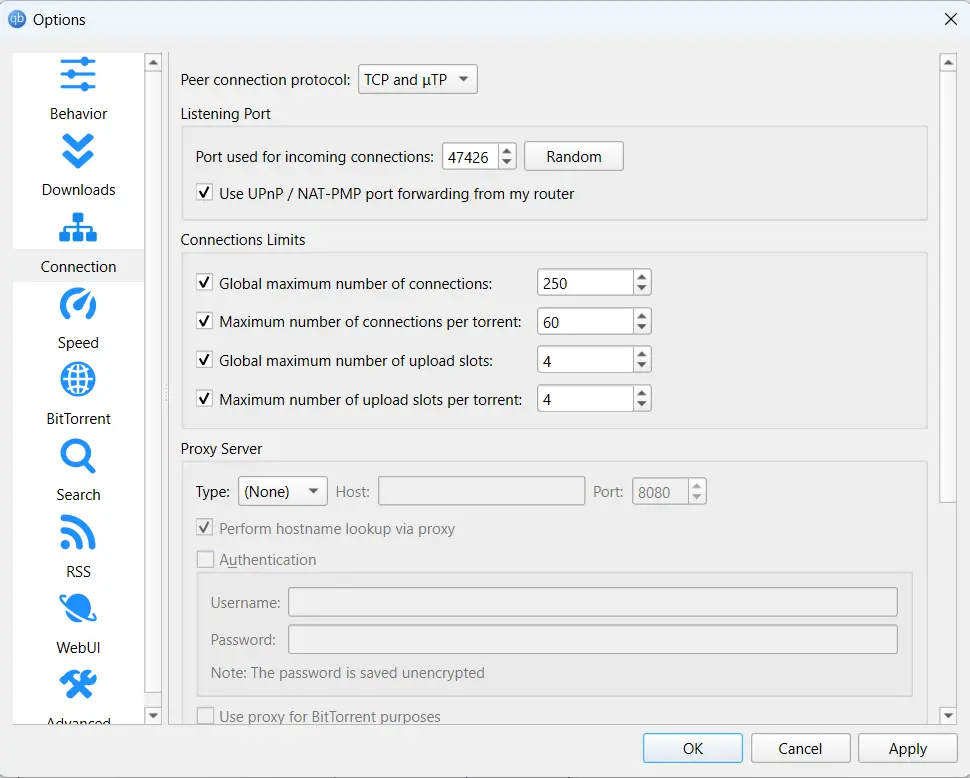
...announce. Move your cursor to the very end of that text and press ENTER to create a blank line, then paste the new trackers. (Without this line spacing, qBittorrent may parse the pasted trackers as a single entry). - Adjust connection limits: Click the Option icon (⚙️) in the top left bar → click Connection. Change the values from default to the recommended values:
- Global Maximum Number of connections: 200-300
- Maximum Number of connection per Torrent: 50-80
- Global Maximum Number of Uploaded slots: 4
(DHT and PeX are enabled by default. No action needed there).
Verify File Integrity (Step-by-step for Beginners):
Windows has a built-in tool to verify the ISO without needing third-party software.
- Open the Command Prompt (Press
Win + R, typecmd, and press Enter). - Type
certutil -hashfile(⚠️ Make sure to leave exactly one space after the word hashfile). - Get the file path into the Command Prompt:
- If you have a mouse: Click and drag the downloaded Linux Mint ISO file directly into the black Command Prompt window and let go. Windows will paste the path automatically.
- If you are using a trackpad (or drag-and-drop fails): Right-click the downloaded ISO file in your folder and select “Copy as path”. Then, right-click anywhere inside the black Command Prompt window to paste the path.
- Type a space, then
SHA256. Your full command should look something like this (using our running example):certutil -hashfile "C:\Users\Name\Downloads\linuxmint-22.3-xfce-64bit.iso" SHA256 - Press ENTER.
- Wait: The prompt will appear to freeze for 1 to 5 minutes while it reads the file. This is normal. Do not close the window.
- Read the output:
SHA256 hash of C:\Users\Name\Downloads\linuxmint-22.3-xfce-64bit.iso:
a1b2c3d4e5f6...[long string of numbers and letters]...
CertUtil: -hashfile command completed successfully.
(Cinnamon and MATE readers: your output will show your edition’s filename here. That is expected — compare the hash string, not the filename label).
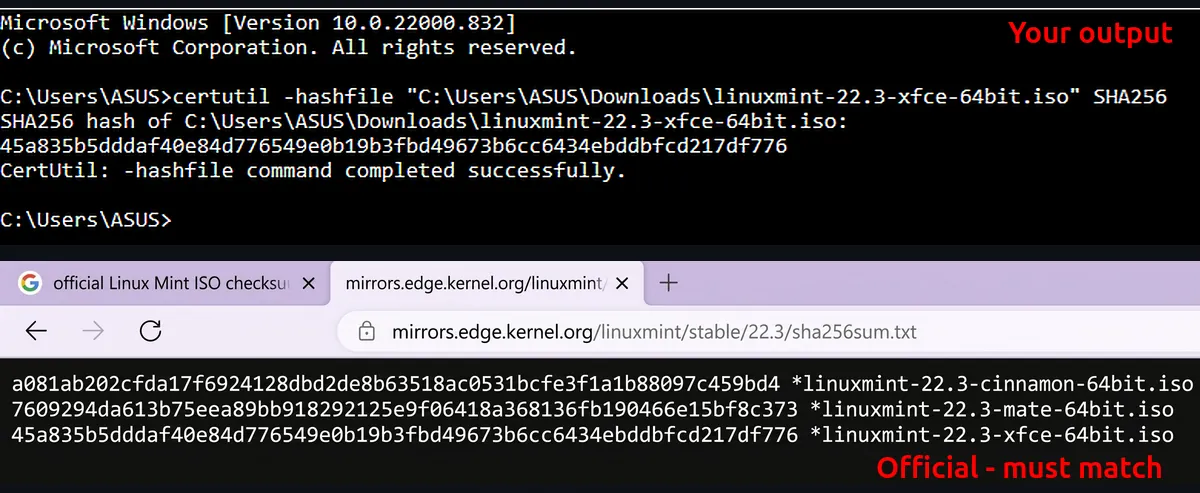
- Compare: Open the official Linux Mint verification page. Find the exact edition (Cinnamon, MATE, or XFCE) and version you downloaded. Compare the long string of characters in your Command Prompt with the one on the website.
- If they match exactly: Your download is perfect.
- If even a single character is different: The download is corrupted. Delete it and download again.
Step 4: Create Boot Media with Ventoy (~10-15 minutes)
- Download Ventoy from the official site.
- Insert your USB drive or SD card in a dedicated reader (8GB+). Ensure it is formatted and empty.
- Run Ventoy2Disk.exe (Allow Admin rights).
- Select your USB device from the dropdown.
- Set the Partition style to GPT.
- Click Install → Accept formatting warnings.
- Copy the Linux Mint ISO file (~2.5GB to 2.8GB) into the Ventoy drive.
- Verify the file integrity on the USB drive using
certutil(same as Step 3).
▶ Full Ventoy walkthrough for beginners (Critical Step)
Why Ventoy?
Unlike Rufus or Etcher, Ventoy prepares the drive once. After that you simply copy ISO files onto it like normal files. You can keep multiple ISOs on the same stick.
1. Download Ventoy
- Go to the official Ventoy website.
- Download the latest Windows release (the
.zipfile). - Extract the Zip folder to your Downloads folder.
2. Prepare the USB drive
- Back up anything important that is currently on the USB drive. Ventoy will erase the entire drive.
- Insert the USB drive (or SD card in a dedicated reader) into your computer.
- (Note: After previous formatting, Windows File Explorer sometimes does not show the drive immediately. This is normal. Do not panic.)
3. Launch Ventoy2Disk
- Go to your Downloads folder and locate the Ventoy
.zipfile you just downloaded. - Right-click it → Extract All (or extract with 7-Zip / WinRAR).
- Open the extracted folder.
- Find and double-click Ventoy2Disk.exe.
- When Windows asks for permission, click Yes (run as administrator).
4. Set the partition style to GPT
- In the Ventoy2Disk window, click Option in the top menu bar.
- Go to Partition Style → select GPT.
- The interface will switch from MBR to GPT.
Why GPT?
Your laptop is running 64-bit Windows 11 in UEFI mode. GPT is the correct partition style for native UEFI boot. Using MBR could force the system into Compatibility Support Module (CSM/Legacy) mode, which is unnecessary and can cause problems later.
5. Install Ventoy on the USB drive
- In the device dropdown, carefully select your USB drive.
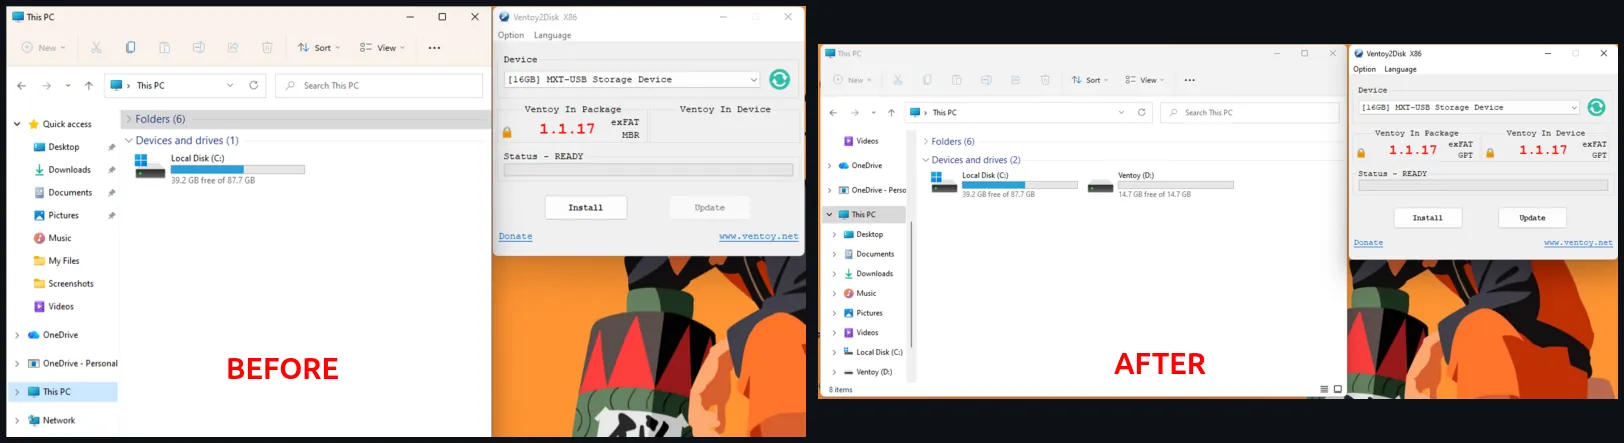
Double-check the drive letter and size so you do not accidentally select your internal hard drive. - Click Install.
- Accept both warning dialogs that appear. Ventoy will format the drive and install its bootloader.
- When the process finishes, Windows File Explorer should show a new drive named Ventoy.
At this point the USB drive is ready. It will contain a small Ventoy system partition (usually hidden) and a large open partition where you will place ISO files.
6. Copy the Linux Mint ISO
- Go to your Downloads folder.
- Locate the Linux Mint ISO.
Important: It must be the large file (~2.5–2.8 GB). Do not copy the tiny.torrentfile (~28 KB). - Copy the ISO file.
- Open the Ventoy drive in File Explorer and paste the ISO there.
- Wait for the transfer to finish.
Expected speed on a normal USB 2.0/3.0 connection: roughly 7–10 MB/s → about 5–7 minutes for a 2.8 GB file. - Confirm the ISO is visible inside the Ventoy drive.
7. Verify the ISO on the Ventoy drive
Copying can introduce corruption. Always verify the file that is actually sitting on the boot media.
- Open Command Prompt (
Win + R→ typecmd→ Enter). - Type the following (leave a space after
hashfile):certutil -hashfile - Drag the Linux Mint ISO from the Ventoy drive into the Command Prompt window (or right-click the file → Copy as path and paste it).
- Type a space and then
SHA256. The full command should look similar to:certutil -hashfile "E:\linuxmint-22.3-xfce-64bit.iso" SHA256 - Press Enter.
- Wait 1–5 minutes while the hash is calculated. The window may appear frozen — this is normal.
- Compare the resulting hash string with the official checksum on linuxmint.com/verify.php.
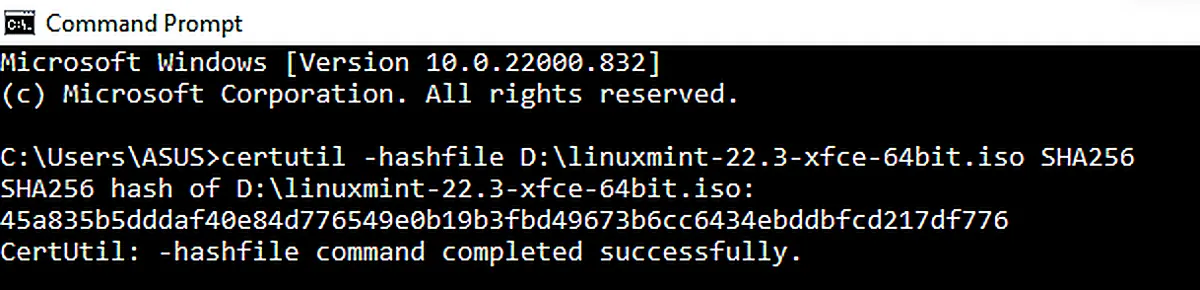
If the hashes match exactly, the file on the Ventoy drive is clean and ready for booting.
If even one character is different, delete the ISO from the Ventoy drive and copy it again.
This verification step is one of the most important safeguards in the entire process. A corrupted ISO on the boot media is a common cause of later boot failures that look like hardware or BIOS problems.
Step 5: Configure BIOS Settings (MOK Enrollment) (~5 minutes)
Boot Menu Keys by Manufacturer:
| Brand | Boot Menu | BIOS Setup |
|---|---|---|
| HP | F9 or Esc | F10 |
| ASUS | Esc or F8 | F2 |
| Dell | F12 | F2 |
| Lenovo | F12 or Fn+F12 | F1 or F2 |
| Acer | F12 | F2 |
Primary Method: Enroll Ventoy Key (Keep Secure Boot ON)
- Insert the Ventoy boot device. Restart and press your boot menu key.
- Select your USB device from the boot menu. It appears under the drive’s own name, usually with a UEFI: prefix (e.g.,
UEFI: SanDiskorUEFI: Kingston). It will NOT say “Linux Mint” — the Ventoy menu loads after the device boots. If the same drive appears twice, choose the entry with the UEFI prefix. - If you see a blue screen failure (MOK Management), press ENTER.
- Select Enroll Key from Disk → Select VTOYEFI → Select ENROLL_THIS_KEY_IN_MOKMANAGER.cer.
- Select Continue → Select Yes.
- If prompted for a password, try leaving it blank and pressing Enter. If rejected, try
ventoy. (If both fail, consult the official Ventoy Secure Boot documentation for your specific version). - Select Reboot.
(Note: Enrolling Ventoy’s key adds it to your machine’s trust store, allowing its bootloader to pass Secure Boot. Only use Ventoy from its official source).
▶ Fallback Method: Disable Secure Boot
If MOK Enrollment fails, disable Secure Boot as a last resort.
- Restart and press your BIOS key.
- Navigate to Security or Boot tab.
- Disable Secure Boot.
- Verify UEFI mode is still active. (⚠️ Do NOT switch to Legacy/CSM).
- Save and exit.
Step 6: Boot into the Live Environment (~3-5 minutes)
- At the Ventoy menu, select the Linux Mint ISO.
- Choose Boot in normal mode.
- At the GRUB menu, select Start Linux Mint Xfce 22.3 64-bit (or your downloaded edition’s name, e.g., Cinnamon).
-
Wait for the live desktop to load.
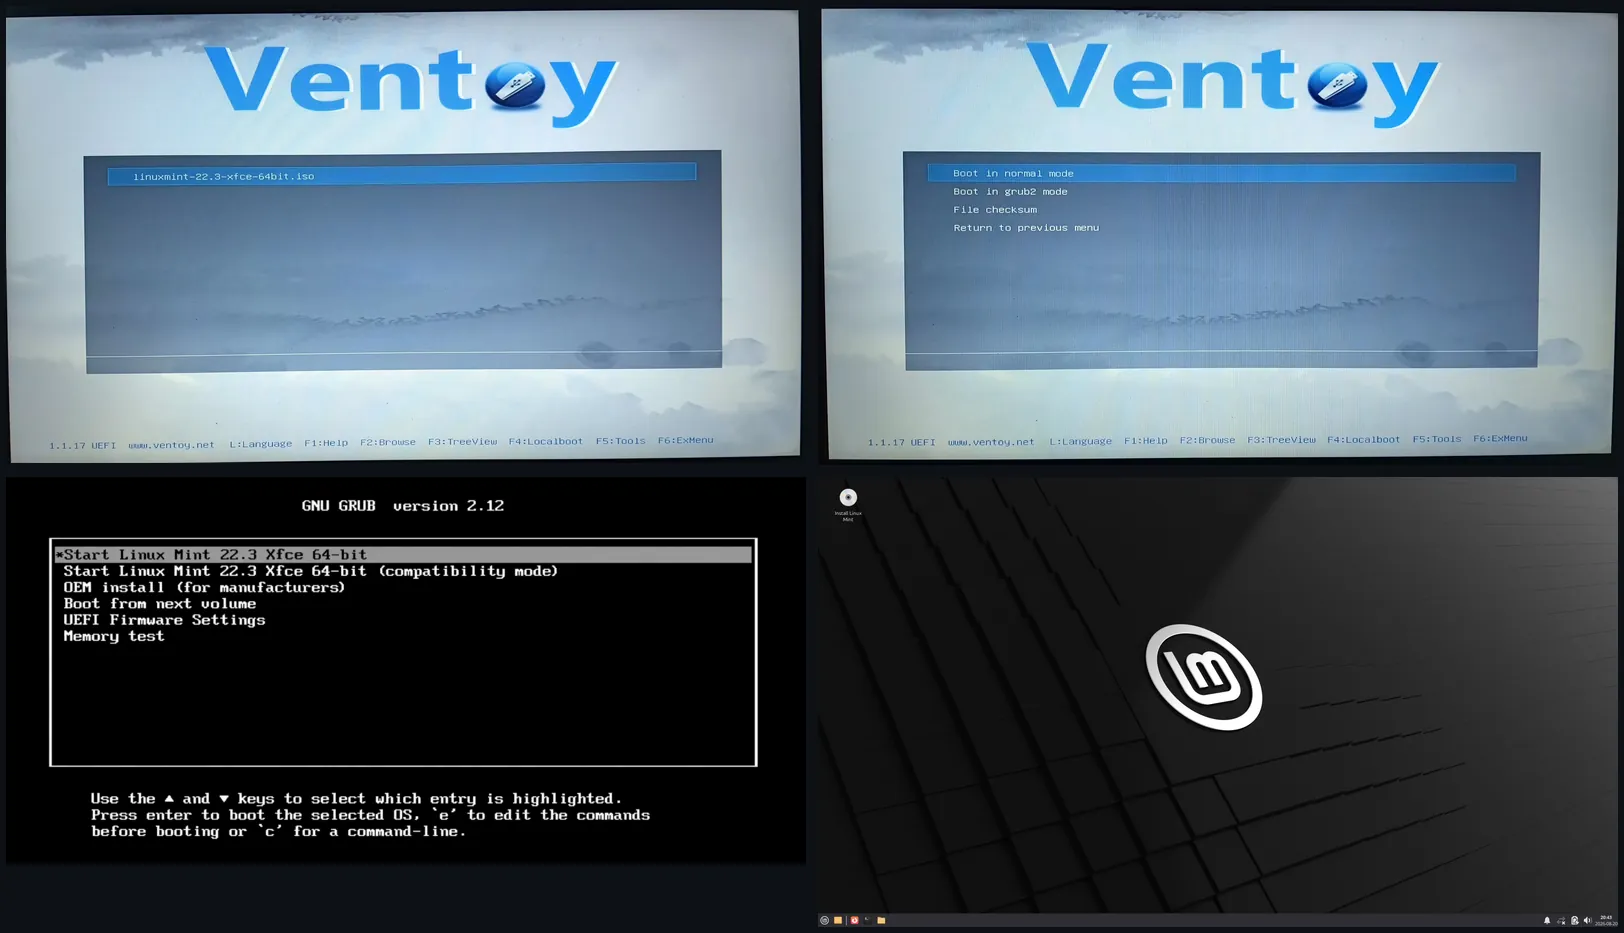
The path from stick to live session: Ventoy loads the ISO, normal boot mode is selected, GRUB launches Linux Mint 22.3 Xfce 64-bit, and the live desktop appears. This is the moment the machine is testing Mint without installing it yet. - Test WiFi, Sound, Keyboard, and Display.
Step 7: Install Linux Mint (~15-30 minutes)
⚠️ WARNING: Home Folder Encryption
Do not enable home-folder encryption on Intel Pentium, Celeron, or older dual-core CPUs, or on machines with 4 GB RAM or less. The cryptographic overhead will noticeably degrade performance on constrained hardware and is difficult to reverse without a fresh installation.
Standard Installation Steps:
- Double-click the Install Linux Mint icon.
- Select Language → Keyboard Layout → Continue.
- Connect to WiFi → Check Install multimedia codecs → Continue.
-
If prompted about mounted partitions, click Yes to unmount.
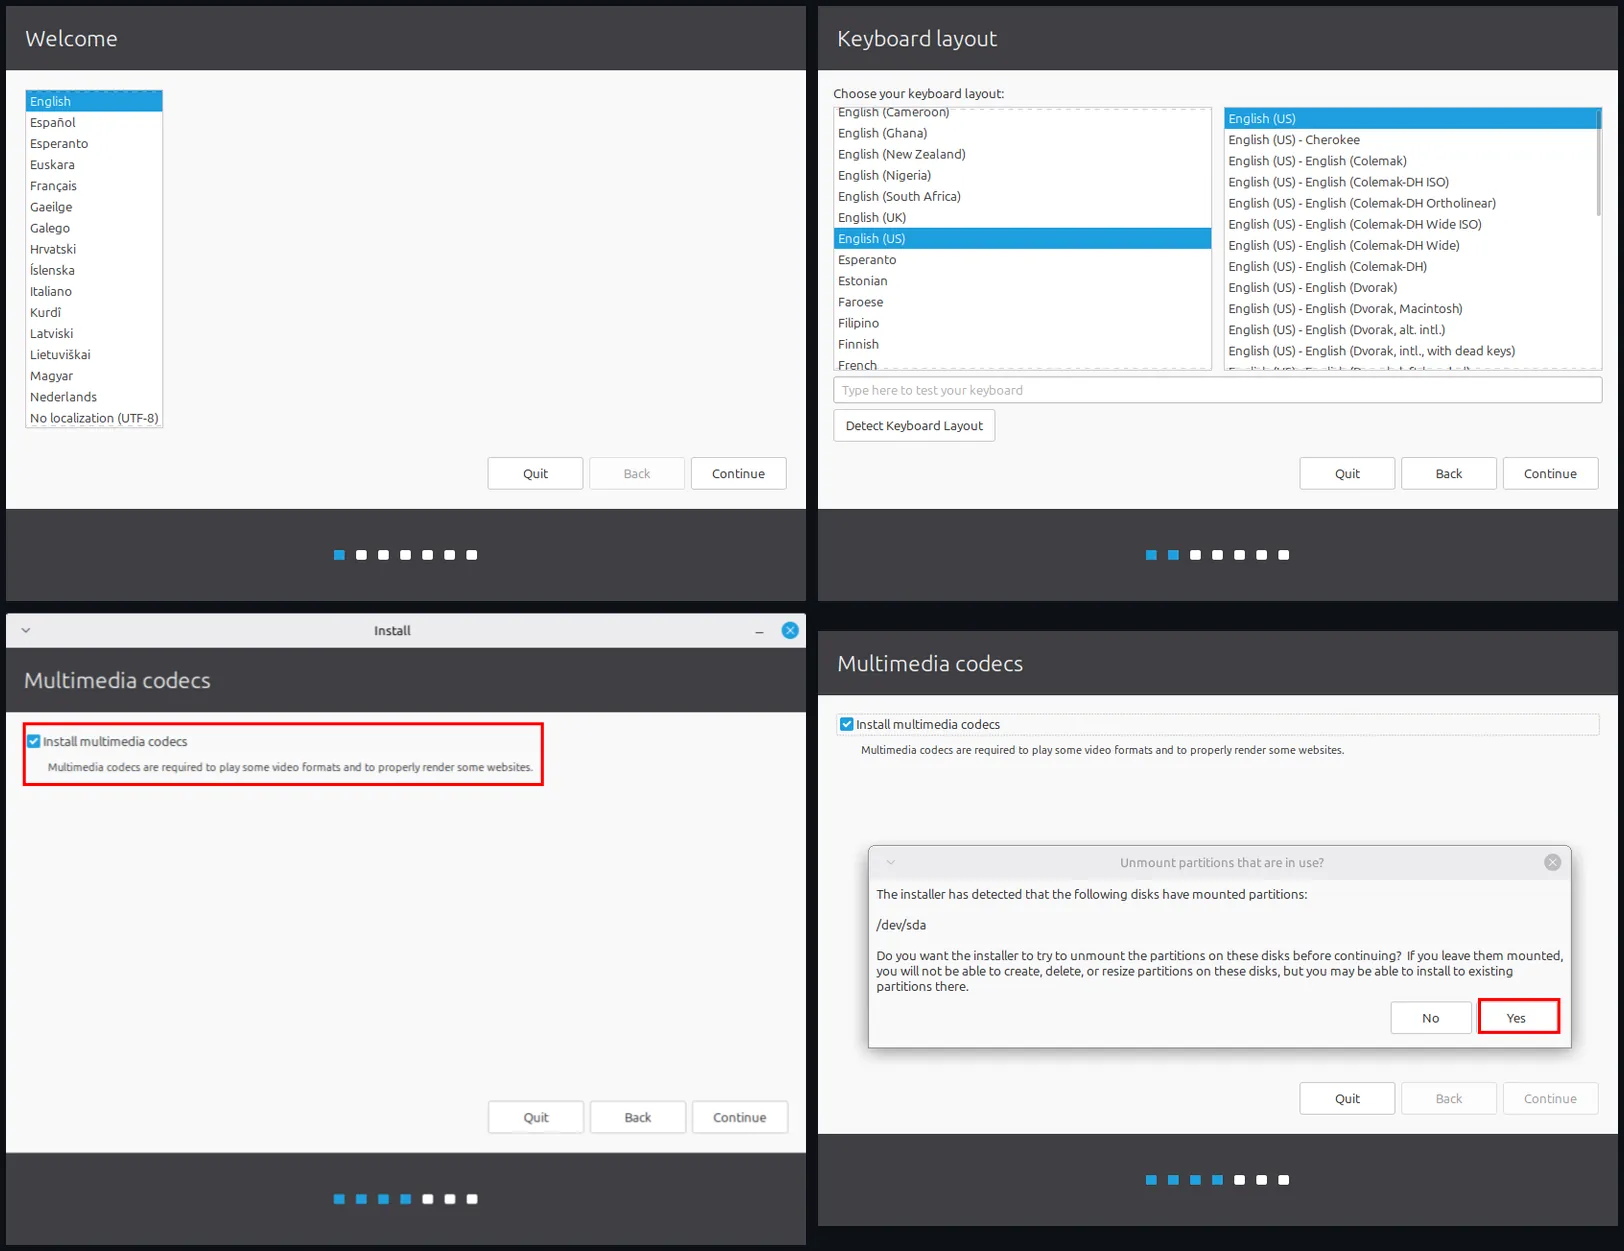
The four screens before the partitioning choice. Pick your language and keyboard as usual; the two red boxes are the only forced calls here — tick Install multimedia codecs so video and sites render, and when the installer asks to unmount the in-use /dev/sda, answer Yes so it can lay out the unallocated window you freed in Step 2. 🛑 STOP AND VERIFY BEFORE PROCEEDING:
Select Install Linux Mint alongside Windows Boot Manager ONLY IF:- Windows Boot Manager is explicitly detected.
- The proposed Linux space corresponds to the unallocated region you created in Step 2.
- The Windows partition remains visible and is NOT marked for formatting.
DO NOT select “Erase disk and install Linux Mint”. That option removes Windows and all existing data. If “Install alongside” is missing, stop and back up your data.
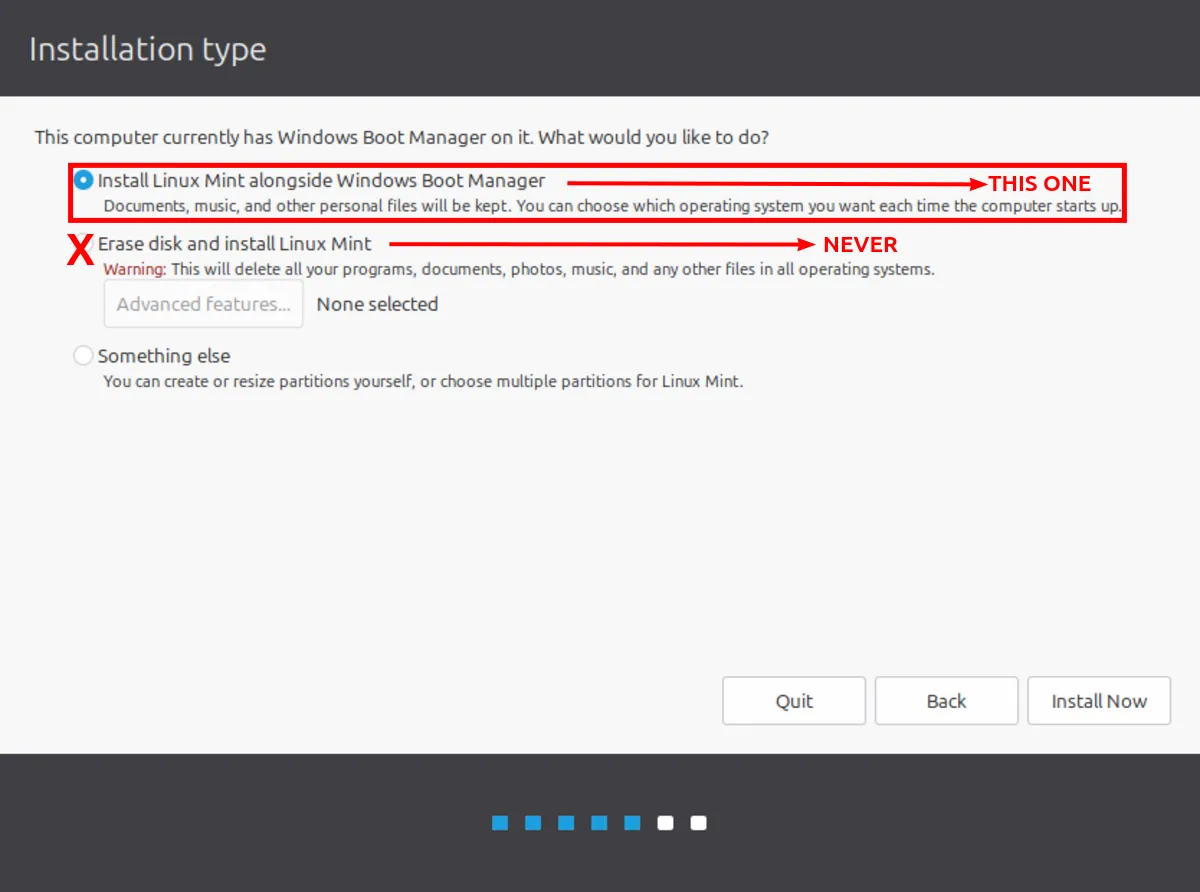
The header is the proof the installer found your Windows — without that line, the alongside option would not appear, so if your screen differs, stop and read before clicking. The red marks settle the choice: alongside is THIS ONE; Erase disk, which wipes every file on every OS, is NEVER. Leave Advanced features at None selected and continue. - Select Install Linux Mint alongside Windows Boot Manager.
-
Create your user account.
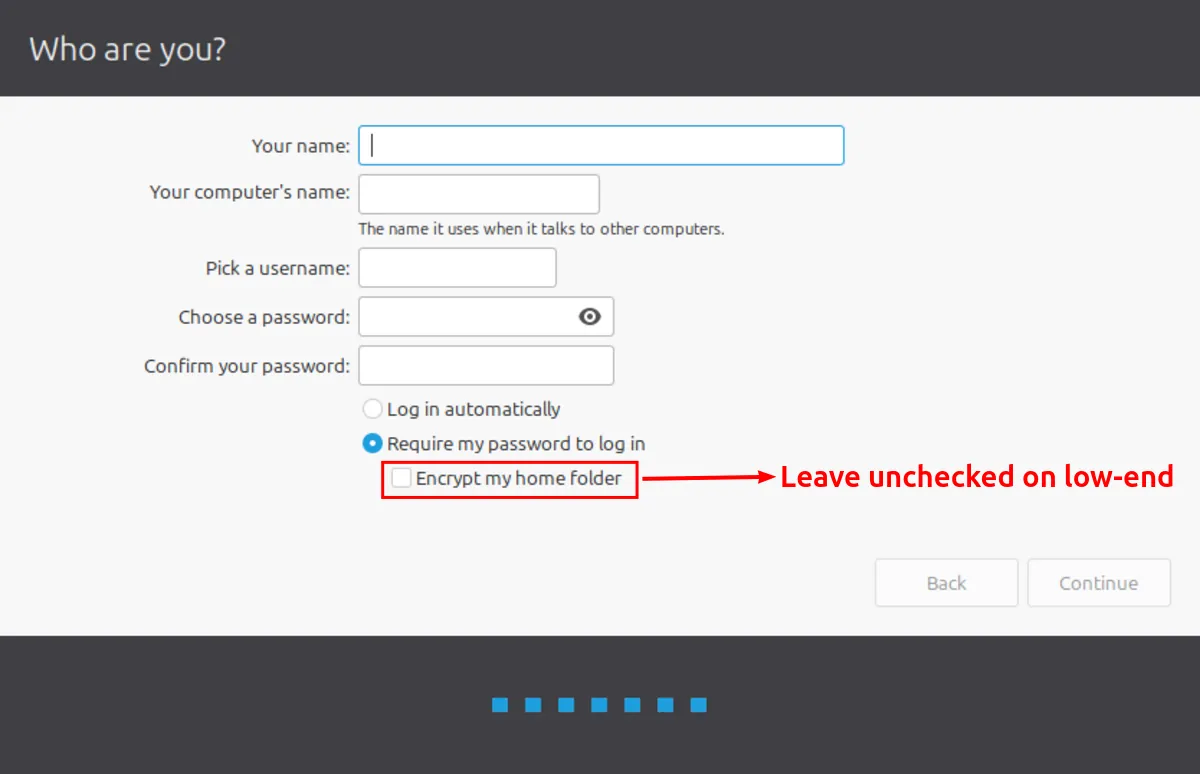
Fill the fields and leave Require my password to log in as the default. The one trap the red box flags: Encrypt my home folder. It looks like free security, but on low-end hardware the home-directory encryption tax is real CPU and RAM on every file access — leave it unchecked, exactly as the mark says. - Click Install Now and confirm.
- Wait for the installation to complete.
- When prompted, remove the boot media and press Enter.
Important: The installer should reuse the existing Windows EFI System Partition. If it offers to create a new EFI partition, stop. Creating a second EFI partition is a common source of later GRUB / Windows boot problems.
Swap: The automated installer creates a swapfile by default. Manual setup is only needed if you chose ‘Something Else’ or are recovering from an interrupted installation (see Step 8).
Step 8: Verify the Dual Boot & Configure Swap (~3 minutes)
- Restart the laptop.
-
The GRUB menu should appear automatically.
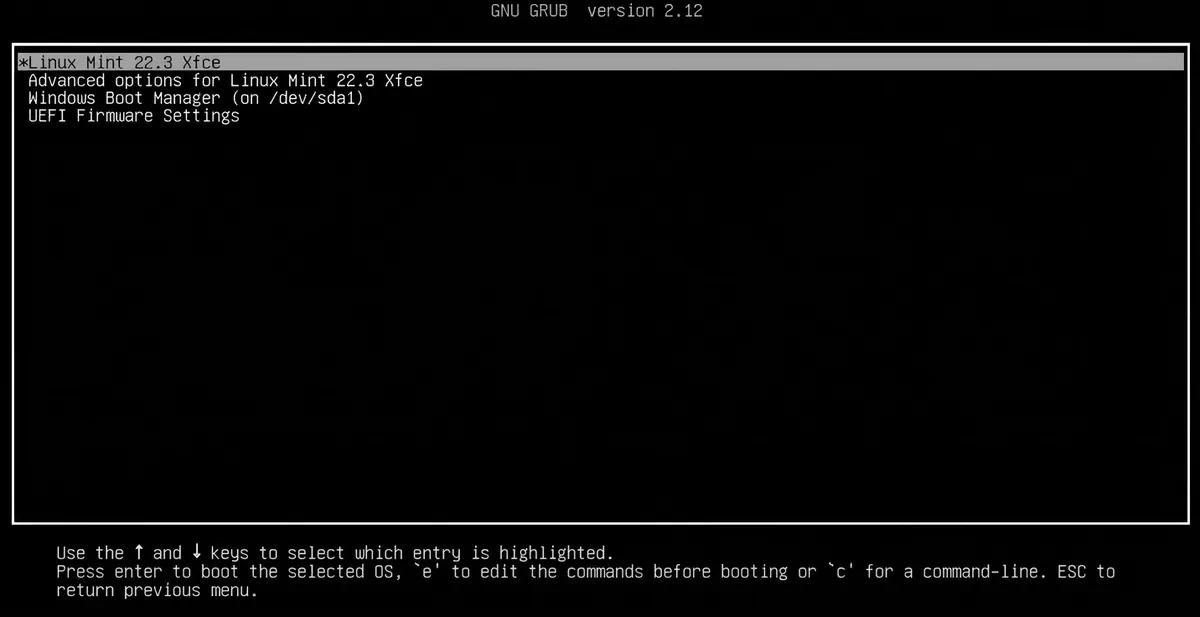
The menu the finished install hands you at power-on: Linux Mint and Windows Boot Manager both listed, Mint as the default. Arrow down and Enter reaches Windows; the /dev/sda1 tag names the EFI partition Windows was installed to. Both operating systems, one switch, no USB stick required anymore. -
Select Linux Mint → verify it boots to the desktop.
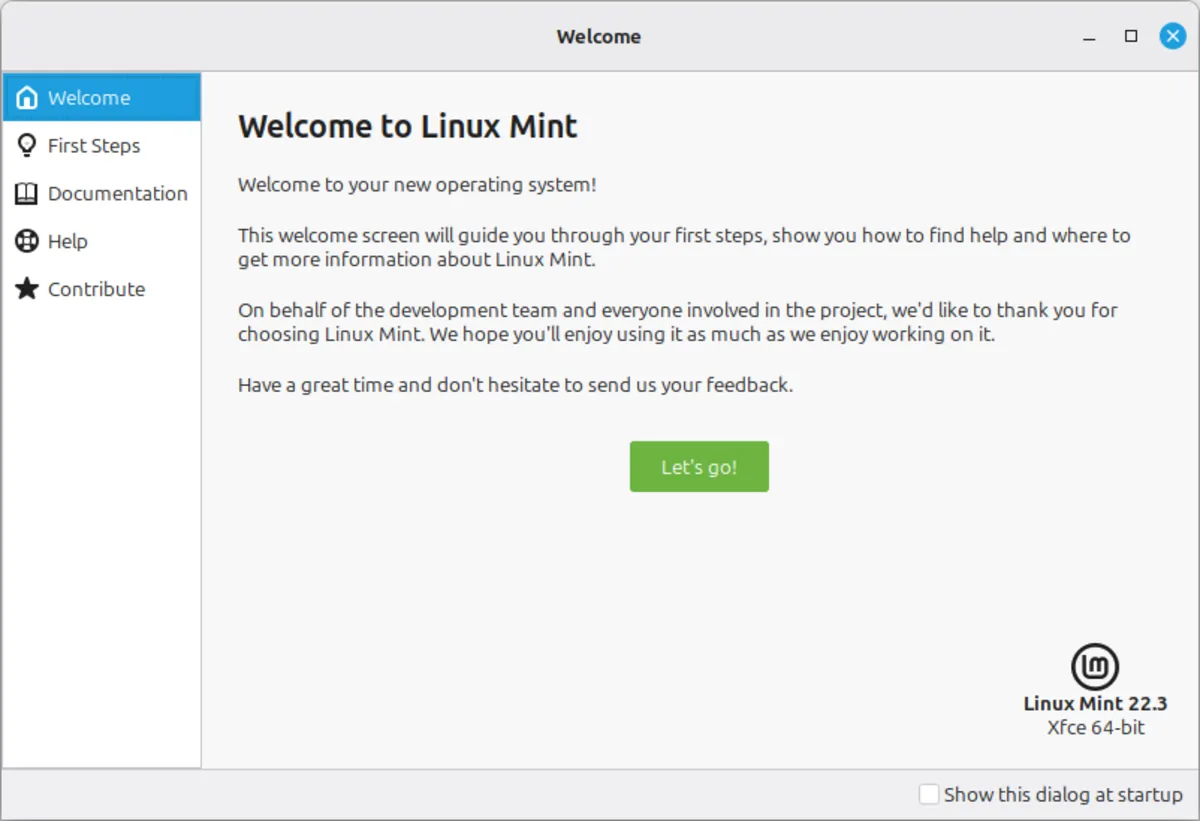
The first thing the new system shows after the reboot: a welcome screen, version-locked to 22.3 Xfce 64-bit, with the startup nag left off. Let's go! opens the guided first-run. Nothing here is required — it is the machine saying it is alive and yours. - Restart → select Windows Boot Manager → verify Windows boots.
Verify Swap Configuration:
Once booted into your new Linux desktop, open a terminal and run:
swapon --show
free -h
If no swap is listed, create it manually:
sudo fallocate -l 4G /swapfile
sudo chmod 600 /swapfile
sudo mkswap /swapfile
sudo swapon /swapfile
grep -q '/swapfile' /etc/fstab && echo "Already present" || echo '/swapfile none swap sw 0 0' | sudo tee -a /etc/fstab
▶ Post-installation checklist
| Task | How |
|---|---|
| Run updates | Open Update Manager in Linux Mint and install available updates |
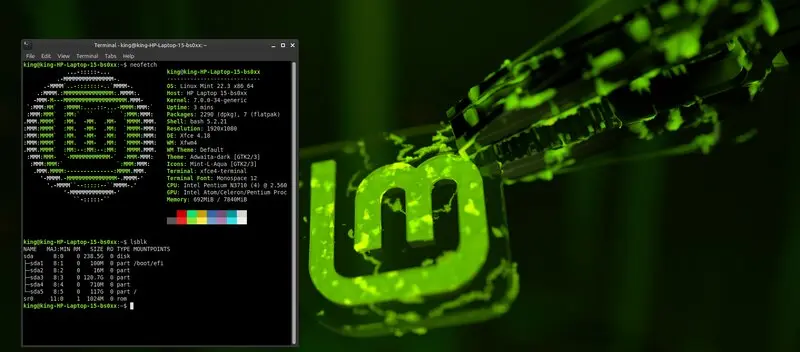
| Check disk layout | Open Disks or run lsblk in the terminal |
| Test reboot | Restart a few times to confirm GRUB appears consistently |
| Run neofetch | Open a terminal and type neofetch (or fastfetch) to see your system specs |
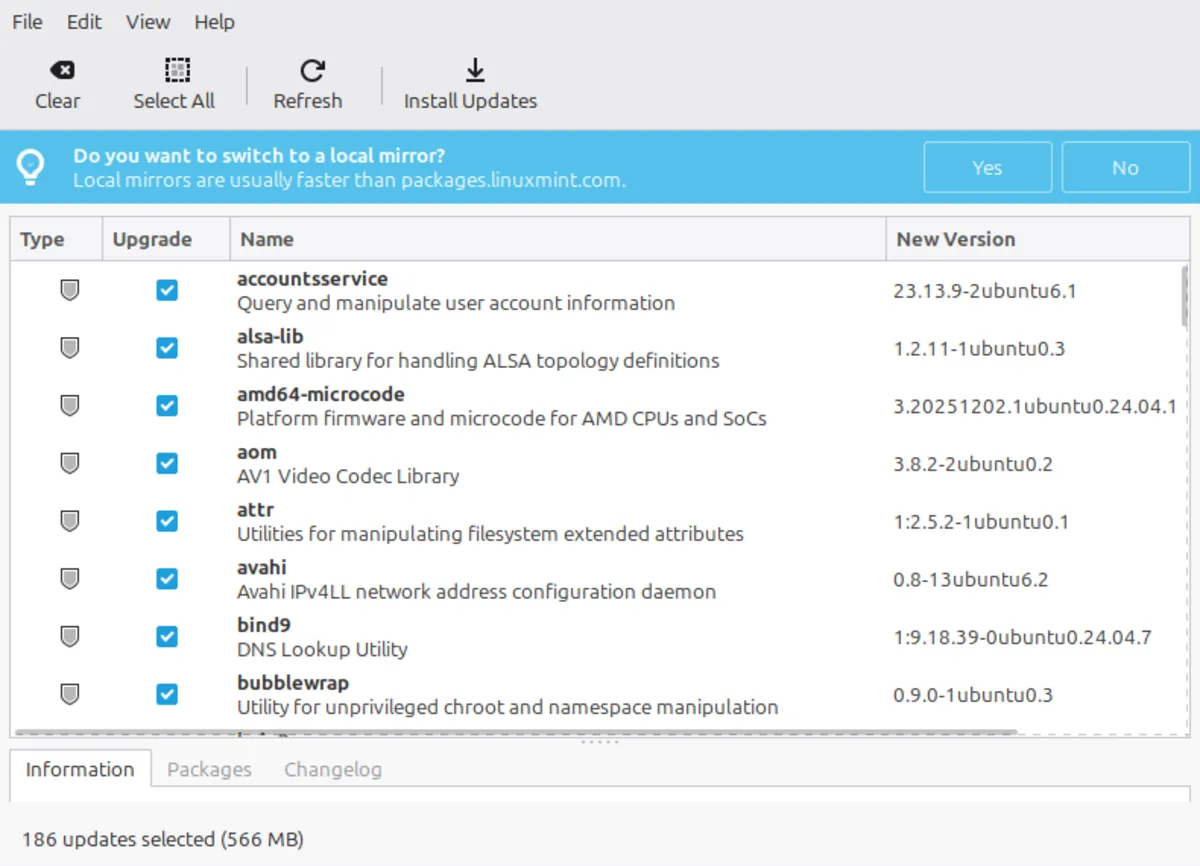
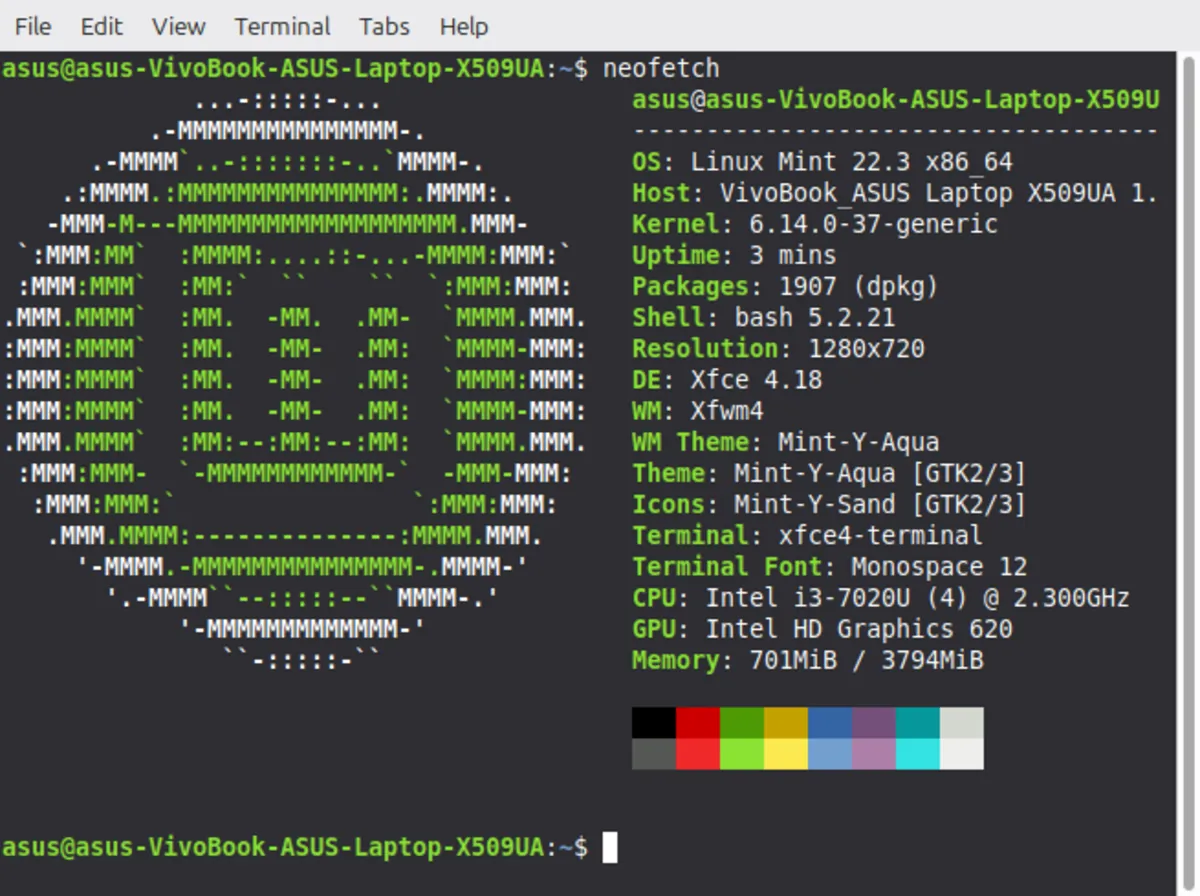
One more validation, from the bench: this same guide was also run end-to-end on the HP 15-bs0xx — the Pentium box that barely runs Windows and stars in the four-part narrative series. Its finish line:
Step 9: Re-enable BitLocker (Optional, ~2 minutes)
You suspended BitLocker with -RebootCount 0 in Step 0. Protection stays off until you turn it back on manually. Do this only after you have booted into Windows through GRUB at least once and confirmed both systems work.
- Boot into Windows through the GRUB menu.
- Open PowerShell as Administrator.
- Resume protection:
manage-bde -protectors -enable C: - Verify:
manage-bde -status C:(Protection Status should say “On”).
⚠️ CRITICAL WARNING: The first time you reboot into Windows after re-enabling BitLocker, the TPM may measure the GRUB bootloader and trigger the recovery screen. Have your 48-digit recovery key ready to type in manually. Once entered, subsequent boots should be seamless. If you never had BitLocker enabled, skip this step.
Performance Comparison
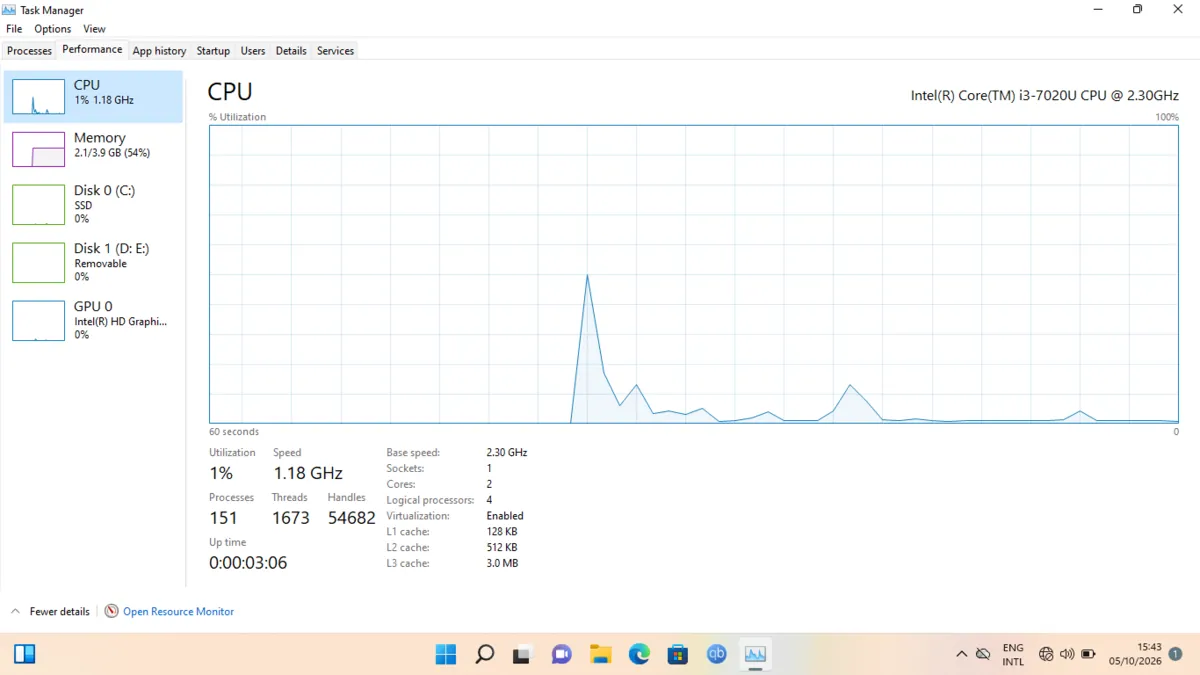
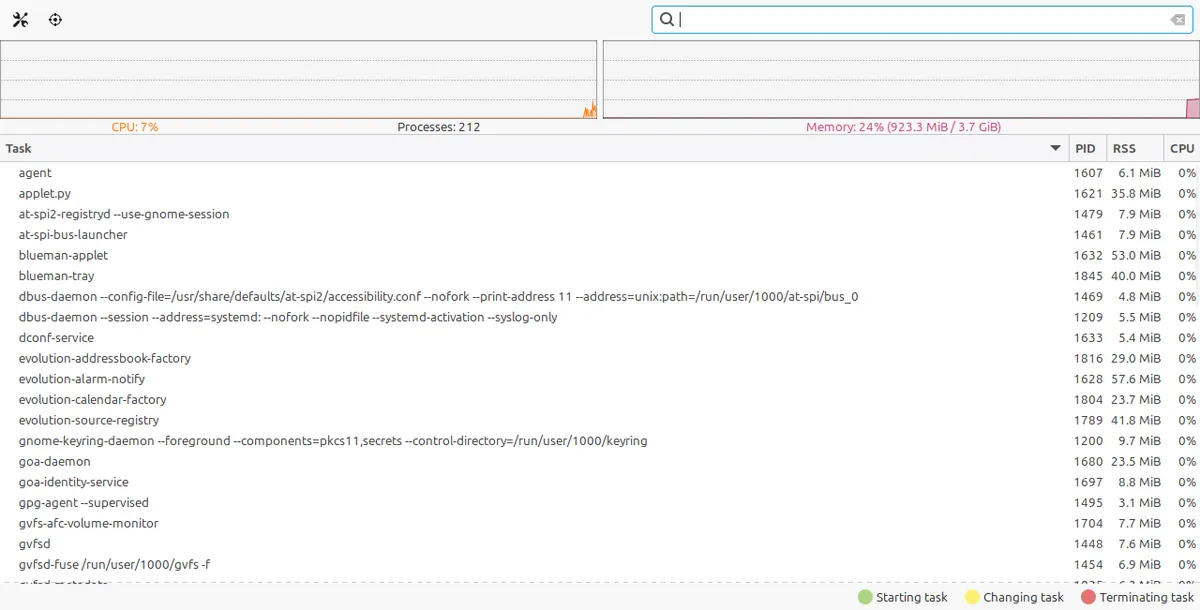
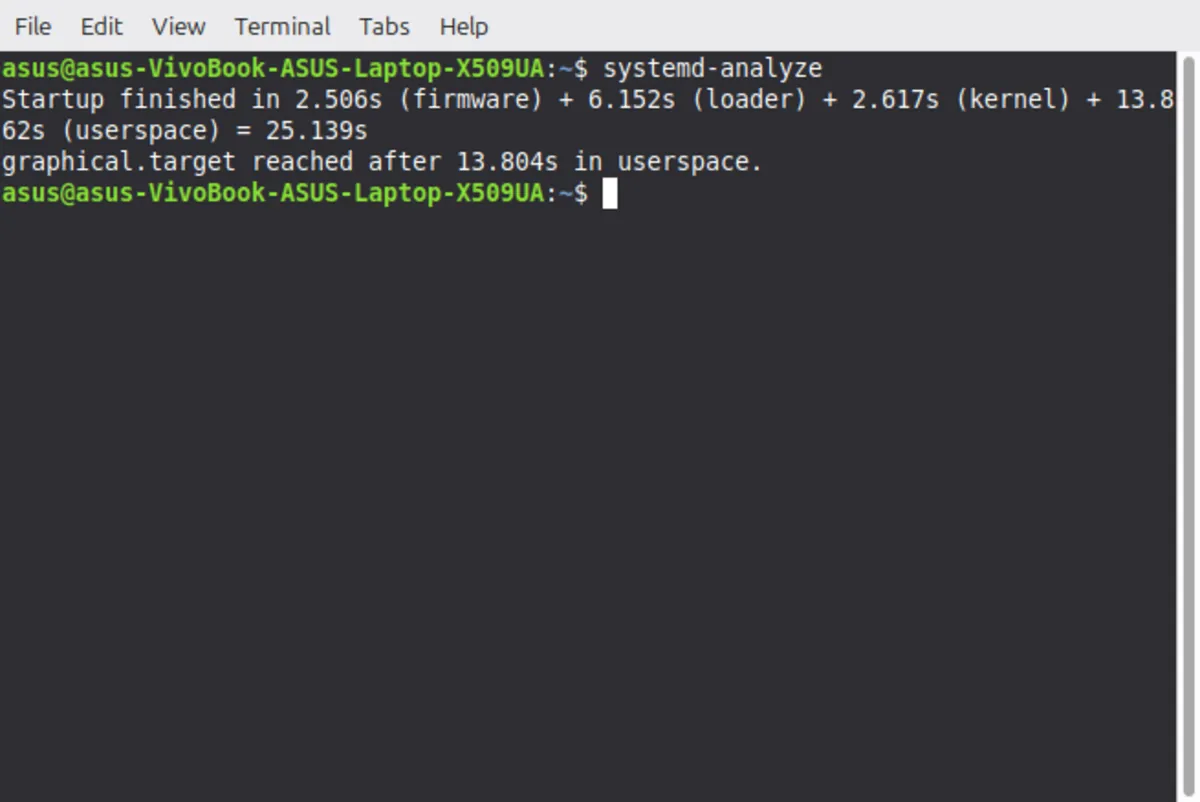
These measurements were taken at the 3-minute mark after a fresh boot with no applications open, on the ASUS test machine. The HP from the narrative series is benchmarked separately, in the series.
| Metric | Windows 11 | Linux Mint XFCE |
|---|---|---|
| Idle RAM | 2.1 / 3.9GB | 923.3MiB / 3.7GiB |
| Boot Time (average) | ~28.6s | ~25.6s |
A note on measurement conditions: Boot times were measured with a stopwatch across three runs per OS. OS memory accounting differs, but based on the displayed idle usage, Linux showed roughly 1GB more physical-memory headroom under these test conditions.
On constrained hardware, that extra gigabyte prevents aggressive background swapping. Linux Mint (XFCE baseline) consumes roughly half the idle RAM of Windows 11. Cinnamon and MATE will use slightly more RAM at idle, but the installation workflow and the performance benefits over Windows remain identical.
Troubleshooting Quick Reference
| Problem | Likely Cause | Fix |
|---|---|---|
| Boot device absent from boot menu | Port/reader incompatibility, firmware USB boot disabled | Try another USB port, use a dedicated reader, enable USB boot in BIOS |
| Device visible but boot rejected | Secure Boot verification, incompatible boot mode | Follow MOK enrollment (Step 5) or Disable Secure Boot |
| Frozen logo during boot | Graphics incompatibility | Try compatibility mode from GRUB |
| Windows partition locked | Fast Startup still enabled | Disable Fast Startup in Power Options |
| BitLocker recovery screen | TPM detected hardware change | Enter your backed-up 48-digit recovery key |
| Tiny shrink space | Unmovable system files | Disable pagefile, hibernation, and System Protection (Step 2) |
| ISO boot fails | Corrupted download | Re-verify SHA256 checksum and re-download |
| GRUB missing after install | Boot order reset or Windows Update | In UEFI firmware, move the ubuntu or Linux Mint EFI entry above Windows Boot Manager. Do not switch to Legacy/CSM. |
| Laptop boots to live environment | Boot media not removed | Shut down, remove USB/SD, restart |
| ext4 creation or mkfs fails with I/O error | Drive fault or geometry conflict | Stop; back up; see Incident Report |
Incident Report: Installation Failure and I/O Recovery on the ASUS VivoBook
⚠️ NOTE FOR BEGINNERS: This section documents an edge-case recovery from one specific machine. If your installation completes without errors, you don’t need to read this. Bookmark it in case you face similar issues later.
This section is not a standard procedure. This is an incident report from the ASUS test machine.
This is a field report from one machine, not a diagnosis of Ubiquity, parted, ext4, or SSDs in general. Everything below is what I observed, what I ran, and what changed as a result. Where I inferred, I say so. Where I don’t know, I say that too.
What Happened
- Initial Setup: I shrunk Windows to 87.8 GiB, leaving an unallocated window of ~150 GiB (sectors 184,303,616–498,878,463) for Linux Mint.
-
Automated Failure: Selecting “Install alongside Windows Boot Manager” halted the installer at the filesystem-creation step. The exact dialog: “Failed to create a file system — The ext4 file system creation in partition #5 of SCSI1 (0,0,0) (sda) failed.”
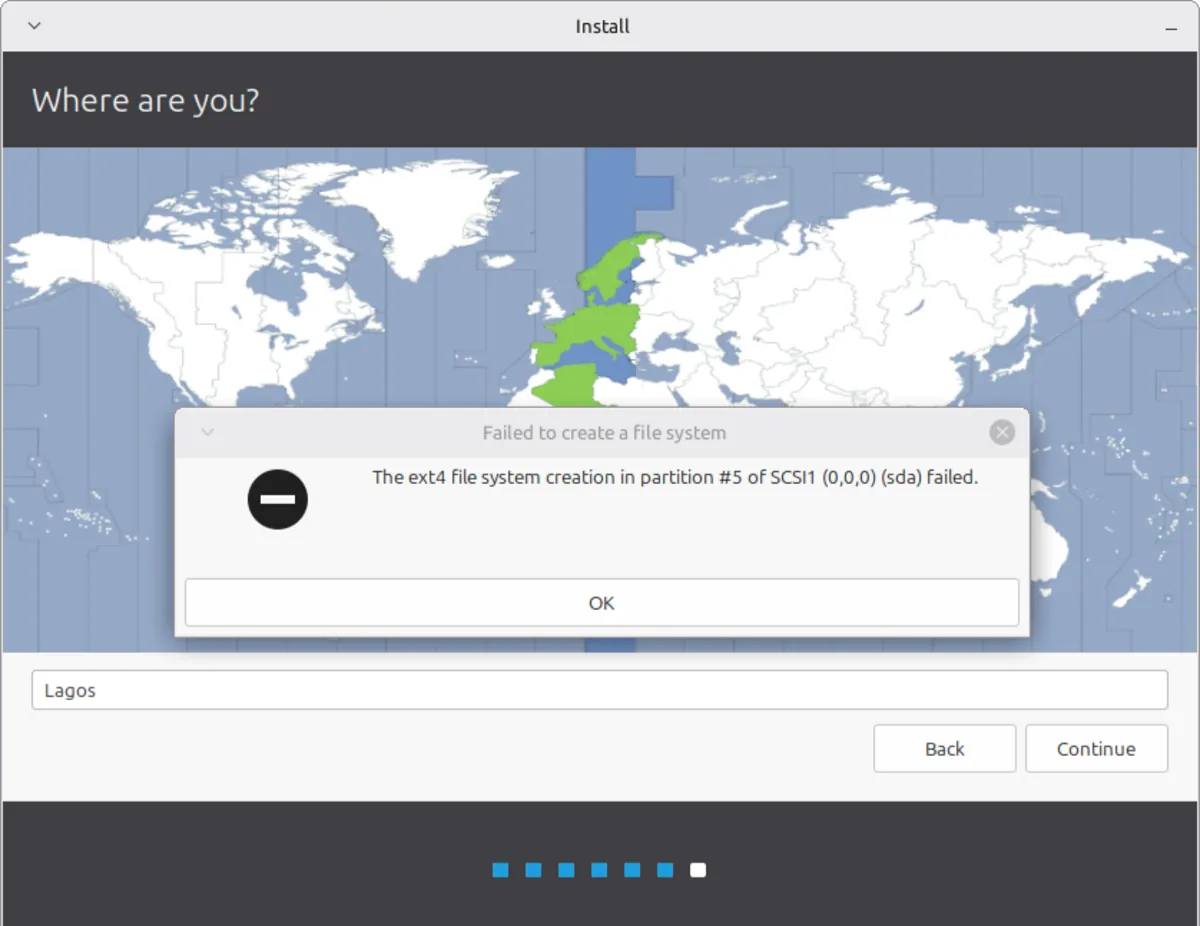
The trigger, verbatim: ext4 creation failed on partition #5, mid-install, over the timezone screen. Everything in this report starts at this dialog. - The Table the Installer Left: In GParted (live session),
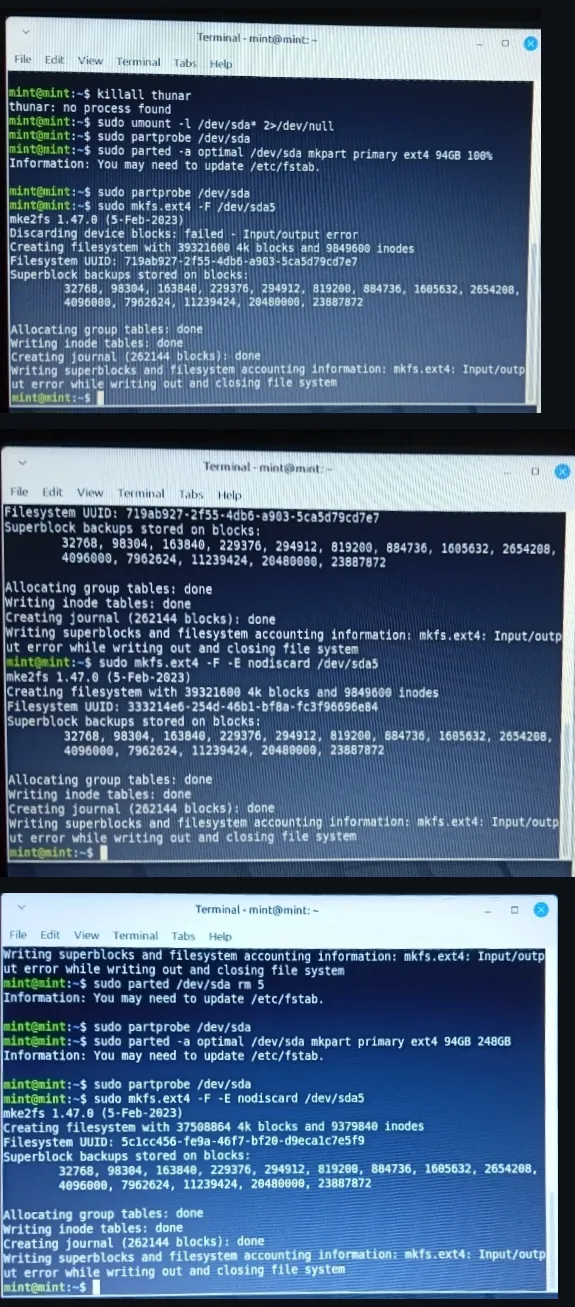
/dev/sda5existed at its full 150.00 GiB with filesystem type “unknown” and a warning flag. No truncation existed at this stage. Every truncated geometry in this report was created later, by me, during recovery. - Manual ext4 Creation Attempts: I attempted filesystem creation by hand from the live session. Four attempts died at the identical final line —
Writing superblocks and filesystem accounting information: mkfs.ext4: Input/output error while writing out and closing file system— across three different geometries, with and without discard. One attempt completed clean.
| # | Command | Span | Flags | Outcome |
|---|---|---|---|---|
| 1 | Ubiquity (automated) | ~150 GiB window | installer defaults | Failed at ext4 creation (dialog above) |
| 2 | mkfs.ext4 -F |
94GB→100% (150 GiB) | default | Discarding device blocks: failed - Input/output error, then died at final superblock write-out |
| 3 | mkfs.ext4 -F -E nodiscard |
same | nodiscard | Died at the identical final line |
| 4 | mkfs.ext4 -F -E nodiscard |
94GB→248GB (143 GiB) | nodiscard | Died at the identical final line |
| 5 | mkfs.ext4 -F -O ^has_journal -E nodiscard |
100GB→200GB (93.1 GiB) | nodiscard, journal-less | Completed without error (24,414,208 blocks) |
Observed pattern, stated as observation only: every failed creation spanned beyond the 200 GB decimal mark; the single clean creation did not. The clean creation was also the only journal-less one, so end-offset and journal presence are confounded in the data. I did not separate those variables, and I am not claiming to.
The Geometry Phase I Caused
This part was my error, and the report says so plainly.
While attempting to resize partitions, I ran parted /dev/sda resizepart 5 100GB and later resizepart 5 95GiB, believing the argument was a size. parted resizepart takes the partition’s END position, not a size. On a partition starting at the ~100 GB mark, “100GB” as an end position leaves roughly 884 sectors. The results, captured live:
- Partition collapsed to 110 4k blocks;
resize2fsrefused with “The containing partition (or device) is only 110 (4k) blocks.” - A later
resizepart 5 95GiBproduced a partition of 489,728 blocks (1.9 GiB).
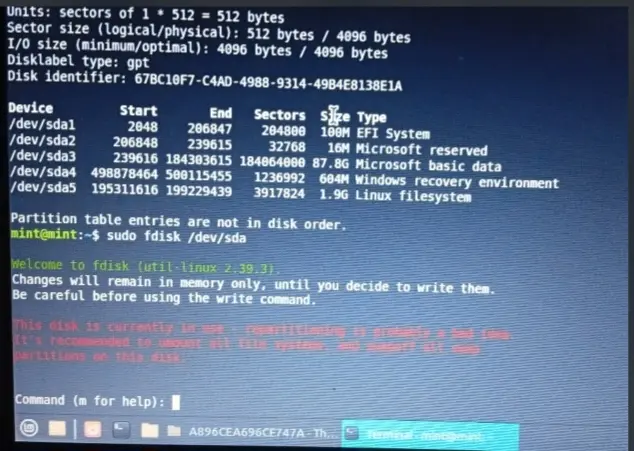
e2fsckthen reported the superblock/device mismatch: “The filesystem size… is 20971520 blocks / The physical size of the device is 489728 blocks… Either the superblock or the partition table is likely to be corrupt!”
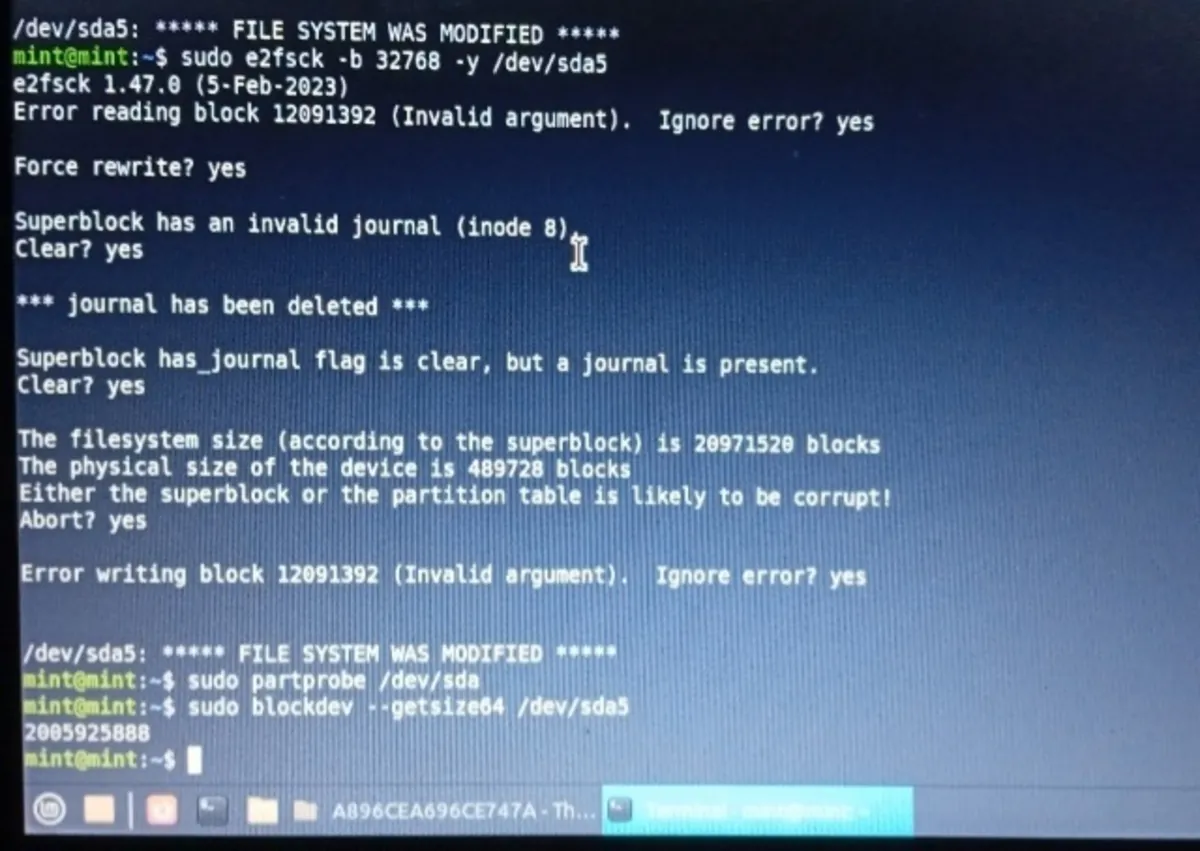
- One collapse was performed from inside the booted installation, on the partition mounted as
/. After it, even running tools failed:sudo: unable to execute /usr/sbin/e2fsck: Input/output error. Do not repair a partition table from an operating system booted off that table.
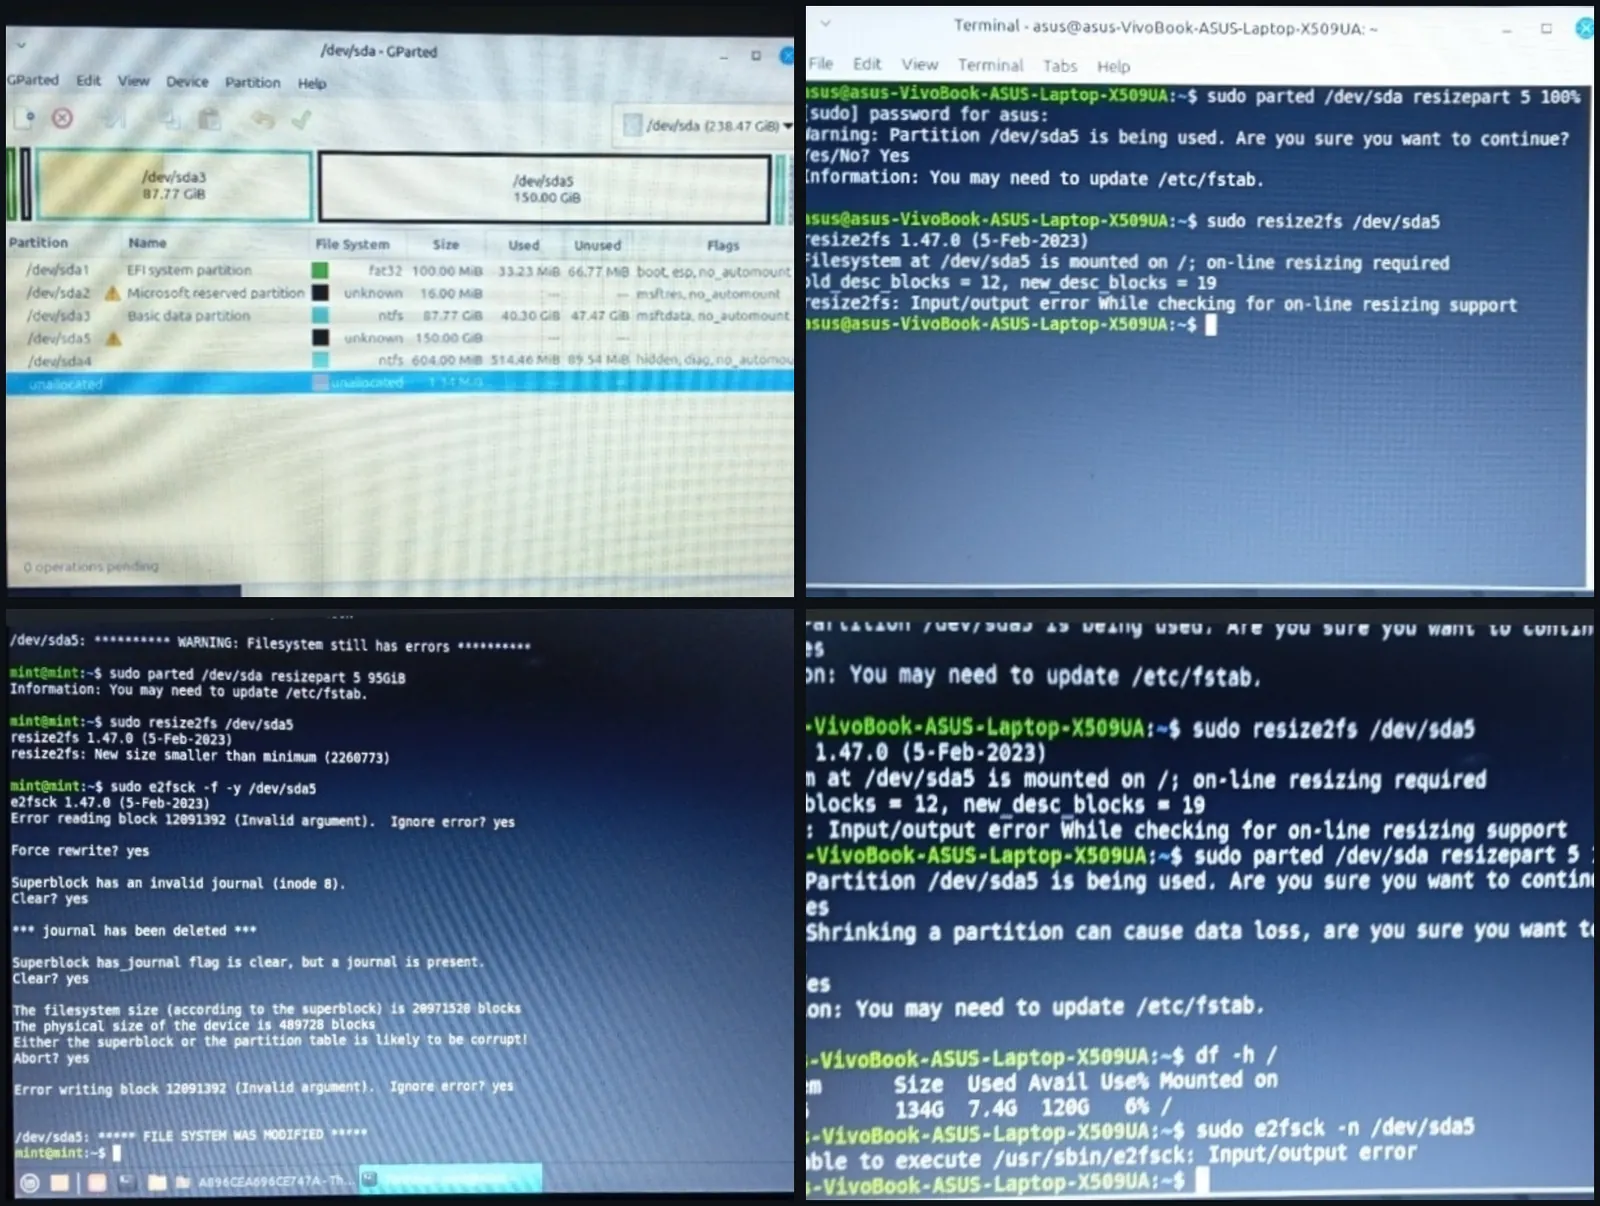
The Recovery Chain That Worked
Warning: The following steps are high-risk. I ran them from a live session, as a last resort. They are not guaranteed to work and can destroy data. These steps recovered this specific drive configuration. Your hardware may differ. If you’re not comfortable with terminal-based partitioning, do not attempt this. Replace the SSD instead.
- Rewrote the partition table with fdisk: deleted
/dev/sda5and recreated it explicitly at sectors 195311616 → 385311616 (90.6 GiB), declining signature removal (N) to preserve ext4 metadata, thenw. - Reconciled filesystem metadata:
sudo e2fsck -b 32768 -y /dev/sda5. (Note: On this specific filesystem, backup superblock 32768 worked. On other drives, usesudo mke2fs -n /dev/sdXNto list valid backup superblock locations without formatting). - Expanded the filesystem:
sudo resize2fs /dev/sda5grew ext4 to 23,750,000 4k blocks, exactly matching the new partition. - Verified:
sudo e2fsck -f -y /dev/sda5passed clean.
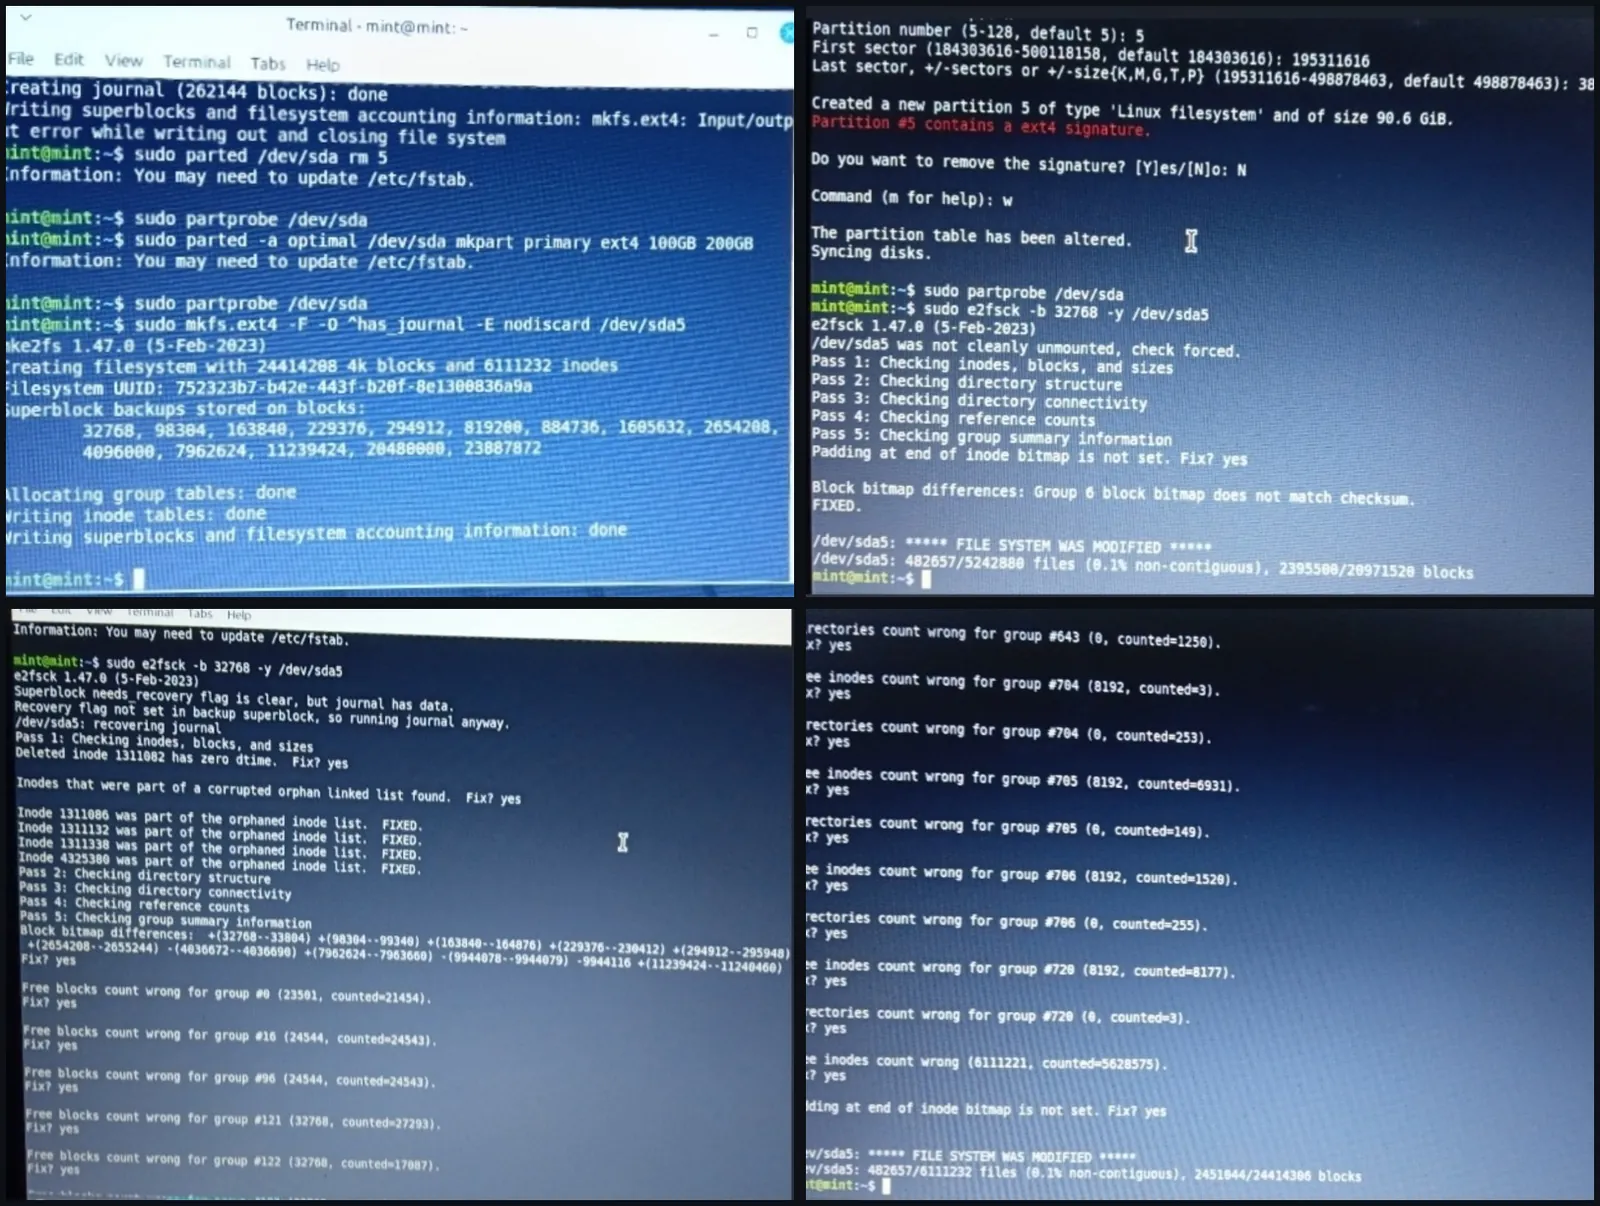
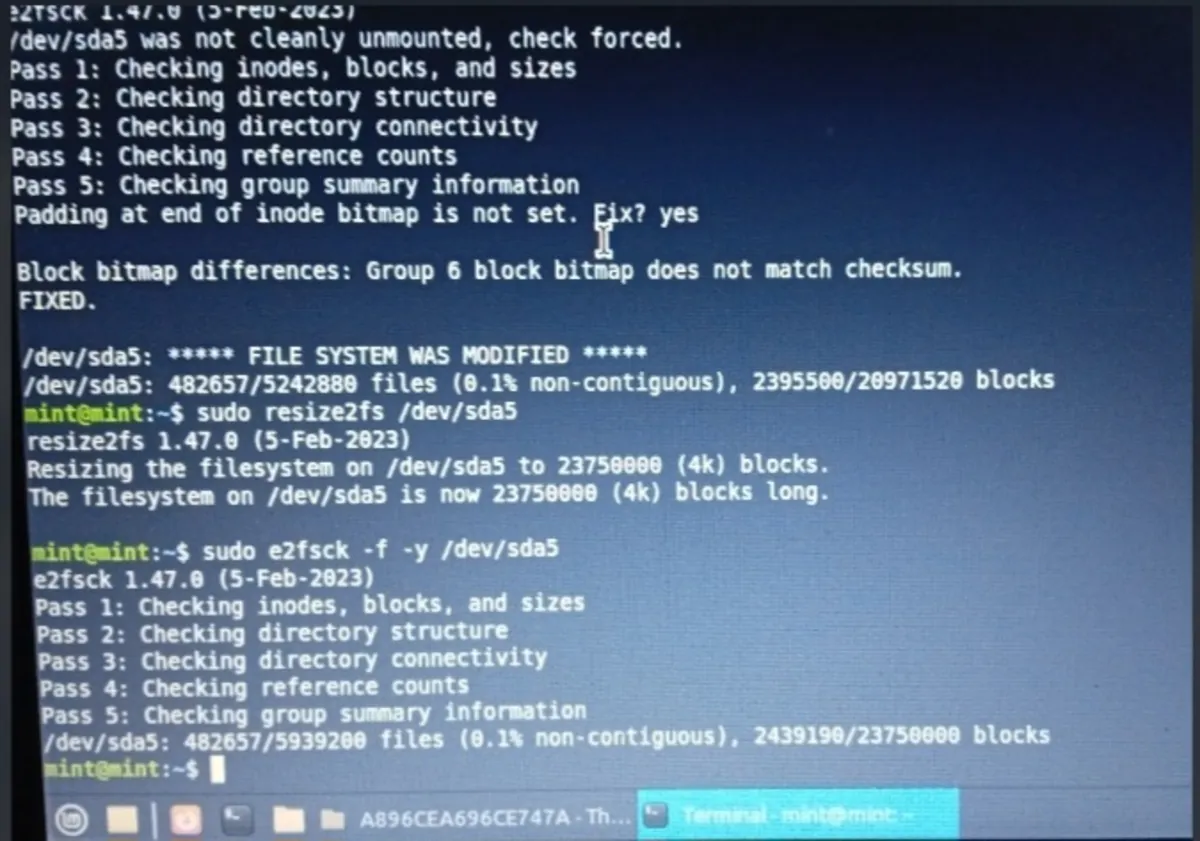
The Outcome & What I Did Not Establish
- Current Status: The system boots and functions normally. The final filesystem spans sectors 195,311,616–385,311,616 and has been stable since.
- Unknown Root Cause: The root cause of the raw I/O failures is unproven. Candidates visible in the data — writes beyond the ~200 GB decimal offset, journal presence at mkfs time, underlying media fault — are confounded. No
smartctloutput and no syslog/dmesg excerpt were captured during the incident. - Counter-evidence: The final 90.6 GiB filesystem lives entirely beyond the originally suspected offset and runs stable, weakening a simple bad-sector story.
Advice for Readers
- Stop Immediately: Do not re-run automated installers repeatedly over failed operations.
- Backup Everything: Secure critical data to external storage or cloud before any block-level work.
- Work From Live Media Only: Never modify a partition table from an OS booted off that table.
- Know Your Tools’ Semantics:
parted resizeparttakes an end position, not a size. - Change One Variable at a Time: When mkfs or resize2fs fails, alter a single parameter per attempt and record every output.
- Expect Hardware Replacement: Persistent raw I/O errors may indicate failing media. Recovery is sometimes possible; replacement is often the safer long-term answer.
- Dual-Boot Isn’t Always Clean: Automated tools work most of the time. Hardware variables exist. This report exists so you know both things at once: recovery is possible, and humility about root causes is not weakness.
Resources
- Linux Mint Official Download
- Linux Mint SHA256 Checksums
- qBittorrent Official Site
- Ventoy Official Site
- Ventoy GitHub Releases
— King Anthony | kinganthony.tech | hello@kinganthony.tech
If this guide saved you from a disaster, share it. If you found something I didn’t cover, reach out. I’m still learning.
Next in this infrastructure series: Automating M365 tenant onboarding with PowerShell — no GUI required.
Installed and running? Continue to the first-hour setup: Linux Mint: The First Hour After Install
Want the full story behind every step? Read the companion narrative series: Dual Booting Linux on a Machine That Barely Runs Windows